Windows Custom Settings in Google Admin Console
Windows custom settings let you deploy policies that Google Admin Console doesn’t list. I start with four fields: a name, an OMA-URI path, a data type, and a value accepted by the Windows Configuration Service Provider (CSP).
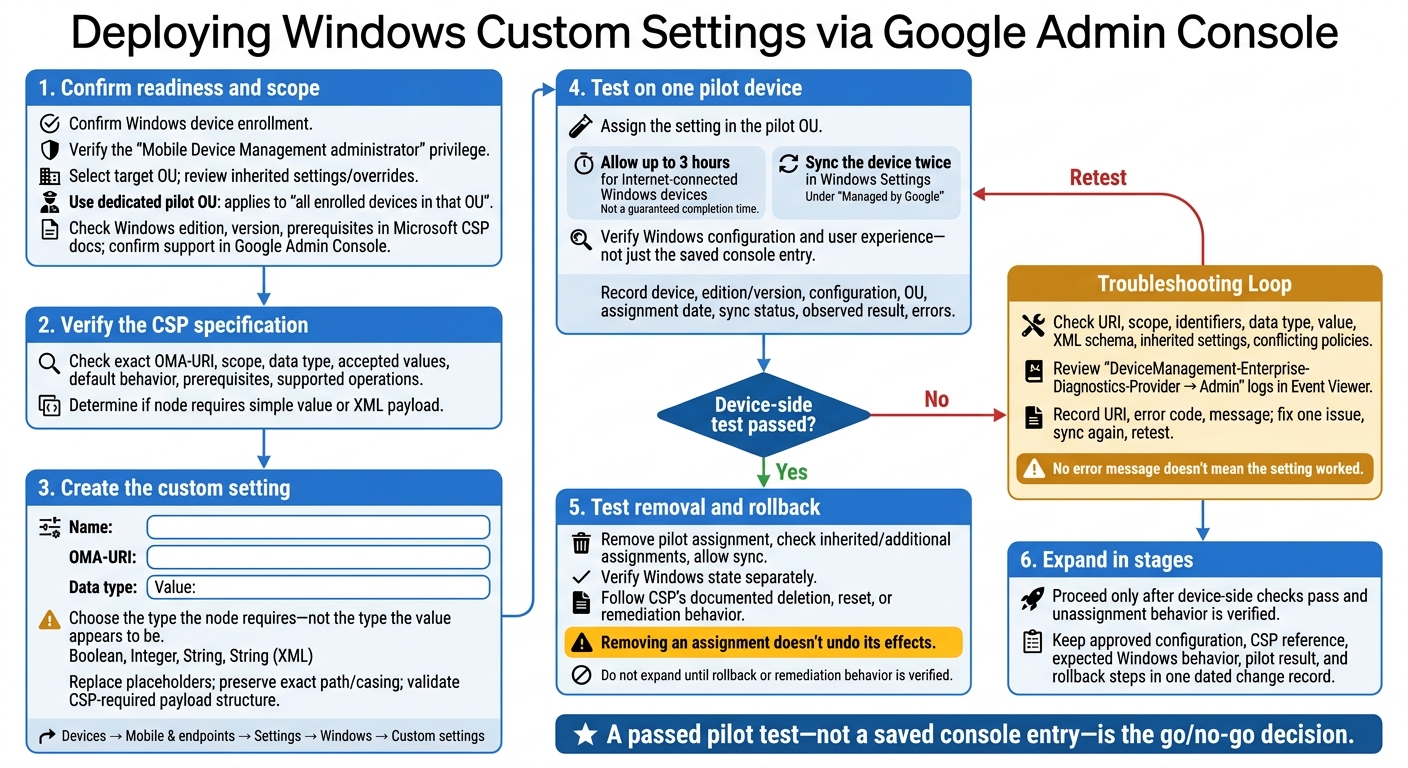
Before rollout, I check enrollment, admin access, the target organizational unit (OU), and Windows support. Then I:
- Check the policy details: Match the path, type, value, and any XML requirements to Microsoft’s CSP documentation.
- Test in a pilot OU: Allow up to 3 hours for policies to apply, then check Windows behavior - not just the console entry.
- Check failures: Review device logs, policy conflicts, and incorrect paths or payloads.
- Test removal: <u>Deleting a setting may leave its effects on the device.</u> I verify the reset or rollback steps before deploying it to more devices.
My go/no-go rule: a passed device-side test, not a saved setting.
Windows Custom Settings: Validate, Test, and Roll Out
1. Check Enrollment, Access, and CSP Support
Check Enrollment and Choose an Organizational Unit
Confirm that the target Windows devices are enrolled and that the administrator has the Mobile Device Management administrator privilege.
With GCPW, devices can enroll at first sign-in if auto-enrollment is configured. Otherwise, enroll them separately.
Go to Devices → Mobile & endpoints → Settings → Windows → Custom settings and select the target organizational unit (OU). Review inherited settings and overrides. Use a dedicated pilot OU to keep testing limited to a small device group: the setting applies to all enrolled devices in that OU.
Check Microsoft’s CSP documentation to make sure each device’s Windows edition and version meet the setting’s requirements, including the supported edition, minimum version, and prerequisites.
Find the OMA-URI, Data Type, and Value
Once you’ve confirmed enrollment and OU scope, check the setting’s exact CSP details. Use Admin Console search or autocomplete to find it by feature name or OMA-URI.
Find the CSP node in Microsoft documentation and verify its exact path, scope, data type, accepted values, default behavior, prerequisites, and supported operations. Also check whether it requires a simple value or an XML payload.
Use search results only to locate the setting - not to confirm support. Confirm support in Google Admin Console before deployment, and use the verified CSP details when creating the custom setting.
sbb-itb-c68f633
2. Create a Windows Custom Setting
Enter the Name, OMA-URI, Data Type, and Value
Once you’ve confirmed support, open Devices > Mobile & endpoints > Settings > Windows > Custom settings. Add the policy using the exact name, OMA-URI, data type, and value from Microsoft’s CSP documentation.
Choose the type the node requires - not the type the value appears to be. Use Boolean, Integer, String, or String (XML) only when the CSP specifies that type.
Compare CSP Paths, Types, and Values
Before saving, use this table to check common CSP paths, data types, and value formats.
| Configuration area | Documented CSP or node | Admin Console data type | Value format | Prerequisites to verify |
|---|---|---|---|---|
| Device lock and passwords | ./Device/Vendor/MSFT/Policy/Config/DeviceLock/... |
Boolean or Integer, depending on the node | Exact documented Boolean or numeric value | Supported Windows editions and policy prerequisites. |
| Settings visibility | ./Device/Vendor/MSFT/Policy/Config/Settings/PageVisibilityList |
String | Documented page-visibility syntax as text | Node support, scope, and allowed page identifiers. |
| VPN controls | ./Device/Vendor/MSFT/Policy/Config/Settings/AllowVPN |
Integer in Google’s documented example | Documented numeric value | Windows support and policy prerequisites. |
| Remote Desktop | Applicable Microsoft Policy CSP Remote Desktop node | The type documented for that node | Node-specific policy value | Exact path, supported Windows version, and value type. |
| Microsoft Defender attack-surface-reduction rules | Applicable Defender Policy CSP rule node | The type documented for that rule | Documented rule identifier and action value | Defender dependencies and Windows edition requirements. |
| Wi-Fi profiles | ./Vendor/MSFT/WiFi/Profile/<SSID>/WlanXml |
String (XML) | Wi-Fi profile XML | Profile schema and certificate dependencies. |
| AppLocker | ./Vendor/MSFT/AppLocker/ApplicationLaunchRestrictions/<Grouping>/<EXE, StoreApps, MSI, Script, or DLL>/Policy |
String (XML) | XML for the selected rule collection | Collection support. |
Prepare XML Payloads and Path Identifiers
The CSP node sets the path format, data type, and payload structure. For XML uploads, check both the XML structure and the CSP-specific content. In AppLocker, the URI values EXE, StoreApps, MSI, Script, and DLL must match the XML collection types Exe, Appx, Msi, Script, and Dll, respectively. Script rules don’t block all PowerShell activity.
For MSI deployment, use the EnterpriseDesktopAppManagement DownloadInstall workflow - not AppLocker’s MSI rules. Insert the actual MSI product identifier, with its braces encoded as %7B and %7D.
Replace every placeholder, including <SSID>, and keep path spelling and casing exact. URI-encode values only when the CSP requires it. For AppLocker’s grouping placeholder, use the required alphanumeric identifier, with separate identifiers where Google requires them.
ADMX-backed settings don’t all use the same upload process. Google’s Chrome ADMX installation workflow uses String, with template text entered directly rather than uploaded as XML. Other ADMX-backed nodes may need specially encoded content. Even valid XML must match the CSP’s required schema and content.
Test the setting in a pilot OU before deploying it to more devices.
3. Test Settings and Resolve Failures
Test One Setting in a Pilot Organizational Unit
Test the custom setting on one pilot device before rolling it out to more devices. Google allows up to 3 hours for policies to apply to internet-connected Windows devices. During testing, sync the device twice in Windows Settings under Managed by Google, then check the result. Verify the Windows configuration and what the user experiences - not just the saved Admin Console entry.
Record the device name or asset ID, Windows version and edition, setting name, OMA-URI, data type, exact value or XML, target OU, date assigned, sync status, observed result, and error details. Add screenshots or exported logs where appropriate.
If the device isn’t in the expected state, check the OMA-URI, value, and policy conflicts next.
Check Paths, Values, and Conflicts
Compare the URI’s spelling, capitalization, scope, and identifiers with the CSP documentation. Then check the data type, value, XML schema, inherited settings, and other policy sources, including Group Policy, scripts, and security software. No error message doesn’t mean the setting worked. Google warns that incorrect paths or XML values can leave a setting unenforced without displaying an error.
Open Event Viewer → Applications and Services Logs → Microsoft → Windows → DeviceManagement-Enterprise-Diagnostics-Provider → Admin. Match events to the device’s sync time. Before changing anything, record the URI, error code, and message. Fix one issue at a time, sync again, and compare the logs and Windows behavior with the original result.
Remove Failed Settings and Verify Windows State
If the setting failed or applied incorrectly, remove its assignment. Go to Devices → Mobile & endpoints → Settings → Windows → Custom settings, remove the failed setting from the OU assignment, and save the change. Check for inherited or additional assignments, then allow the device to sync.
Removing an assignment doesn’t undo its effects. Check the device state separately and follow the CSP’s documented deletion, reset, or remediation behavior. The previous state may persist.
Conclusion: Verify Settings Before Expanding Deployment
Before rollout, release only settings that passed pilot testing on supported Windows versions and editions. Verify the OMA-URI, data type, and value for each setting.
Use a passed pilot test - not a saved console entry - as the go/no-go decision for broader deployment. Keep the approved configuration, CSP reference, expected Windows behavior, pilot result, and rollback steps in one dated change record.
Expand in stages only after device-side checks pass and you verify what happens when the setting is unassigned. If it remains in place, confirm CSP-supported remediation and rollback behavior on the device before proceeding.
FAQs
How do I confirm a CSP works with Google Admin Console?
Check that the required Google Workspace APIs are enabled in Google Cloud Console. Confirm that your service account is active, uses the correct OAuth scopes, and has domain-wide delegation approved under Security > API Controls.
Test the account in a controlled setting to verify that it can access only the intended data. If you encounter errors, use the Security center’s Investigation tool to review OAuth activity and check that the expected scopes are approved.
What if two policies target the same OMA-URI?
When two policies target the same OMA-URI path, they can conflict and keep the intended setting from applying correctly. Check for overlapping policies, especially when using Google Admin console settings alongside third-party tools.
If settings fail or behave unexpectedly, review your organizational unit hierarchy. Higher-level policies may override custom configurations. Document both the expected and actual settings to help pinpoint the conflict.
How can I safely roll back a persistent setting?
Test configurations in a staging organizational unit before deploying them across your organization. If a setting fails, record its current value and expected baseline. Keep OS rollback controls in test environments only - restoring older versions can bring back security vulnerabilities.
Edit policies in the Google Admin console, check changes against your documented baseline, and watch for overrides farther down the organizational tree.