School Chromebook App Deployment: Guide
If I deploy Chromebook apps without a plan, I risk bad installs, privacy issues, and support pileups. The plain answer is this: I need to set up Managed Google Play, map apps to the right OUs, choose the right install type, test updates before full rollout, and review usage and policy on fixed dates.
Here’s the article in simple terms:
- I turn on Managed Google Play and allow Android apps only for the OUs that need them.
- I sort apps by required or optional before I push anything.
- I review privacy for FERPA and COPPA, especially for students under 13.
- I build OUs by school, grade band, role, and device use like carts, loaners, and testing devices.
- I choose install modes like Allow install or Force install based on classroom use.
- I test app updates in a pilot OU first, since ChromeOS version and AUE can block app use.
- I use a support checklist to check OU policy, sync, OS version, profile issues, and network before resetting devices.
- I track pilot results with simple targets like 95%+ install success and fewer than 5 tickets per 100 users in 4 weeks.
- I run audits on fixed dates: 01/15, 04/15, 07/15, and 10/15.
- I flag devices with less than 4 GB free because low storage often causes app install problems.
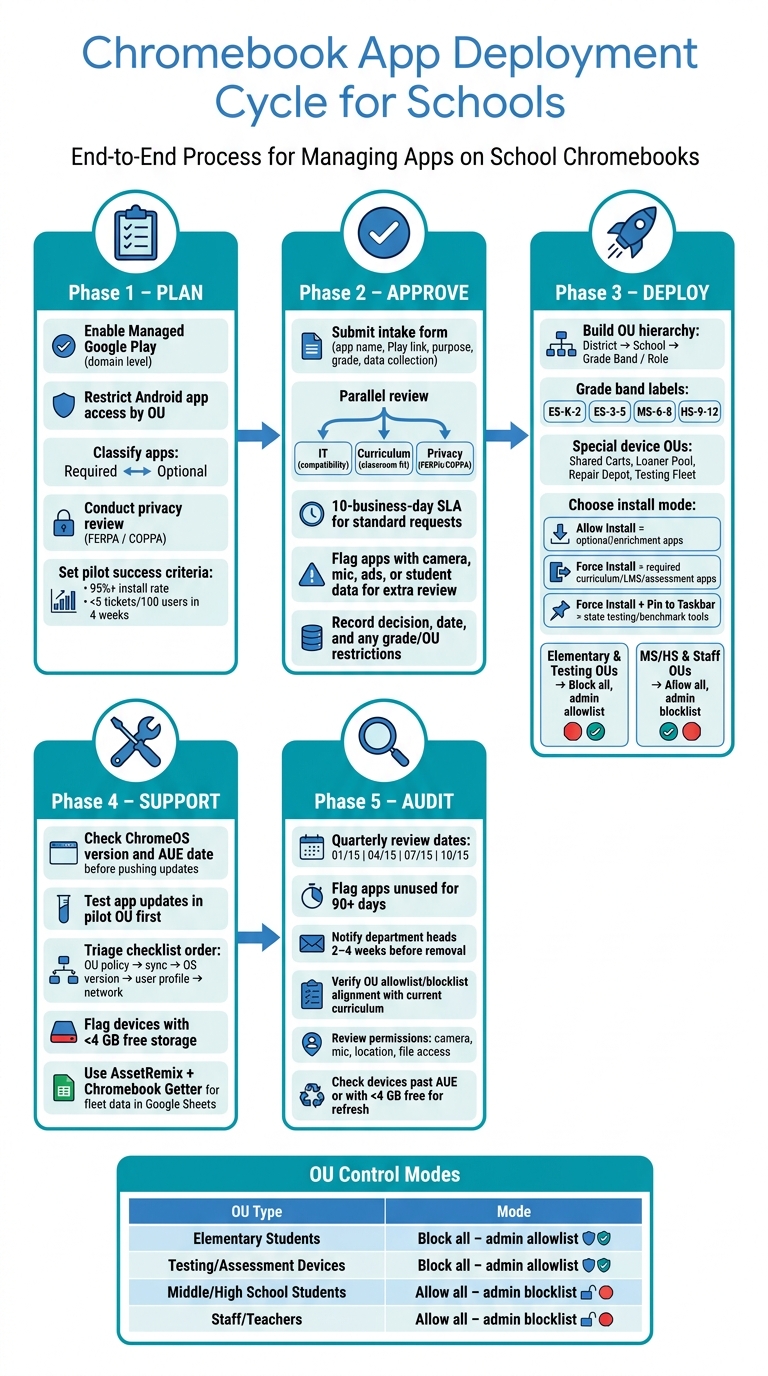
A short way to think about it: plan, approve, deploy, support, and audit. That flow helps me keep student access, staff needs, privacy rules, and help desk work in line.
The guide below walks through that process from setup to review.
Chromebook App Deployment Cycle for Schools
1. Plan the Deployment and Set Up Managed Google Play
Good planning helps you avoid two common problems: missed installs and apps going live across the whole district when they were only meant for one group.
Admin Console Prerequisites and Service Settings
First, make sure you have super admin access or delegated admin rights for Chrome and Google services. Your Chromebooks need to be enrolled in your district’s Google Workspace for Education domain and already under management. It also helps to confirm that your target user OUs are already in place before you touch app settings.
On managed Chromebooks, Android apps are off by default. To turn them on, go to Apps > Additional Google services and enable Managed Google Play at the domain level. From there, restrict access by OU so only the groups that need Android apps can use them. Also check that the required Android management subscription is active.
Next, open Devices > Chrome > Apps & extensions > User app settings, choose the target OU, find Android apps on Chrome devices under Additional app settings, and set it to Allow.
You’ll also need to accept the Google Play / Android Enterprise terms of service when prompted. If you’re enabling managed Google Play for users under 18, Google may require guardian consent under its Terms of Service. That’s why it’s smart to coordinate with your district communications or policy team before turning this on for student OUs at scale.
Once those service settings are done, you can sort out which apps belong in each rollout group.
Define App Scope, Risk, and Success Criteria Before Deployment
Before you configure anything, decide whether each app is required or optional.
Required apps usually include things like:
- State testing tools
- Core LMS clients
- Accessibility apps linked to IEPs or 504 plans
These should be mapped to the right grade bands and staff or student roles. Optional or enrichment apps can be offered without forcing installation.
This is also the right moment for a privacy review. Don’t leave that until after deployment. For each app you’re considering, review its data collection, retention, sharing, advertising use, and data location. You’ll also want to check FERPA and COPPA fit, especially for students under 13. In some districts, vendors must also sign a data processing agreement before an app gets approved.
Set your pilot success criteria before you push even one app. A simple set of thresholds can keep the decision grounded in data:
- 95% or higher successful install rate
- Low crash frequency
- Fewer than 5 support tickets per 100 users during a four-week pilot window
Those numbers give curriculum leaders and administrators a plain basis for a go/no-go call on a district-wide rollout.
With that done, you can pick the install method in the next step.
Map the Basic Deployment Flow
Go to Devices > Chrome > Apps & extensions > Users & browsers, then select the target user OU in the left panel. Click Add from Google Play, search for the app, and open its details pane.
Before you click Select, check the permissions it requests, such as camera, microphone, storage, and location. Match those permissions against your privacy review. That small check can save you a lot of cleanup later.
After you add the app, set it to Force install if it’s required or Allow install if it’s optional. Then verify the app on a test device before you expand the rollout.
Those test results give you a starting point for OU policy changes and the next round of rollout decisions.
sbb-itb-c68f633
2. Design Organizational Units and App Policies for Schools
Once you’ve picked the apps, the next job is putting them in front of the right people. That means students, staff, and device groups need their own policy scope. Your OU setup decides where force installs, optional installs, and test-only apps show up.
Build OU Structures by School, Grade, Role, and Special Use
Use OUs to control rollout scope and keep mistakes from spilling across the whole district.
A simple setup usually works best: district at the top, then school, then grade band or role-based sub-OUs. Under Students, split first by school and then by grade band. Names like ES-K-2, ES-3-5, MS-6-8, and HS-9-12 give you steady policy targets that won’t need constant cleanup.
Under Devices, add separate sub-OUs for groups with special needs, such as:
- Shared Carts/Labs
- Loaner Pool
- Repair Depot
- Testing/Assessment fleets
Those groups help keep high-risk or short-term policies away from your main student and staff populations.
Also, don’t build a maze. If you go past 4–5 OU levels, management gets messy fast, and the extra depth usually doesn’t give you much in return.
Choose Play Store Allowlist or Blocklist Control by OU
ChromeOS gives you two Play Store control models at the OU level: block all apps and allow only approved ones, or allow all apps and block only restricted ones.
Match that model to the age group and the job the device needs to do.
| OU Type | Recommended Mode | Reason |
|---|---|---|
| Elementary students | Block all apps, admin manages allowlist | Limits exposure to unvetted apps |
| Testing/Assessment devices | Block all apps, admin manages allowlist | Enforces strict lockdown during exams |
| Middle/High school students | Allow all apps, admin manages blocklist | Supports electives and project-based learning |
| Staff/Teachers | Allow all apps, admin manages blocklist | Provides flexibility for instructional tools |
This is one of those spots where a little restraint goes a long way. Younger students and testing fleets usually need tighter controls. Older students and staff often need more room to work.
Separate User App Policies From Device Policies
In ChromeOS, User & browser settings follow the signed-in user, while device settings stay with the Chromebook itself. That split matters a lot in schools where devices are shared, checked out, or reassigned in the middle of the year.
For 1:1 student Chromebooks, user-scoped settings usually make more sense because app access and browser behavior should follow the student. For shared carts and loaners, device-scoped settings are the safer bet because the hardware itself needs guardrails, no matter who signs in.
Use user-scoped settings for personal app access and browser behavior. Use device-scoped settings for kiosk mode, managed guest sessions, and sign-in restrictions on shared hardware.
And if Chrome extensions and Android apps do the same job, pick one version per OU and write that choice down. Otherwise, things can get confusing fast for both users and admins.
3. Review Apps and Choose the Right Deployment Method
Once your OU scope is set, the next step is simple: decide which apps belong in each group and how students or staff should get them.
Set Up an App Request and Approval Workflow
A standard intake form makes app requests easier to review and a lot less messy. Ask for the app name, Google Play link, instructional purpose, target grades, usage frequency, and whether the app collects any student data. For students under 13, flag any personal-data collection for COPPA review.
Send each request to IT, curriculum, and privacy reviewers at the same time. IT checks compatibility and permissions. Curriculum checks classroom use. Privacy checks how the vendor handles data and whether it fits FERPA needs. Set a 10-business-day SLA for standard requests.
Apps that collect student data, ask for camera or microphone access, or include ads need extra review before approval.
After that, record the decision, date, and any limits, such as approval for grades 9–12 only. That record helps during audits, and it saves time when the same app comes up again later.
After approval, choose the install method based on the app’s role in class.
Use Install Policies That Match the Classroom Need
Use three deployment states: Allow install, Force install, and Force install + pin to taskbar. In most cases, Allow install should be the default for Android apps. Save Force install for apps students must have.
| Deployment Method | Common School Use Case | Pros | Cons |
|---|---|---|---|
| Allow install | Optional enrichment apps, teacher-recommended tools | Saves storage; students install only what they need | Needs clear directions; adoption may vary |
| Force install | Core curriculum apps, LMS clients, required assessment tools | Same access across a class or grade | Can clutter devices and cause bandwidth spikes during rollout |
| Force install + pin to taskbar | State testing apps, benchmark tools | App is easy to find; cuts down pre-test confusion | Can clutter the shelf if used too often |
If you pin apps to the shelf, use that setting with care. It works best as a short-term setup during high-stakes testing windows.
Manage Private Apps and Student Self-Install Options
Private apps and student self-install are both controlled distribution paths. That means the same review process and install rules should apply to both.
Publish internal tools or vendor-only tools as private apps in Managed Google Play, then deploy them using the same install rules you use for public apps. Since the district acts as the publisher, version control and update planning matter even more, especially for apps tied to day-to-day workflows.
For student self-install, use a curated Managed Google Play allowlist so students can install only apps that have already been approved. For younger students or testing fleets, admin-assigned apps only is usually the safer path.
4. Control Updates and Run a Support Process That Scales
App reliability depends on keeping ChromeOS, app updates, and support workflows in sync. The OU structure and install settings you set earlier play a big part in how safely you can roll out updates and handle support at scale.
Coordinate ChromeOS Versions and Android App Updates
Managed Google Play sends app updates on its own, but those updates can break on older ChromeOS builds. And if a device has already hit its Auto Update Expiration (AUE) date, a newly updated app may stop launching altogether.
Before you push app updates, check OS versions and AUE status in the target OU. Test new app versions in a pilot OU first. Then use Chromebook Getter to flag devices that no longer support current Android apps. That simple step helps keep required classroom and testing apps running on every assigned Chromebook.
After you confirm update compatibility, support teams can sort through issues much faster with a shared checklist.
Use a Standard Troubleshooting Checklist for App Issues
When a student reports an app problem, follow the same triage path each time: check policy first, then move to the device.
| Issue | Common cause | Admin Check | Escalation Trigger |
|---|---|---|---|
| App not appearing | Incorrect OU assignment | Verify the device is in the correct OU and the app policy is applied | Policy is correct but the app is still missing after sync |
| App fails to launch | Corrupt user profile | Check recent user metadata and clear the user profile | Issue persists after a user-profile wipe |
| App incompatible | Outdated OS or past AUE date | Run an OS version and AUE report | Device is confirmed past AUE date |
| Sync error | Network or IP restriction | Check the last known IP address and enrollment status | Issue persists across networks or specific network segments |
| Kiosk freeze | Hung session | Bulk reboot kiosk devices | The freeze returns after reboot |
If the policy checks out and the OS is current, reset the user profile before you jump to a full device reset. For issues that won't go away, review device telemetry for signs of hardware or battery trouble that might disrupt background app updates.
Those checks make it easier to tell the difference between a one-off user problem and something hitting the whole fleet.
Track Incidents With ITAM and Help Desk Data
Use AssetRemix to sync serial numbers and device IDs from Google Admin. Then use Chromebook Getter to export OU, OS version, AUE date, and last known IP address into Google Sheets for fleet review. With that data in one place, device records can show whether an app issue is tied to one user or to a broader policy rollout.
When the same app issue keeps popping up, pull a report filtered by OU and OS version. If the failures cluster around devices on the same older build, the next step is pretty clear: update the OS for that group, or mark those devices for refresh if they are past their AUE date. That gives your team a cleaner, more predictable support path instead of a constant scramble.
5. Audit App Deployment, Usage, and Compliance
Once day-to-day support settles down, move from break-fix work to scheduled audits. Put quarterly reviews on the calendar for 01/15, 04/15, 07/15, and 10/15. Those dates line up with quarterly school reviews, which makes follow-up a lot easier.
Review App Inventory and OU Policy Consistency on a Schedule
At each review, export the app list from the Admin console for your main OUs, such as Elementary-Students, Middle-School-Students, and High-School-Staff. Then flag any app that hasn't been used in the last 90 days based on sign-in and usage logs.
Before removing anything, notify department heads 2–4 weeks in advance. That gives teams time to speak up if an app still serves a class, lab, or staff workflow.
You should also check that each OU's Play Store allowlist or blocklist still fits current curriculum and support needs. At the same time, verify that required core apps - testing browsers, content filters, and communication tools - are applied the same way across every OU that needs them. This kind of scheduled review helps catch core app drift caused by old config changes. Each audit should confirm that app scope, OU policy, and install rules still match how devices are being used in schools.
Also review any app requesting camera, microphone, location, or file access. Make sure each one still has documented approval that lines up with district data privacy policies and FERPA/COPPA considerations.
Combine Fleet Reports With Asset Data for Better Audits
Fleet reports get a lot more useful when you connect them to IT asset records. Data from the Admin console - like ChromeOS version, enrollment status, disk utilization, and assigned primary user - shows device health at a glance.
When you link that with purchase date, funding source - such as ESSER vs. general fund - warranty status, and repair history, you get the full lifecycle picture. That matters for state or federal reporting, and it also helps IT make better replacement decisions.
Join Chromebook metadata with asset records to find out-of-warranty, low-storage, or outdated devices before they fail. Pay close attention to devices with less than 4 GB free, since that level often leads to app install failures and poor testing performance.
Conclusion: Build a Repeatable Chromebook App Deployment Program
App deployment only works when it's treated as a repeatable cycle: plan, deploy, support, and audit. Fixed review dates, clear ownership, and documented decisions keep the rollout tied to classroom needs instead of turning into a last-minute scramble.
Use the table below to assign owners and review cadence.
| Audit Area | Data Source | Owner | Review Frequency |
|---|---|---|---|
| App Inventory & Permissions | Admin Console / Chromebook Getter | IT Administrator | Quarterly (01/15, 04/15, 07/15, 10/15) |
| OU Policy Consistency | Admin Console / OU Exports | Systems Engineer | Monthly |
| Device Health (OS / Disk Space / AUE) | Chromebook Getter / AssetRemix | Help Desk Manager | Quarterly |
| Enrollment Status | Chromebook Getter / Admin Console | IT Administrator | Quarterly |
| Asset & Licensing Alignment | AssetRemix / ITAM Data | IT Asset Manager | Bi-Annually |
| Support Trends & App Tickets | Help Desk / AssetRemix | Help Desk Lead | Monthly |
With clear owners and fixed dates, this becomes a predictable program that can keep running even when staff turnover hits.
FAQs
How do I choose the right OU structure for app deployment?
Group devices and users into logical OUs based on how you plan to manage them. That might mean organizing by school, grade level, class, or a special program. Start with one top-level OU, then add child OUs for groups that need their own settings.
Here’s why this setup works so well: child OUs inherit policies from their parent OU. So you can set baseline rules at the top, then add more specific policies further down the tree. That gives you tight control without making the setup messy, and it also gives you a safe place to test changes in a staging OU before rolling them out to everyone.
When should I force install an app instead of allowing it?
Force-install apps that are critical for educational use, such as Google Classroom, so devices are ready for immediate classroom deployment.
That means students can use key tools as soon as they sign in. It cuts setup time and keeps devices consistent across the organizational unit.
What should I check before rolling out app updates district-wide?
Start with a controlled test OU and move in a representative sample of devices, including at least 5% of each hardware model.
Use that test phase to make sure key workflows work the way they should. Check things like:
- web app loading
- printer access
- network access
- single sign-on
Then roll out updates in phases. Start small, then expand over several days so you can spot problems early before they hit everyone.