
How to Enroll Windows Devices With Google Workspace
To enroll a Windows device with Google Workspace, enable Windows device management, then open Google’s enrollment link and sign in with the intended user’s managed Google Account. Signing in to Google Workspace alone does not enroll the computer.
Before starting, check for a supported Windows 10 or 11 edition, an eligible license, and local administrator rights.
- Manual enrollment: Uses Google’s enrollment link without changing the Windows sign-in account.
- GCPW enrollment: Can enroll the device during the first eligible Google sign-in to Windows when automatic enrollment is allowed. The intended user should sign in first.
- Verification: Check the device record, assigned user, and policy sync in the Admin console before deployment.
If enrollment fails, check permissions, licensing, management settings, and any existing enrollment before retrying.
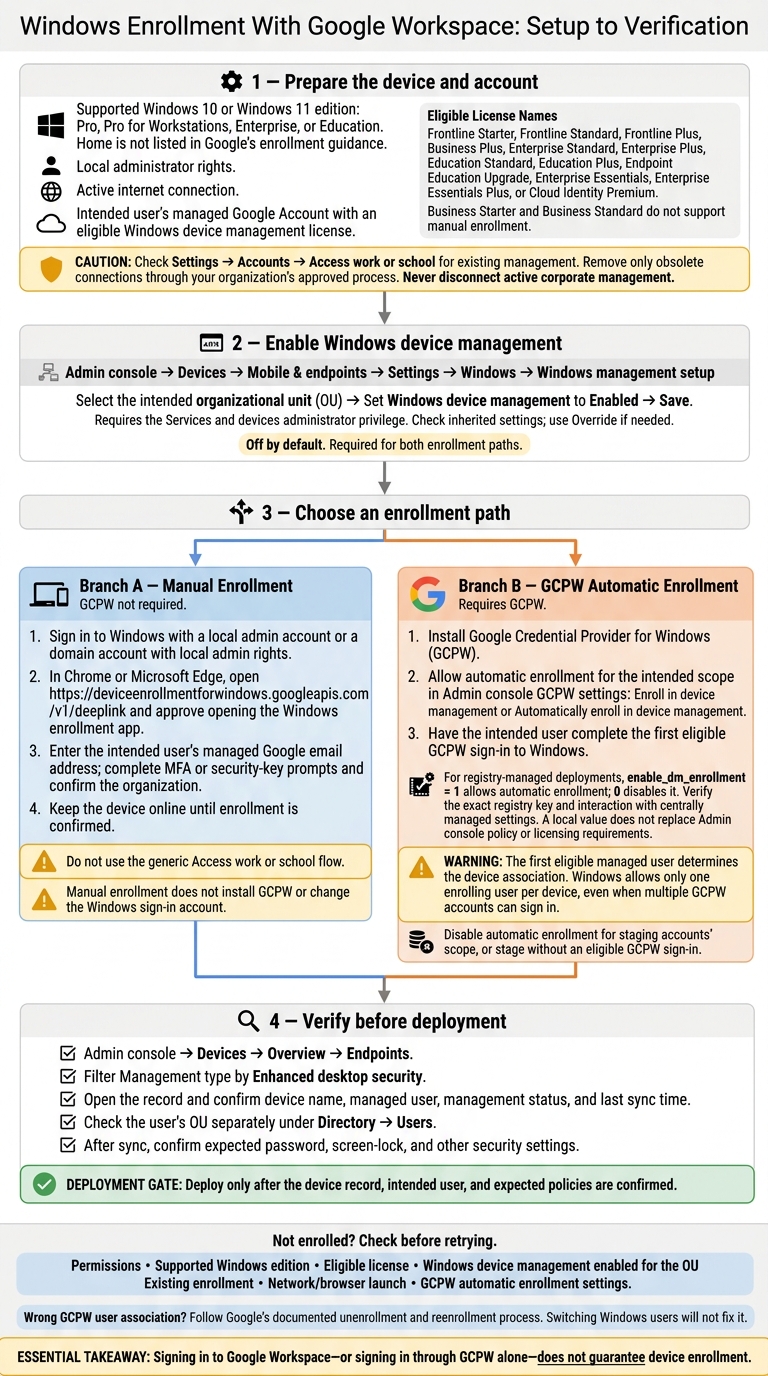
Windows Enrollment With Google Workspace: Setup to Verification
1. Prepare Google Workspace and Windows
Turn On Windows Device Management
Windows device management requires one of these licenses: Frontline Starter, Frontline Standard, Frontline Plus, Business Plus, Enterprise Standard, Enterprise Plus, Education Standard, Education Plus, Endpoint Education Upgrade, Enterprise Essentials, Enterprise Essentials Plus, or Cloud Identity Premium. Business Starter and Business Standard don’t support manual enrollment.
Sign in to the Admin console using an administrator account with the Services and devices administrator privilege. Go to Devices → Mobile & endpoints → Settings → Windows → Windows management setup. Select the intended organizational unit (OU), set Windows device management to Enabled, and click Save.
Apply this setting to the OU whose policies should take effect. Check inherited settings, and choose Override if that OU needs a different configuration. Windows device management is off by default and must be enabled for both manual and GCPW-based enrollment.
Check Device and Account Requirements
Once Windows device management is enabled, check that the device and account meet the enrollment requirements.
Open Settings → System → About to check the Windows version and edition. Google’s enrollment guidance lists Windows 10 and Windows 11 Pro, Pro for Workstations, Enterprise, and Education. Home isn’t listed.
For manual enrollment, you’ll need local administrator access, an active internet connection, and the intended user’s managed Google Account with an eligible Windows device management license. Open Google’s enrollment link in a current version of Chrome or Microsoft Edge, then pass control to Windows.
Check Settings → Accounts → Access work or school for old management connections. Remove only obsolete entries through your organization’s approved process. Never disconnect active corporate management.
sbb-itb-c68f633
2. Enroll the Windows Device Manually
Open Google’s Windows Enrollment Link
Sign in to Windows with a local admin account or a domain account with local admin rights. You’ll use this account only to start enrollment, then sign in to Google in the next step.
Open https://deviceenrollmentforwindows.googleapis.com/v1/deeplink in Chrome or Microsoft Edge. Approve the prompt to open the Windows enrollment app. Don’t use the generic Access work or school flow.
Sign In and Finish Enrollment
Enter the intended user’s managed Google email address and select Next. Don’t use a local Windows username, domain username, or personal Gmail address. The Google Account you enter identifies the user associated with device management.
Complete any MFA or security-key prompt and confirm that the account belongs to the intended organization. Keep the device online until enrollment is confirmed.
After enrollment, check that the device appears in the Admin console and syncs policy.
Manual enrollment does not install GCPW or change the Windows sign-in account.
How to enable Windows 10 management in Google G Suite
3. Understand GCPW Automatic Enrollment
Use GCPW if you want enrollment to happen during Windows sign-in rather than through the enrollment link. Google Credential Provider for Windows (GCPW) lets users sign in to Windows with a managed Google Account. GCPW sign-in alone does not enroll the device.
Compare Manual and GCPW Enrollment
Choose automatic enrollment only when the first eligible Windows sign-in should also create the device record.
| Factor | Manual enrollment | GCPW automatic enrollment |
|---|---|---|
| Enrollment path | Google’s Windows enrollment link; GCPW is not required | GCPW must be installed |
| Trigger | Completing the enrollment flow | First eligible GCPW sign-in with automatic enrollment allowed |
| Enrollment identity | Google Account entered during enrollment | Usually the first eligible managed Google Account used in GCPW |
| Requirements | Prerequisites in Section 1 | Same prerequisites, plus automatic enrollment allowed by an Admin console policy or enable_dm_enrollment |
Automatic enrollment works for user-driven setup. Choose manual enrollment when you need direct control over the enrollment identity or want technicians to stage devices without tying enrollment to the first GCPW sign-in.
Set Up Automatic Enrollment for the Intended User
In the Admin console, go to Devices → Mobile & endpoints → Settings → Windows. Under GCPW settings, find Enroll in device management or Automatically enroll in device management. Confirm that the setting applies to the intended organizational unit or group. After enrollment, check the enrollment record and policy sync in the Admin console.
For registry-managed deployments, set enable_dm_enrollment to 1 to allow automatic enrollment or 0 to disable it. Before making changes, check the exact GCPW registry key and how it interacts with centrally managed settings. The local value does not replace Admin console policy or licensing requirements.
The intended user should complete the first eligible GCPW sign-in. If a technician signs in first with an eligible account, enrollment can become tied to the wrong user. Windows allows only one enrolling user per device, even when multiple GCPW accounts can sign in.
To avoid that mix-up, disable automatic enrollment for the staging accounts’ scope, or stage devices without an eligible GCPW sign-in. Then have the intended user sign in. Before deployment, check the device record, user association, and latest policy sync.
4. Verify Management and Troubleshoot Enrollment
After manual enrollment or the first GCPW sign-in, confirm that Google created the device record and applied the expected policy.
Check the Device Record and Policy Sync
If enrollment finished but the device doesn’t show the expected management state, check its record first.
In the Admin console, go to Devices → Overview → Endpoints. Filter Management type by Enhanced desktop security, then open the device record. Confirm the device name, managed user, management status, and last sync time.
Check the user’s organizational unit separately under Directory → Users. After sync, compare the computer’s password, screen-lock, and other security settings with the settings expected for that organizational unit.
Fix Manual Enrollment Failures
If the enrollment link won’t launch, open it in Chrome or Microsoft Edge and allow the request to switch applications. Verify network access to Google services and record the exact error message.
Check these enrollment requirements:
- Local admin rights and a supported Windows 10/11 edition: Pro, Pro for Workstations, Enterprise, or Education.
- Eligible licensing and Windows device management enabled for the organizational unit (OU).
- Whether the device is already enrolled.
Fix the issue before retrying the enrollment link with the intended managed Google Account. After sync, check the endpoint record again.
If the device still doesn’t appear, collect the device name, Windows version and edition, account, organizational unit, license, browser, and exact error before escalating.
Fix GCPW Enrollment and User Association
Use these steps when GCPW sign-in works, but the device is missing, unmanaged, or linked to the wrong user.
If sign-in succeeds but enrollment fails, check the intended OU policy and any local enable_dm_enrollment override. Then retry sign-in.
The first eligible managed user determines the device association. If the wrong user is associated, unenroll and reenroll the device using Google’s documented process. Switching Windows users won’t fix the association.
Some settings can remain after unenrollment. After sync, verify both the corrected managed user and the device’s policy behavior.
For repeated GCPW failures, enable verbose logging, reproduce the issue, then turn logging off.
Conclusion: Confirm Enrollment Before Deployment
Confirm the device record and policy sync before deployment. Deploy only when the device appears as Enhanced desktop security and the expected policies have applied.
GCPW is optional for manual enrollment. If you use it for automatic enrollment, make sure the intended user signs in first.
FAQs
Will enrollment affect my existing Windows files and apps?
Enrolling a Windows device with Google Workspace - including through Google Credential Provider for Windows (GCPW) - is designed to keep existing files and apps intact. GCPW lets users sign in with their Google Workspace credentials and supports single sign-on (SSO) and multi-factor authentication (MFA).
Check your settings in the Google Admin Console for any additional policies that could affect local data.
How long should I wait for device policies to sync?
On internet-connected Windows devices, policies can take up to 3 hours to apply. During testing, sync the device twice in Windows Settings under Managed by Google to check that the policies have applied.
Organization-wide changes, such as organizational unit (OU) settings, may take up to 24 hours to take effect throughout your organization.
How do I transfer an enrolled device to another employee?
Update the device’s assigned user field in AssetRemix so the asset record reflects the new employee. If their department or role requires different policy settings, move the device to the appropriate organizational unit in the Google Admin Console.
Make sure the new employee is set up in your directory and linked to the device record for accurate lifecycle tracking and reporting.