7 Cloud App Rollout Steps for K-12 Device Fleets
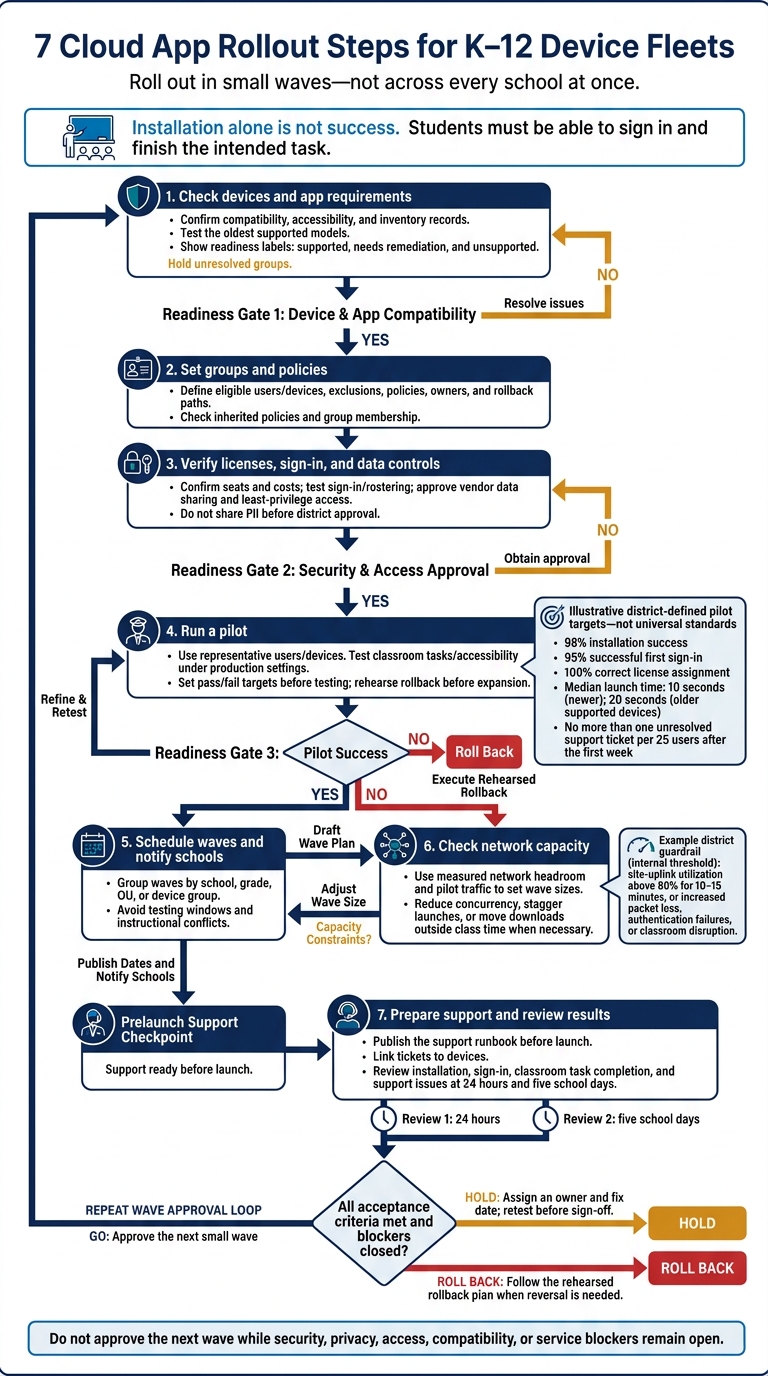
I recommend rolling out cloud apps in small waves - not across every school at once. Start with approved users and devices, test classroom tasks, and pause expansion when access, privacy, security, or network checks fail.
I use these seven steps to keep the rollout on track:
- Check devices and app requirements: Confirm compatibility, accessibility, and inventory records.
- Set groups and policies: Define who gets access and how the app reaches them.
- Verify licenses, sign-in, and data controls: Check seats, costs, account access, and vendor approval.
- Run a pilot: Test classroom use and rehearse rollback before adding users.
- Schedule waves and notify schools: Avoid testing windows and explain what changes.
- Check network capacity: Use measured traffic to set wave sizes before publishing dates.
- Prepare support and review results: Give staff clear fixes and check progress at 24 hours and five school days.
My go/no-go rule: <u>installation alone is not success</u>. Students must be able to sign in and finish the intended task. Set targets before launch - such as a district-chosen 98% installation success rate - and approve each new wave only after blockers are closed.
7 Cloud App Rollout Steps for K–12 Device Fleets
1. Check Device Inventory and App Requirements
Start with devices eligible for the first wave. Build a device-and-app requirements matrix before rollout. Record each device’s type, model, OS and browser versions, serial number, ownership, school, grade, organizational unit (OU), assigned user, and management status.
Use lifecycle state and last check-in to filter out retired, missing, and inactive devices. Then cross-check device-management records against asset records and school rosters.
Match each device group to the app’s supported format: browser URL, extension, mobile app, or desktop installer. Check processor, memory, storage, OS, camera, microphone, and peripheral requirements. Test the oldest models in each group, not just recent purchases. Label each group supported, needs remediation, or unsupported.
Accessibility is a launch requirement. Test keyboard navigation, screen readers, captions, contrast, and zoom with students and staff who use the district’s assistive technology. Document any barriers the vendor needs to fix.
Confirm sign-in methods, student eligibility, shared-device support, and required SIS/LMS integrations. Record requested permissions and any required extensions or software. Do not share personally identifiable information until the district approves the vendor and limits the integration to required instructional data.
Use AdminRemix tools to connect the review to fleet records and flag missing assignments or incorrect OUs. Check discrepancies against Google Admin. Give each unresolved group an owner, a due date, and an explicit deployment hold. Use the supported and unsupported labels to build deployment groups for the next step.
sbb-itb-c68f633
2. Set User Groups and Deployment Policies
After confirming device readiness, define each audience before assigning app access to people and devices. Separate audiences by school, grade, role, program, and location. Give each group a clear eligibility rule, a membership source, and an owner who approves changes.
Use organizational units for stable populations and groups for changing or cross-school access. Target users, browsers, and devices separately. A teacher’s access should follow their account; a library station’s settings should stay with the hardware.
Before saving, compare membership against current enrollment and staff records. Remove graduates and transferred students, check overlapping roles, and make sure excluded populations remain excluded. Review inherited settings and exceptions: parent organizational units can pass policies to child units, while a group may introduce an override. Check at least one account and device for every affected school, grade, role, and location.
With audiences defined, choose the least restrictive policy that meets the need. Require installation for must-have apps and offer optional access to supplemental tools. Use managed guest sessions on shared devices when the app works without individual sign-in, and kiosk mode on dedicated devices. Confirm that the selected mode supports the app’s core workflow. Keep the policy’s scope narrow so the pilot can test it quickly.
Before enabling access, record the target population, deployment type, exclusions, approval date, and rollback path. Have each department approve the settings for its role, especially staff-only functions and assessment restrictions. Assign a business owner to manage eligibility and an IT owner to handle technical changes. Review groups before each semester, after transfers, and before testing windows.
3. Confirm Licenses, Sign-In, and Data Controls
Match purchased seats to current needs before provisioning accounts. Check seats against enrollment, staffing, pilot users, late enrollees, and replacement-device needs. Confirm whether licenses apply to named users, shared devices, individual devices, schools, or concurrent users. Record unused, duplicate, suspended, and unassigned seats. If the contract allows it, keep a 5%–10% reserve for late enrollment. Document who can approve more purchases or seat reassignments.
Record contract dates, renewal notice deadlines, minimums, overage pricing, prorated-seat rules, refunds, auto-renewal terms, and service commitments. Calculate both the initial and expected total cost in U.S. dollars, including planned additions, license fees, integration charges, support, storage or usage charges, and overages. Assign a procurement owner to review renewal dates at least 60–90 days before expiration. Keep the rollout within the pilot until seat availability, renewal risk, and overage costs are clear.
Next, check that sign-in and rostering can support the full rollout. Test SSO, MFA, account matching, password recovery, and deprovisioning. Require MFA for administrators and other accounts with elevated permissions. Confirm whether the app supports OneRoster 1.2 through CSV or REST API, then document sync frequency and error handling. Test student, teacher, substitute, and administrator accounts, plus users with duplicate or changed names. Make sure each account gets access to the correct school or class.
Approve data sharing, not just the app. For this rollout wave, connect every requested roster field to a documented instructional need and reject data that isn't needed. Do not put personally identifiable information in OneRoster IDs. Before deployment, have the privacy or legal team review the vendor agreement, privacy policy, security terms, retention and deletion rules, subprocessors, breach-notification terms, and restrictions on advertising, data sales, or unrelated model training. Under FERPA’s school-official exception, the provider must remain under the district’s direct control over the use and maintenance of education-record information.
Assign primary and backup owners for approval, provisioning, revocation, and audits. Create a permission matrix that separates license assignment from student-data export. Apply least privilege: students get only instructional features, teachers manage their assigned classes, and administrators receive narrowly scoped reporting or configuration rights.
Keep the seat forecast, cost estimate, signed agreements, access-test results, roster-validation results, and change logs together. For each material access change, record the requester, approver, account, role, timestamp, and reason. The IT asset or help desk team can use AdminRemix to maintain the license register, assignment history, renewal calendar, and exception queue. Use these approved settings for the pilot wave.
4. Test the App With a Pilot Group
Use only devices and users cleared in Steps 1–3. Choose a small group that reflects the fleet - not just volunteers. Include students, teachers, instructional technology staff, help-desk staff, and at least one school administrator. Sample approved device groups across grades and classroom types, including students who use assistive technology. Test the oldest and newest supported devices and versions. Use the production OU structure and deployment path planned for the full rollout.
Have participants complete their usual classroom workflow under production settings, including switching devices. Test installation, updates, removal, and reinstallation after a reset. Check content filtering under normal district policies, along with printing, audio playback and recording, camera and microphone access, and file uploads. If the app supports offline use, disconnect Wi-Fi, save work, reconnect, and check that the work syncs.
Make accessibility a pass/fail item. Students who use screen readers, keyboard navigation, magnification, captions, speech-to-text, or alternative input devices should complete the same classroom tasks. This includes navigating error messages and dialogs. Test routine disruptions, too, such as an absent teacher or an unavailable device.
Set these thresholds before pilot users begin.
District-defined targets could include 98% installation success, 95% successful first sign-in, and 100% correct license assignment; median launch times of 10 seconds on newer devices and 20 seconds on older supported devices; and no more than one unresolved support ticket per 25 users after the first week.
Log each device model, OS, task, result, timestamp, and error. Review results by device type and user role so averages don’t hide failures. Use these pass/fail results to decide whether more users and devices can join the rollout.
Rehearse rollback before expanding. Name who can approve it and who will carry it out. Document how to disable assignments, revoke access, remove the app or extension, preserve student work, restore settings, and notify schools. Test these steps on a small subset, then verify that access is revoked, work is preserved, and settings are restored.
Review the results with IT, instructional leaders, accessibility representatives, privacy or legal staff, and help-desk owners before scheduling the next wave and notifying schools. Carry only the approved fixes into that wave.
5. Schedule Rollout Waves and Notify Schools
Group rollout waves by school, grade, OU, or device group. Set boundaries that keep issues contained and help schools coordinate access. Keep large and high-risk groups separate to protect instruction. Before assigning dates, ask school leaders to flag state testing, benchmark assessments, report-card deadlines, enrollment periods, back-to-school preparation, major events, and the busiest instructional weeks.
Track each wave in a shared rollout register. Include the device count, deployment window with separate staff and student start times, go/no-go checkpoint, rollback cutoff, and owner.
Use the register to check readiness before deployment. Confirm that all prerequisites remain in place, and defer any group with unmet requirements. Treat Step 6 as a scheduling gate: publish dates only after confirming that network capacity supports the planned wave size. Reserve a backup window for schools with readiness issues or instructional conflicts. Log every schedule change, its reason, the new date, and the communication plan.
Once a wave is approved, notify teachers, school leaders, students, IT staff, help desk staff, and administrators right away. Explain what changes, who gets access, when access starts, what they need to do, and where to get help. Include families when home access is affected. Use a clear U.S. date and time format:
“October 14, 2026, from 7:00–8:00 p.m. ET”
Give teachers classroom-use guidance and students brief sign-in instructions. Provide school leaders with an escalation contact, and give support staff the wave roster and known issues.
Send the first notice when the schedule is approved, a reminder several business days before deployment, and a same-day message covering required actions. Require principals or school tech leads to confirm receipt and flag conflicts. After validation, send a final status update: ready or delayed.
6. Check Network Capacity and Adjust Wave Sizes
Once you schedule a wave, size it for the network that will carry it. Use measured network headroom - not advertised bandwidth. Measure traffic during one normal school day and one peak-use period. Check internet and site-uplink utilization, latency, packet loss, DNS response time, access-point client counts, and Wi-Fi channel utilization. Then use pilot measurements of install, sign-in, and download traffic to size waves for the available WAN and Wi-Fi headroom.
Estimate peak Mbps as devices downloading × MB per device × 8 ÷ (seconds × 1,000). Record expected concurrency separately, since synchronized starts can push demand above the estimate. Label calculations as estimates and replace assumptions with pilot measurements wherever possible. Use the same method for every wave so you can compare capacity checks.
| Traffic source | Estimated peak demand | Available capacity | Risk | Mitigation |
|---|---|---|---|---|
| Installation or updates | Package size × concurrent devices ÷ download window | Measured site-uplink and internet headroom | Downloads can crowd out instruction | Throttle downloads; preload outside class time |
| First-launch setup and sign-in | Concurrent launches × measured authentication demand per device | Measured proxy connections and identity capacity | Login timeouts or failed setup | Stagger launches; check connection caps |
| Content downloads or sync | Content size × concurrent downloads ÷ download window | Measured remaining WAN capacity and wireless airtime | Congestion or vendor rate limiting | Cache where supported; limit simultaneous sync |
| Normal classroom use | Measured busy-period traffic | Measured WAN headroom and wireless capacity by room | Slow lessons, video, or collaboration | Prioritize instructional traffic; shrink waves |
Check the full path, not just the Wi-Fi signal. Test Wi-Fi coverage and capacity in classrooms, libraries, gyms, and portable buildings. A strong signal doesn’t mean an access point can support everyone at once. Run an RF site survey, validate after deployment, and size access points for simultaneous users.
Test required domains, ports, redirects, and certificate handling through student and staff DNS filters, firewalls, and proxies. Test sign-in, password reset, uploads, downloads, and embedded content. Confirm the app provider’s concurrent-user, activation, and API limits, and watch for 429 rate-limit responses and timeouts.
Set hold thresholds before expanding.
An internal guardrail could be site-uplink utilization above 80% for 10–15 minutes, or increased packet loss, authentication failures, or classroom disruption.
Treat these as district thresholds, not universal standards. If demand exceeds them, reduce concurrent devices, stagger classrooms, or move nonurgent downloads outside class time. Avoid a single districtwide synchronization event that could still overload the WAN. Apply QoS where supported to preserve testing, live instruction, emergency communications, and accessibility services. Hold or slow the wave when capacity slips.
7. Prepare Support and Monitor Rollout Results
Once a wave is approved, publish support details before launch. Create a one- to two-page runbook as the support plan for that wave. Include the app name, supported versions and models, expected install behavior, owners, escalation contacts, rollback authority, admin paths, screenshots, and target resolution times. Add step-by-step fixes for failed installs, missing access, sign-in errors, outdated asset records, and license-assignment problems.
Document device reassignment, rollback, and data-protection incidents in separate procedures:
- Device reassignment: Before a device changes hands, clear the prior session and wipe or factory reset it according to district policy. Update the asset record with the new user, school, OU, serial number, status, and date.
- Rollback: When a wave needs reversal, follow the documented rollback plan. Limit rollback steps to approved administrators.
- Suspected data exposure: Treat it as a security incident. Restrict access, preserve logs and screenshots, and notify the district’s incident-response lead and privacy or legal contact under the approved response plan.
Link every ticket to the affected device. Record the user, school, asset ID or serial number, app version, exact error, timestamp, location, and troubleshooting already completed. AdminRemix’s AssetRemix help desk can link tickets to asset records to help teams triage tickets faster. Match tickets to the right Chromebook using serial numbers or Google Admin device IDs. Keep ticket fields consistent so teams can compare problems across schools and device models.
After each wave, check both deployment status and classroom use. Track installation and access separately, along with sign-in failures, crashes, performance complaints, license counts, device health, open and reopened tickets, and median time to resolution. Break down results by school, device model, ChromeOS version, and deployment group to assess whether the next wave can stay on schedule.
Review tickets and teacher feedback at 24 hours and five school days. Check whether students could sign in and complete the intended classroom task. Use recurring issues to decide whether the next wave should proceed.
When an issue recurs, change only the specific control involved. Record the reason, owner, expected effect, and review date. After each review, send every school a short issue summary and fix status, and clear, delay, or narrow the next wave based on the findings.
Conclusion: Approve Each Wave Before Proceeding
After each wave review, use a one-page approval checklist to decide whether to proceed, hold, or roll back. Cover all seven steps: inventory and compatibility, group access, licensing and sign-in, pilot results, notifications, network capacity, and support readiness.
Set go/no-go criteria before launch. Include deployment and sign-in success rates, confirmation that every supported device type passes the core classroom workflow, network performance, and help-desk staffing and escalation coverage.
Name one rollout owner with authority to pause the rollout, plus one backup. In the same change log, record the app version, target schools and groups, wave date and local time, acceptance criteria, test evidence, approver, and go/hold/rollback decision.
Do not approve the next wave while blockers remain open. Give every security, privacy, access, compatibility, or service blocker an owner and a fix date. Retest before sign-off, and approve the next wave only when the checklist is complete and every blocker is closed.
FAQs
How many users should we include in our pilot?
Include 5% of the devices from each hardware model in your fleet so the pilot reflects the range of devices in your district’s inventory.
Set this threshold before rollout. Then assess your four-week pilot using measures such as an install rate of at least 95% and fewer than 5 support tickets per 100 users.
How long should we wait between rollout waves?
Spread rollout waves across several days so your team can track performance and spot issues early. Policy changes and app deployments can take up to 24 hours to reach all student devices. Give those changes time to take effect, and check that your test groups are stable before starting the next wave.
When should we roll back instead of fixing issues?
If the same application issue continues after initial troubleshooting, roll back the update. Filter a report by organizational unit and OS version. If failures cluster on the same older build, update the OS or replace the hardware rather than repeat the same fixes.
For incorrect bulk data imports, use Chromebook Getter’s version history to restore a previously saved, accurate state.