
Ultimate Guide to Chromebook Troubleshooting
Chromebooks are reliable, but issues like Wi-Fi problems, login errors, or hardware glitches can disrupt productivity. This guide provides step-by-step solutions for common problems, ensuring your Chromebook runs smoothly without unnecessary resets or data loss. Here's what you'll learn:
- Fixing Hardware Issues: Diagnose power, display, keyboard, and trackpad problems using simple checks and the Diagnostics app.
- Network Troubleshooting: Resolve Wi-Fi connectivity errors, DNS issues, and router conflicts.
- Software Optimization: Update Chrome OS, clear cache, and perform resets (like Powerwash) when needed.
- Account and Login Solutions: Address login errors and sync problems for Google Workspace accounts.
- When to Escalate: Identify when a professional repair or replacement is necessary.
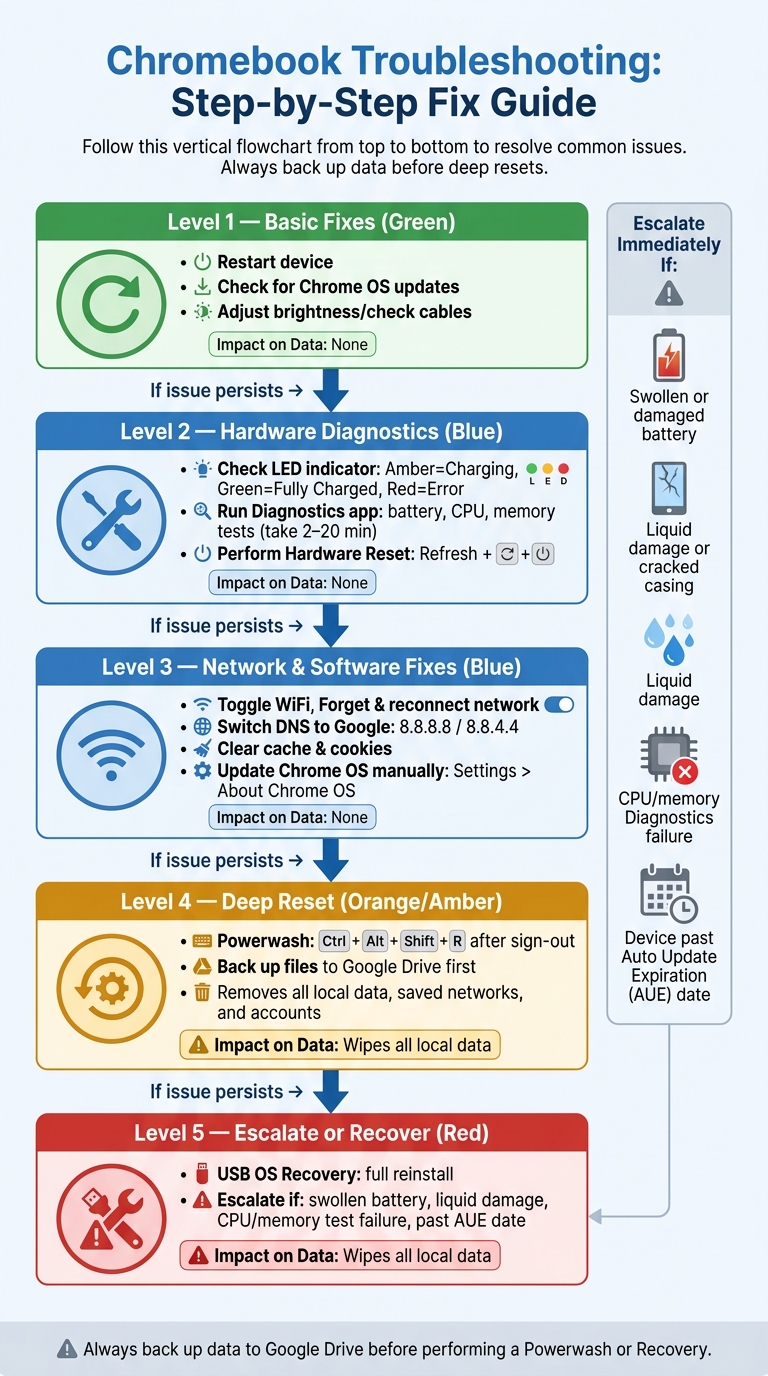
Follow a structured approach: start with basic fixes (restart, updates) and escalate only when required. This method saves time, protects data, and helps IT teams manage devices effectively.
Chromebook Troubleshooting: Step-by-Step Fix Guide
How to Fix Frozen or Unresponsive Chromebook - 2025
sbb-itb-c68f633
Diagnosing Hardware Issues
When troubleshooting hardware problems, it's important to follow a logical approach. Start by checking hardware components before moving on to software or connectivity. Hardware issues can sometimes mimic software glitches, so begin with simple checks like brightness settings or ensuring cables and connections are secure. Only consider a physical fault after ruling out these basics. For IT administrators, implementing Chromebook management software can help track these hardware issues across a fleet. Below, you'll find common hardware problems and their corresponding solutions.
To dig deeper, use the Diagnostics app for testing components like the battery, CPU, and memory. Open the Launcher, search for "Diagnostics", and run the tests. Depending on the component being checked, these tests can take anywhere from 2 to 20 minutes.
Power and Battery Problems
If your Chromebook won't turn on, start by inspecting the charging port for debris or damage. Pay attention to the LED indicator light:
- Amber/Orange: Charging
- Green/White: Fully charged
- Red: Communication error between the battery and system
For a completely drained battery, plug in the charger and wait at least 30 minutes before attempting to turn on the device. If there's still no response, try a hardware reset:
- For Chromebooks: Power off the device, hold the Refresh key, and tap the Power button. Release the Refresh key once the device begins to boot.
- For tablets: Press and hold Volume Up + Power for 10 seconds.
Once the power issue is resolved, move on to checking the display and other interactive components.
Display and Peripheral Issues
A black or distorted screen doesn't always indicate a broken display. To confirm, connect your Chromebook to an external monitor. If the external screen works fine, the issue likely lies with the internal panel, which may need professional repair.
"If your display is off or garbled, or your sound doesn't work, there's a decent chance it's a hardware issue and you should have a pro take a look." - Sydney Butler, Technology Writer, How-To Geek
For keyboard or trackpad problems, try connecting an external USB keyboard or mouse. If the external device works, the internal component may have failed. If the touchpad seems unresponsive but shows no physical damage, try gently swiping your fingers across it for about 10 seconds or pressing Esc multiple times to clear minor glitches.
Here’s a quick reference for common hardware issues and diagnostic steps:
| Hardware Component | First Diagnostic Step | Common Fix |
|---|---|---|
| Battery | Check LED color; run Diagnostics app | Charge for 30 minutes; perform a hardware reset |
| Display | Connect to an external monitor | Perform a hard reset; disable hardware acceleration |
| Keyboard/Trackpad | Test with an external USB peripheral | Log in as Guest |
| CPU/Memory | Run the Diagnostics app (temp/usage) | Close unused tabs; check for overheating |
| USB/Bluetooth | Test the device in a different port | Use another port; toggle Bluetooth |
Fixing Network and Connectivity Problems
After running hardware diagnostics, addressing network issues becomes essential to get your Chromebook back in full working order. Network problems can be tricky because your Chromebook might show "Connected", yet web pages won’t load. These issues often stem from configuration errors, router conflicts, or DNS problems. Follow these steps in order to save time and effort.
WiFi Connectivity Troubleshooting
Start by toggling the WiFi off, then restart both your Chromebook and router to resolve any temporary glitches.
If the issue continues, head to Settings > Network > Wi-Fi > Known Networks, and forget any networks you’re not using. Also, check your router’s frequency: 2.4GHz provides better range but may be slower due to interference, while 5GHz offers faster speeds but with a shorter range.
For networks requiring a login page (captive portals), try accessing a non-HTTPS site like http://example.com to trigger the login screen. Alternatively, starting a Guest session can sometimes bypass extensions that block portal loading.
If you suspect your Chromebook’s internal WiFi receiver isn’t working, you can use a USB-to-Ethernet adapter as a temporary fix.
"ChromeOS devices support networks with a non-broadcasted SSID, but you must know the network name and password. Chrome does not always notify you if you enter an incorrect password." - Google Help
Keep in mind that ChromeOS supports several security protocols, including WEP, WPA, WPA2, EAP-TLS, EAP-TTLS, and EAP-PEAP. However, TKIP is not compatible with the IEEE 802.11n standard and may cause speed issues. Additionally, network passwords exceeding 24 characters can sometimes cause authentication problems on ChromeOS.
If tweaking WiFi settings doesn’t work, the issue might lie with DNS settings.
DNS and Internet Access Errors
When your Chromebook shows "connected but no internet", it’s often a DNS-related problem. To fix this, navigate to Settings > Network > Wi-Fi > [Network Name] > Network. Under "Name servers", switch from automatic to Google name servers (8.8.8.8 and 8.8.4.4) or input a custom DNS address. This adjustment can resolve errors like "Page not found" or DNS lookup failures without requiring further troubleshooting.
If the problem is more complex - for instance, if only your Chromebook struggles to connect while other devices work fine - check whether the necessary hostnames are allowlisted in your network’s firewall. This is particularly important for managed devices used in schools or workplaces that rely on specific Google services.
To figure out exactly where the connection is failing, use the Chrome Connectivity Diagnostics extension from the Chrome Web Store. This tool checks for issues like DNS latency, blocked ports, and weak signals, giving you a clearer picture of what’s wrong. Additionally, the ChromeOS Task Manager (Search + Esc) can help identify whether a specific tab or background process is hogging bandwidth and mimicking a connectivity problem.
The table below outlines a step-by-step approach to network troubleshooting:
| Troubleshooting Level | Action | Purpose |
|---|---|---|
| Level 1: Basic | Restart router & Chromebook | Clears temporary communication conflicts |
| Level 2: Network | Forget & reconnect to network | Resets the handshake between device and network |
| Level 3: Advanced | Static IP / Manual DNS | Fixes "Connected, No Internet" and DNS issues |
| Level 4: System | Hard reset (Refresh + Power) | Resets hardware components like the WiFi card |
| Level 5: Final | Powerwash | Restores factory settings to resolve deep software issues |
Managing Software and Chrome OS Performance
Once you've confirmed that your network is stable, the next step to optimize your Chromebook's performance is tackling software-related issues. Problems like outdated system files, excessive browser data, or corrupted user profiles can slow things down. Start by updating Chrome OS, then clear cache and cookies, and if necessary, reset the device using a Powerwash.
Updating Chrome OS
Chrome OS updates itself automatically, but you’ll need to restart the device for the updates to take effect. Keep an eye out for notifications in the system tray - a blue icon means a restart is recommended, while an orange icon indicates a restart is required. For manual updates, navigate to Settings > About Chrome OS > Check for updates. Always connect the Chromebook to a power source during updates to avoid interruptions, as a shutdown mid-update can corrupt the system.
For IT administrators managing multiple Chromebooks, the Long-Term Support (LTS) channel is a smart choice. It delivers security updates every two weeks while introducing new features only every six months, minimizing disruptions in managed environments. Additionally, regularly check each device's Auto Update Expiration (AUE) date under Settings > About Chrome OS > Additional details. Once a device reaches its AUE date, it will no longer receive security updates, even though it may still function.
After updating, clearing the cache can help further improve performance.
Clearing Cache and Cookies
If your Chromebook feels slow or web pages aren’t loading as they should, clearing the browser cache is a quick and effective solution. Over time, cached files and outdated cookies can build up, forcing the browser to work harder than necessary. To clear them, open Chrome and go to three-dot menu > Settings > Privacy and security > Clear browsing data. Select both Cookies and other site data and Cached images and files, then click Clear data.
If performance issues persist, use Task Manager (Search + Esc) to identify and close resource-heavy apps or tabs.
For more stubborn problems, a Powerwash may be necessary.
Performing a Powerwash
A Powerwash, Chrome OS’s version of a factory reset, should be your last resort. It erases everything stored locally, including files in the Downloads folder, saved networks, and user accounts. Before initiating a Powerwash, try disabling browser extensions one by one or performing a Hard Reset (Refresh + Power), which can resolve temporary glitches without deleting any data.
If a Powerwash becomes unavoidable - for example, due to persistent freezing, a corrupted profile, or a failed OS update - make sure to back up all important files to Google Drive or an external storage device. Remove any SD cards before beginning the reset. To start a Powerwash, sign out of your account and press Ctrl + Alt + Shift + r. For managed devices, only an administrator can perform this reset through the admin console.
"Performing a factory reset erases all the information on your device's hard drive, and gives Chrome OS a fresh start." - Google Pixelbook Help
| Reset Type | Data Deleted? | When to Use |
|---|---|---|
| Hard Reset (Refresh + Power) | No | For hardware glitches or a frozen screen |
| Powerwash (Factory Reset) | Yes - all local data | For a corrupted profile, persistent lag, or OS update failure |
| Recovery (USB drive) | Yes - full OS reinstall | For a severely corrupted or unbootable Chrome OS |
Account and Login Troubleshooting
After addressing performance and connectivity issues, the next step is ensuring secure account access and proper synchronization. Login problems often arise in Google Workspace environments after software updates. Recognizing specific error messages can help you quickly pinpoint and resolve the issue.
Fixing Login Failures
Error messages are your first clue to what’s going wrong. For example, "Couldn't find your Google Account" usually means there’s a typo or the email address is incomplete. In Google Workspace, users must enter their full organizational email address (e.g., user@company.com), not just their username. Another common error, "Username or password cannot be verified on this current network", might seem like a credential issue, but it’s often due to a weak or unstable Wi-Fi connection. Try moving closer to the router or switching networks before assuming the password is incorrect.
Here’s a quick breakdown of common error messages and their solutions:
| Error Message | Likely Cause | Recommended Action |
|---|---|---|
| "Couldn't find your Google Account" | Typo or missing full email address | Re-enter the complete email (e.g., user@company.com) |
| "Username or password cannot be verified" | Weak or unstable Wi-Fi | Switch networks or restart the router |
| "Sorry, you don't have permission to sign in" | Admin or owner restrictions | Contact the IT administrator |
| "Please start a Guest session to activate the network" | Conflicting account or captive portal | Sign in as Guest first to establish a connection |
| "Account may have been deleted or disabled" | Admin action or terms violation | Use Google Account Recovery or contact support |
For conflicts involving @gtempaccount.com addresses, sign in at google.com/accounts and follow the data migration steps to rename the conflicting account. Another tricky issue occurs when a password has been recently changed - Chromebooks might require the old password to decrypt cached data before syncing new credentials.
If a device is stuck in a login loop, disconnect all USB peripherals and try signing in again. Sometimes, hardware interference can cause this issue. If that doesn’t work, perform a Hard Reset by pressing Refresh + Power.
Once login issues are resolved, the next step is to tackle any lingering sync problems to ensure your data is up-to-date.
Syncing Google Workspace Accounts

Sync problems can arise even after a successful login. For instance, bookmarks or passwords might not update as expected. First, make sure sync is enabled by navigating to Settings > You and Google > Sync and Google services. Also, confirm that the device is running Chrome OS version 110 or later, as older versions can cause Endpoint Verification issues.
For managed devices, persistent sync problems can often be diagnosed by right-clicking the Endpoint Verification extension and selecting Options > Download Log. This log file can then be shared with the IT team for further analysis.
In environments using federated identity - where Active Directory or third-party providers like RM Unify are synced with Google Workspace - sync failures often result from timing delays between the identity provider and Google’s servers. Administrators can manually trigger a resync via the Google Workspace Admin console by accessing the App Library and resyncing usernames and passwords. If the issue affects multiple users on the same device (rather than across multiple devices), performing a device wipe and re-enrollment is usually the fastest fix.
When to Escalate: Help Desk and Asset Management
If software fixes don’t solve the problem, it’s time to send the device to a specialist.
When to Escalate an Issue
Once you've tried all the standard troubleshooting steps for hardware, connectivity, or software problems, it’s best to escalate troublesome Chromebooks. Physical damage is a clear red flag - if you notice a swollen battery, liquid damage, or a cracked casing, unplug the device immediately and avoid any further troubleshooting. These devices need professional attention right away. Similarly, if the internal keyboard or trackpad stops working entirely but an external USB keyboard and mouse function fine, it points to a hardware issue that can’t be fixed with basic resets.
If Diagnostics tests for the CPU, memory, or battery fail, ensure you save the logs and escalate the issue. Providing a record of the steps already taken - like hard resets, Powerwashes, or USB recovery attempts - can help avoid redundant efforts.
It’s also important to check the warranty status and end-of-support date of the device. If the Chromebook is past its Auto Update Expiration (AUE) date, professional repairs might cost more than replacing the device. In such cases, replacing the Chromebook is usually the better option.
| Escalation Trigger | Pre-Escalation Step |
|---|---|
| Swollen battery, liquid damage, or cracked casing | Unplug the device immediately; do not attempt to charge it |
| CPU or memory test failure in Diagnostics | Save the session log from the Diagnostics app |
| Device won’t charge after 30+ minutes with a known-good charger | Perform a hard reset (Refresh + Power) |
| "ChromeOS is missing or damaged" after USB recovery | Confirm the recovery media was correctly created on another computer |
| Internal keyboard/touchpad unresponsive, external USB works | Test in Guest Mode to rule out profile-specific problems |
For organizations managing large fleets, handling recurring issues on individual devices should tie into a broader, centralized approach.
Using Asset Management Tools
If you’re managing a handful of Chromebooks, reactive escalations might work fine. But for larger fleets, asset management tools are a game-changer.
Tools like AdminRemix's AssetRemix and Chromebook Getter provide a centralized way to monitor fleet health and manage device metadata in bulk using Google Sheets. These platforms also enable remote commands, such as rebooting or Powerwashing devices, and integrate with systems like Snipe-IT, Lansweeper, and JAMF for real-time asset tracking. If you notice recurring issues with a particular Chromebook model, these tools can help identify patterns, making it easier to decide whether to retire an entire batch instead of repeatedly repairing individual units. AdminRemix even offers a free account to get started, with upgrade options available for full-scale fleet management.
Conclusion: Building a Reliable Chromebook Troubleshooting Process
When it comes to troubleshooting Chromebooks, having a clear and structured process makes all the difference. Start with the basics - like restarting the device or checking for updates. If those don’t work, move on to a hardware reset. Only escalate to more intensive measures, such as a Powerwash or full OS recovery, when absolutely necessary. This step-by-step approach not only saves time but also helps protect user data.
Here’s a quick breakdown of the troubleshooting steps:
| Troubleshooting Level | Action | Impact on Local Data |
|---|---|---|
| Basic | Restart / Check for updates | None |
| Hardware Reset | Refresh + Power button | None |
| Powerwash | Factory reset | Wipes all local data |
| Recovery | OS reinstallation via USB | Wipes all local data |
Efficiency in troubleshooting often comes down to two key practices: using standardized diagnostics and keeping device records up to date. Tools like the ChromeOS Diagnostics app can pinpoint hardware issues - like battery, CPU, or memory problems - before you even think about manual repairs. Pair this with asset management platforms, such as AdminRemix's AssetRemix, and you’ll have a seamless way to track warranty dates, device assignments, and repair histories. This not only simplifies fleet management but also ensures you’re making informed decisions about whether to repair or replace a device.
Dr. Willie Sanders, Jr., author of the ChromeOS System Administrator's Guide, emphasizes this point perfectly:
"Your ChromeOS device, though typically lower in cost than other computing devices, still represents an investment. Therefore, to protect that investment, it is important to understand how to identify and correct issues with your ChromeOS device and software before they escalate into full-blown disasters."
Whether you're managing a small classroom or a large corporate fleet, having a structured troubleshooting process backed by effective tools ensures your devices run smoothly. This not only boosts user productivity but also reduces the workload for your IT support team.
FAQs
How can I tell if my Chromebook issue is hardware or software?
Figuring out whether you're dealing with a hardware or software problem starts with observing the symptoms. If you're facing physical problems - like a keyboard that won't respond or ports that seem damaged - it's probably a hardware issue.
On the other hand, if your Chromebook powers on but feels sluggish, freezes, or crashes, the culprit is likely software-related. To troubleshoot, try restarting your device, checking for system updates, or performing a factory reset. If the problem sticks around, consider using diagnostic tools or reaching out to professional repair services for help.
What should I do if my Wi-Fi says 'Connected' but nothing loads?
If your Chromebook says it's connected to Wi-Fi but nothing is loading, here are a few steps you can take:
- Double-check the Wi-Fi status in your Chromebook's settings to ensure it's properly connected.
- Restart both your Chromebook and your router to clear up any temporary glitches.
- Use Chrome's connectivity diagnostics or try resetting your network settings to troubleshoot deeper issues.
- Improve your signal by moving closer to the router or disconnecting other devices that might be hogging bandwidth.
These steps should help you get back online quickly!
How do I back up data before a Powerwash or recovery?
Before resetting your Chromebook with a Powerwash or recovery, make sure to back up your files. This step is crucial since all locally stored data will be erased during the process.
- Locate any important files, such as downloads, documents, or photos.
- Save these files to Google Drive or transfer them to an external hard drive or USB flash drive to keep them safe and accessible after the reset.