Remote Device Inventory Checklist for IT Teams
If one remote device has no clean record, IT can lose track of who has it, where it is, and whether it should still be in service.
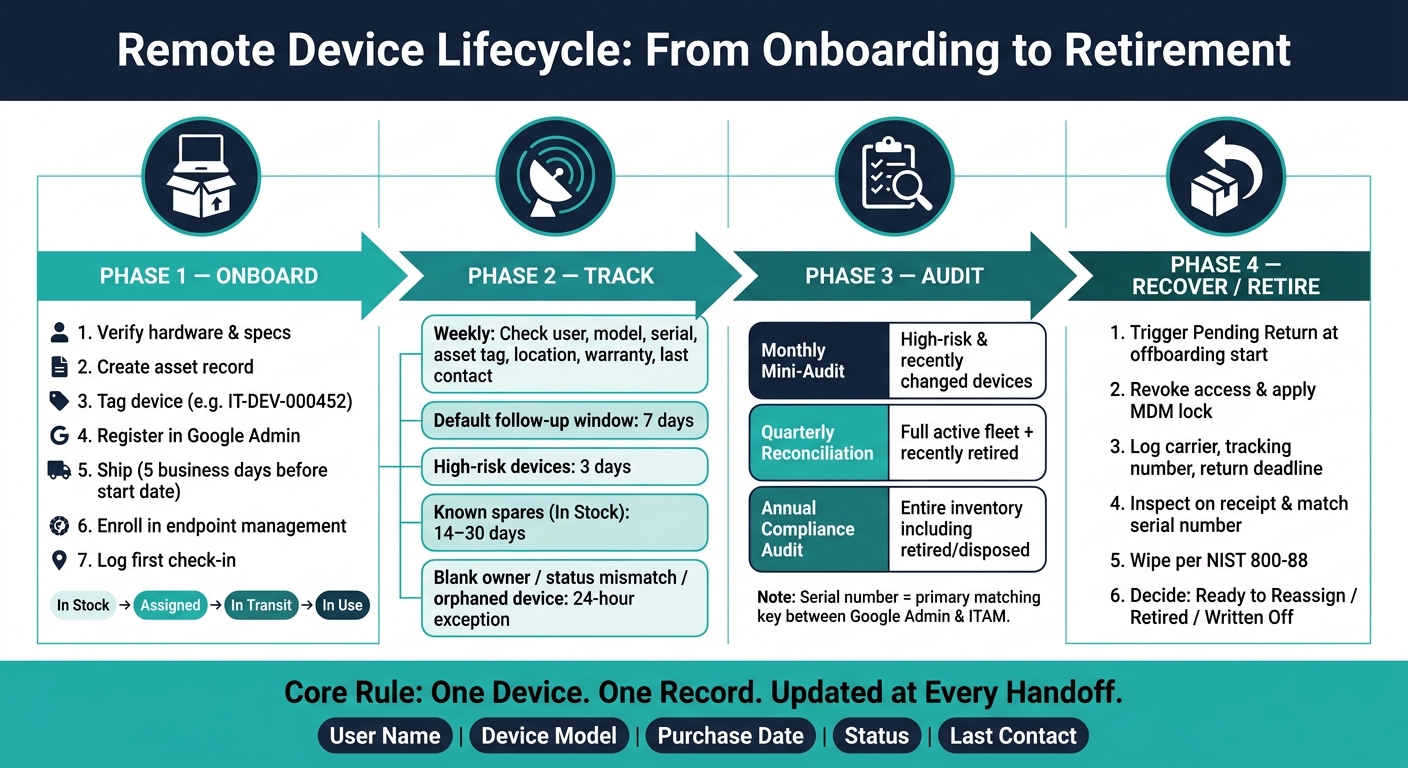
I’d sum this up in one line: use one record per device from shipping to retirement, and keep that record synced across Google Admin, ITAM, and offboarding work. The article shows how to do that with fixed fields, set status rules, weekly last-contact checks, monthly and quarterly audits, and a return process that starts before an employee leaves.
Here’s the full article in plain terms:
- I start with a standard device record for every asset
- I keep the same fields every time, such as:
- asset tag
- user name
- serial number
- purchase date
- purchase cost
- status
- location
- last contact
- warranty end date
- refresh due date
- end-of-life date
- I use fixed formats like MM/DD/YYYY and dollar amounts such as $1,299.00
- I move devices through a clear path:
- In stock
- Assigned
- In transit
- In use
- Pending Return
- Ready to Reassign, Retired, or Written Off
- I confirm onboarding in this order:
- verify hardware
- create the asset record
- tag the device
- register it in Google Admin
- ship it
- enroll it
- log first check-in
- I track remote devices every week by checking:
- assigned user
- model
- serial number
- asset tag
- location
- warranty date
- last-contact timestamp
- I use 7 days as the default follow-up window for stale last-contact data
- I tighten that to 3 days for higher-risk devices
- I let known spare devices marked In stock sit longer, usually 14 to 30 days
- I treat blank owners, mismatched status, and orphaned devices as 24-hour exceptions
- I audit on a set schedule:
- monthly mini-audit
- quarterly reconciliation
- annual compliance audit
- I match Google Admin and ITAM records with the serial number as the main key
- I log audit work with:
- auditor name
- audit date
- issues found
- fixes made
- I start recovery as soon as offboarding begins, not on the last day
- I log return shipping details like:
- carrier
- tracking number
- expected arrival date
- return deadline
- I inspect returned devices, wipe them under NIST 800-88, then decide whether to reassign, repair, retire, or dispose of them
One detail matters more than anything else: if Google Admin says one thing and your ITAM tool says another, the record is already drifting. That’s when duplicate shipments, missed returns, and audit gaps start to show up.
So the core idea is simple: one device, one record, updated at each handoff. The rest of the article explains how I’d keep that record current during onboarding, weekly tracking, audits, and recovery.
Remote Device Lifecycle: From Onboarding to Retirement
1. Onboard and Assign Devices for Remote Staff
Use the same order every time: verify the hardware, create the record, tag and register the device, ship it, enroll it, and confirm the first check-in.
Create the Asset Record and Add the Device
Before a device leaves your hands, make sure it’s on your approved hardware list. Check that the model, OS version, and specs match the role profile. For example, a developer might get a Dell Latitude 5440. Add a physical asset tag like IT-DEV-000452, and record the exact serial number from the device itself. That detail matters. If the serial number is off, Google Admin may accept the upload but block the assignment later.
Next, register the device in Google Admin > Company owned inventory. If you’re adding one device, manual entry works fine. For bulk onboarding, download Google’s import template, add the serial numbers and asset tags, and upload the file. Google supports up to 100,000 entries per file.
Keep status changes simple and consistent: In stock → Assigned.
Once the asset record and inventory entry match, ship the device. Then wait for enrollment before marking it as in use.
Confirm Delivery, Enrollment, and First Check-In
Ship the device at least 5 business days before the start date. Record the carrier, such as UPS or FedEx, along with the tracking number and shipment date. Then set the status to "In transit." Send the tracking details and first-login steps at the same time so the employee has what they need on day one.
When the device arrives, confirm delivery using the carrier’s proof-of-delivery record. After that, update the status to "In use" only once enrollment in endpoint management is done. For Chromebooks, check that the device landed in the right organizational unit and has the right policy set.
Capture two dates from the endpoint console:
- The deployment date
- The first last-contact timestamp in MM/DD/YYYY hh:mm AM/PM format
Don’t close onboarding until both enrollment and first check-in are logged.
Log the deployment date and first check-in before moving to ongoing tracking.
Use AdminRemix to Keep Onboarding Records in Order
AdminRemix stores the required fields, links each asset record to a help desk ticket, and supports CSV import and export so Google Admin and ITAM records stay aligned. That gives support staff one place to check the device record, shipping details, and current status.
Use Chromebook Getter to manage bulk Chromebook metadata in Google Sheets.
Use the same record fields in the next step to track status and last contact.
2. Track Device Status and Last Contact
After deployment, update remote device records every week. Inventory data goes stale fast, and once records drift, small gaps can turn into bigger problems.
Check Assignment, Status, and Location
Each week, check the assigned user, deployed model, and recorded location against HR or payroll data. If someone moves, transfers, or leaves the company, update the record right away.
Verify these master fields: user name, device model, serial number, asset tag, purchase date, status, warranty end date, and location.
Use a controlled status list - In use, In stock, In repair, Retired, Lost - and avoid free-text values. Free-text status fields often lead to audit errors.
These weekly checks set the baseline for audit-ready records.
Flag Devices With Old Last-Contact Data
Last contact is the most recent device check-in timestamp. Store it in one format: MM/DD/YYYY HH:MM AM/PM plus time zone. For example, 09/15/2026 2:30 PM ET. Also note which system generated it.
Use 7 days as the default follow-up window. Cut that to 3 days for high-risk devices. Extend it to 14–30 days only for known spares marked In stock. When a device hits the threshold, open a ticket or contact the user. If there is still no response after 2–3 missed cycles, escalate and mark the device Lost.
Treat orphaned devices, status mismatches, and blank-owner records as 24-hour exceptions.
Any device that misses the threshold should move into the same review queue used for audit exceptions.
Use a Simple Table for Status Rules
Use this table during weekly reviews. Each status ties to a clear IT action and a defined effect on audit or recovery work.
| Status | Purpose | Required IT Action | Effect on Audit or Recovery |
|---|---|---|---|
| In use | Actively assigned and checked in on time. | Verify owner, location, and last-contact weekly. Confirm MDM enrollment and encryption. | Counted as active; owner, location, and last-contact data must be complete. |
| In stock | Unassigned and stored at a known site. | Confirm physical stock monthly; update location and redeployment readiness. | Part of capital inventory; low recovery effort if location is accurate. |
| In repair | Out for service; link the ticket or RMA. | Track ETA; update status when repair closes. | Supports audit of repair costs and lifecycle decisions. |
| Retired | Wiped, disposed of, or resold; remove from active inventory. | Document wipe and disposal; retain a limited record. | Excluded from active counts; validates depreciation and data destruction. |
| Lost | Missing after investigation; start lock, wipe, and replacement. | Initiate remote lock or wipe; document the incident; begin replacement process. | High-risk category; closely scrutinized in audits. |
Keep these status rules the same across systems. That way, the next audit step compares like for like, and mismatches are much easier to spot during the inventory audit.
3. Audit Remote Inventory and Match Records Across Systems
Run audits on a fixed schedule: a monthly mini-audit, a quarterly reconciliation, and an annual compliance audit.
Match Inventory Data Between Google Admin and ITAM Records
Start each audit by exporting a new device list from the Google Admin console under Devices > Endpoints or Mobile & endpoints > Company owned inventory. Save it to Sheets or CSV so you have a timestamped baseline. Then export the matching AssetRemix report.
Use the serial number as the main key when you join the two exports. Use the assigned user as a second check. From there, run VLOOKUP or XLOOKUP to spot rows where the data doesn’t line up. Before you do that, clean both files first: trim serial numbers, standardize user names, and format dates as MM/DD/YYYY.
The mismatches you’ll usually see are pretty familiar: devices still assigned to former employees, typos in serial numbers, missing purchase dates, and status conflicts. Each mismatch should have a clear owner. IT operations should handle assignment and status issues. Procurement or finance should fix missing cost and date fields. Security or compliance should take devices marked lost or stolen.
Check Lifecycle, Cost, and Audit Records
For every device flagged during reconciliation, check the full lifecycle record. Make sure the purchase date is filled in and formatted as MM/DD/YYYY. Confirm that the purchase cost in USD matches the original purchase order, like $750.00 for a mid-range Chromebook. Check the warranty or support end date, the planned refresh date, and any end-of-life markers. For Chromebooks, that includes the Auto Update Expiration (AUE) date published by Google.
For each corrected record, log four items:
- Auditor name
- Audit date
- Issues found
- Remediation steps taken
That audit trail shows who reviewed the asset and what changed. In AssetRemix, you can record these fields directly on the asset record, which makes it easy to see who last audited a device and what was updated.
Flag unresolved gaps for recovery or offboarding review.
Compare Audit Timing and Scope
Use the table below to match audit depth to review scope.
| Audit Type | Scope | Data Sources | Fields Verified | Common Findings |
|---|---|---|---|---|
| Monthly mini-audit | High-risk or recently changed devices | Google Admin export, AssetRemix summary reports | User assignment, status, last contact, recently added or removed devices | Devices with 30+ days since last check-in; missing status updates after repair; devices linked to users who changed roles or org units |
| Quarterly reconciliation | Full active fleet plus recently retired assets | Google Admin, AssetRemix, HR/offboarding records, procurement records | User name, device model, serial number, status, purchase date, purchase cost, last contact, warranty date, refresh date | Former employees still assigned; missing purchase dates or costs; duplicate records; status mismatches |
| Annual compliance audit | Entire inventory, including retired and disposed assets | Google Admin, AssetRemix, HR/offboarding logs, finance, security tools, audit logs | Full asset record, lifecycle data, audit log entries, policy adherence | Gaps in audit coverage; incomplete lifecycle history; missing auditor names or remediation notes; exceptions to offboarding procedures |
Move unresolved gaps into recovery and offboarding review.
sbb-itb-c68f633
4. Recover Devices During Offboarding or Loss
Use this checklist when offboarding, audit exceptions, or loss cases point to a missing device. Recovery statuses are temporary. The record should end in Active, Ready to Reassign, Retired, or Written Off.
Update Status, Set Up Return Shipping, and Track the Device
Start recovery as soon as offboarding is confirmed. Don’t wait until the employee’s last day.
Open the asset record and confirm the user name, email address, serial number, asset tag, current status, and last contact time first. That quick check helps make sure you’re working on the right device before anything else happens.
Then change the device status from In Use to Pending Return right away. Send the return kit before the final workday. Once offboarding is confirmed, revoke access, end active sessions, and apply the required MDM lock or wipe immediately.
In the asset record, log the carrier name, tracking number, expected arrival date, and return deadline. For high-value equipment, require a signature on delivery.
Inspect, Reimage, Reassign, or Retire the Device
When the device comes back, close the loop in the asset record.
Match the serial number on receipt, inspect the device’s condition, note any damage or missing accessories, and log the received date. Then update the record with condition on arrival, repair required, location, and ready to reassign status.
Use the repair cost, remaining warranty, device age, and security support status to decide what happens next. If the device still meets company standards, wipe it using NIST 800-88 procedures, reimage it with the standard build, remove former user certificates and MDM trust relationships, and set the final status to Ready to Reassign.
If the device no longer qualifies for reuse, mark it Retired or Disposed and record the disposal method in the asset record.
Compare Offboarding Cases in One Table
Use the same record, but adjust the response based on the case.
| Offboarding Case | Fields to Verify | Status Change | Last-Contact Review | Shipping or Incident Steps | Closeout Record |
|---|---|---|---|---|---|
| Voluntary Departure | User name, email, serial number, asset tag, status, condition | In Use → Pending Return → Returned → Ready to Reassign or Retired | Confirm the last check-in before the user powers down the device | Send a prepaid return kit before the final workday; log carrier name, tracking number, and expected arrival date | Update the asset record with received date, condition, wipe method, and final status |
| Involuntary Termination | User name, serial number, last contact, MDM lock status | In Use → Pending Return (expedited) → Returned → Ready to Reassign or Retired | Check the last check-in status immediately before locking the device | Revoke access and apply MDM lock right away; expedite or supervise return shipping | Record access revocation time, lock date, return tracking, inspection results, and final disposition |
| Lost or Stolen Device | Serial number, last contact, last known location, device identifiers | In Use → Missing or Stolen | Identify the last known IP address and check-in timestamp; preserve both in the incident record | Trigger remote lock or wipe per policy, file an incident report, and record any insurance or police report reference | Log the incident number, security response actions, wipe confirmation, and whether the device is marked Stolen or Disposed |
Conclusion: Keep One Clean Record for Each Remote Device
This checklist only works if everything rolls up into one record per device. It doesn’t need to be fancy. It just needs five fields that stay current: user name, device model, purchase date, status, and last contact. With those five details in place, IT can see who has the device, what device it is, when it was bought, whether it’s active, and when it last checked in.
Once that core record exists, the main problem is drift between systems. Stale data is where remote inventory starts to fall apart. One system says Assigned. Another says In Stock. Then come the delays, duplicate shipments, and audit gaps. If onboarding, tracking, auditing, or recovery data gets out of sync, remote inventory breaks. Keeping Google Admin and ITAM records aligned closes that gap.
Quarterly audits help. So do automated last-contact updates and manual status changes at key handoffs. Together, they keep the record current. And when manual cleanup is needed, AssetRemix can centralize these records and require key fields before a device moves to the next stage.
Keep the record clean at each handoff and audit. Google Admin and your ITAM system should match at all times. That’s the whole point of the checklist: one current record that holds up through every handoff. One clean record keeps remote devices accounted for from shipment to retirement.
FAQs
What should IT do first when device records don’t match?
Start with a regular audit to find where the mismatch begins. First, confirm that identity mapping is correct by linking device identifiers - such as serial numbers or Google device IDs - to the right asset tags.
Next, use physical checks or device pinging to find duplicate serial numbers, missing tags, or wrong location data. Then update device status and user assignments as soon as possible.
How can IT handle devices that stop checking in for long periods?
Use IT asset management tools to track last sync dates, device status, and metadata like last login dates. That gives your team a simple way to spot devices that look inactive or missing.
If a device stays unresponsive, trigger recovery workflows, change its status from In Use to Pending Return, and keep accountability in your central tracking system.
Which fields matter most if the inventory process is just starting?
Start with the fields that give you a solid base:
- Serial number or asset ID
- Assigned user or owner
- Location
- Status
- Purchase date
- Warranty expiration
These fields help you identify each device, see where it is, check its current state, and manage it over time.