
Mass Enrollment for Chromebooks: Best Practices
Mass enrollment of Chromebooks simplifies setup for schools by enabling IT teams to enroll thousands of devices quickly using automated processes through the Google Admin Console. This method saves time and money compared to manual enrollment or white-glove services, which can cost $5–$25 per device. Key steps include preparing a deployment team, setting up enrollment stations, verifying inventory, and choosing the right enrollment method like Zero-Touch Enrollment (ZTE) or automated tools like Go-Box. Post-enrollment, tools like Chromebook Getter streamline metadata management, while AssetRemix supports lifecycle tracking. These processes ensure devices are secure, policy-compliant, and ready for classroom use.
Expert Chromebook enrollment tips (5 things to remember!)
sbb-itb-c68f633
Planning Before Enrollment
Getting everything in order - your workspace, team, and inventory - is key to a smooth deployment. Skipping these steps could lead to delays or unexpected issues.
Building Your Deployment Team
Your deployment team should be made up of individuals skilled in tasks like unboxing, physical setup, and initial device configuration. These team members will handle on-site logistics and address common issues as they arise.
To keep things running efficiently, separate device distribution from troubleshooting. Set up a dedicated support desk to manage Wi-Fi, configuration, or hardware-related problems. This approach ensures that the main enrollment line stays on track.
"Your IT teams will be responsible for distributing new devices to students and teachers, configuring final settings, and addressing any immediate technical issues. Remember that with your tech teams primarily focused on handing out devices, their bandwidth for other issues will be extremely limited." – Incident IQ
Use enrollment service accounts with restricted permissions instead of primary admin accounts. Configure these accounts to allow users to enroll or re-enroll devices only. If you're working with thousands of devices, create multiple unique accounts to avoid CAPTCHA flags or suspicious login alerts.
On deployment day, implement "out-of-office" protocols to free up IT staff for critical tasks instead of routine tickets.
Once your team is ready, shift your focus to setting up an efficient deployment station.
Creating a Deployment Station
Design your deployment station for batch processing. Set up tables to handle 10 devices at a time, along with 10 USB recovery drives and 10 automation tools like Rubber Duckies. This setup keeps the workflow manageable and avoids overloading your team.
Prepare your network ahead of time by using the Chromebook Recovery Utility to create USB drives loaded with the latest ChromeOS version. Updating devices via USB is much faster than relying on Wi-Fi, especially when enrolling hundreds of devices. This also helps prevent network congestion.
Make sure your station has enough power strips or charging stations to keep devices powered and ready to go without interruptions.
Before you start processing devices, accept Google's Terms in the Admin Console and enable the "Asset identifier during enrollment" feature. This allows you to input asset IDs and locations as part of the enrollment process.
With your station ready, the next step is to confirm your device inventory.
Verifying Device Inventory
After setting up your team and deployment station, double-check your device inventory. Count all Chromebooks and ensure the Admin Console is prepared to handle any new purchases. For used or previously signed-in devices, perform a full wipe or factory reset before enrollment. Remember, devices must be enrolled before any user logs in; otherwise, they won’t be properly registered in your domain.
Ensure all devices are running the latest version of ChromeOS using pre-created USB updates. This ensures consistency across devices and reduces strain on your network during enrollment.
If you’re using automation tools like Rubber Ducky, prepare at least 20 USB drives - 10 for the Chromebook Recovery Utility and 10 for enrollment scripts. Test your scripts on a few devices first to account for potential network or hardware issues before deploying them to your entire inventory. This small step can save you a lot of headaches later.
Enrollment Methods
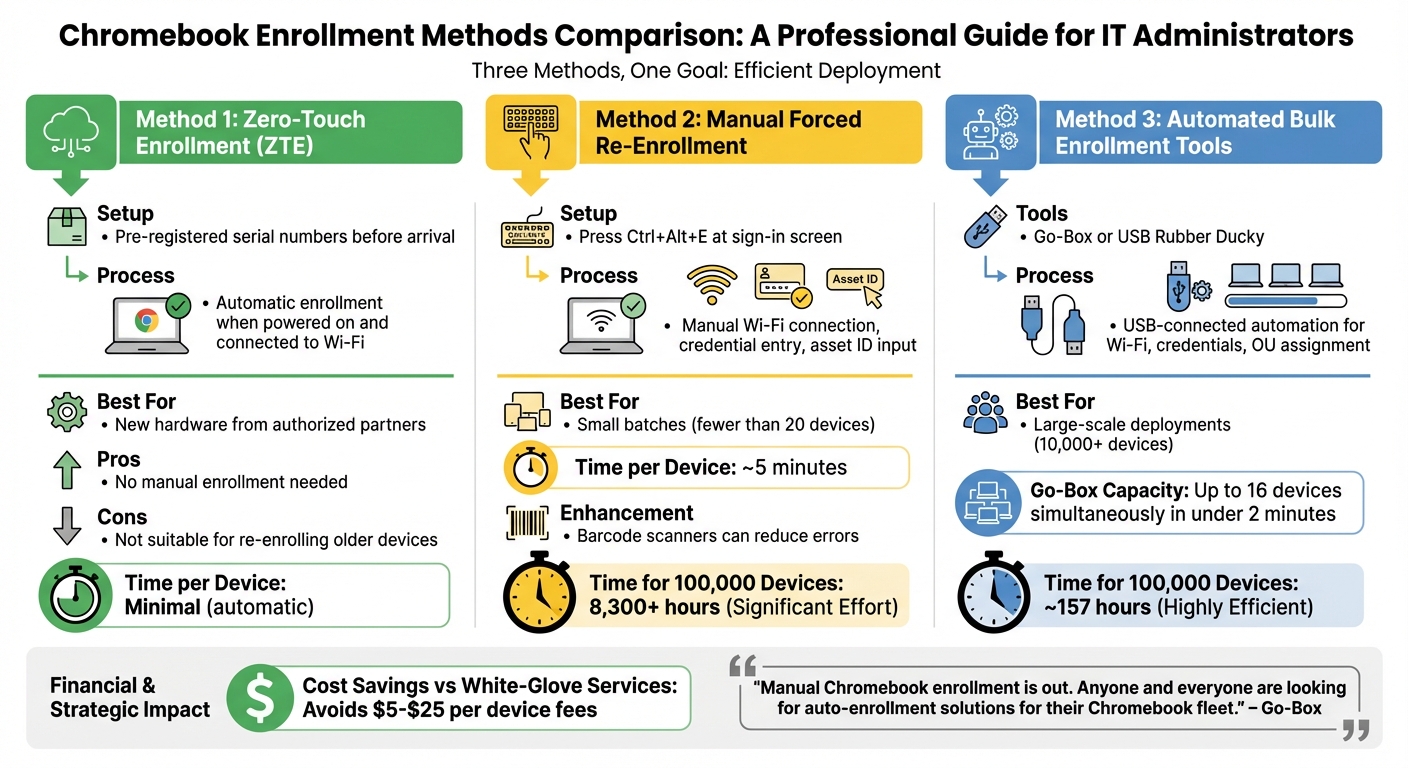
Chromebook Enrollment Methods Comparison: Time and Cost Analysis
Once your deployment station is set up and your device inventory is confirmed, it's time to choose the enrollment method that works best for your fleet size, available resources, and device type.
Here’s a breakdown of the main options:
Zero-Touch Enrollment
Zero-Touch Enrollment (ZTE) simplifies the setup process by pre-registering device serial numbers with Google before they even arrive at your location. When you buy Chromebooks from an authorized reseller or manufacturer, they register the devices using your organization's Customer ID and enrollment token. After the devices are powered on and connected to Wi-Fi, they enroll automatically. In the Google Admin Console, these devices appear as "Pre‑provisioned" until they connect to the internet, at which point their status updates to "Provisioned".
While ZTE eliminates the need to manually enroll each device, you’ll still need to handle post-enrollment tasks like updating the operating system, installing apps, and configuring policies. This method works best for new hardware purchased from authorized partners but isn’t suitable for re-enrolling older devices or models not registered through approved channels.
Manual Forced Re-Enrollment
Manual enrollment is a hands-on process that requires setup for each device individually. To start, power on the Chromebook and press Ctrl+Alt+E at the sign-in screen to access the enterprise enrollment page. From there, you’ll need to manually connect to Wi-Fi, enter your enrollment account credentials, and - if required - input the asset ID and location. This process takes about five minutes per device, which is manageable for small batches (fewer than 20 devices) but becomes a major time investment for larger fleets. For example, enrolling 100,000 devices could take over 8,300 hours.
To speed things up, barcode scanners can be used to enter usernames, passwords, and asset tags, helping to reduce typing errors. Also, make sure the Forced Enrollment policy is enabled in your Admin Console. This ensures that wiped or factory-reset devices must re-enroll before they can be used again.
Automated Bulk Enrollment Tools
For large-scale deployments, automated tools like Go‑Box or USB Rubber Ducky can streamline the process by mimicking user actions. These tools connect to Chromebooks via USB and handle tasks like Wi-Fi setup, credential entry, and assigning devices to specific organizational units. Go‑Box, for instance, can enroll up to 16 devices simultaneously in under two minutes. For a fleet of 100,000 devices, this can cut down processing time from over 8,300 hours to around 157 hours.
Go‑Box is ideal for IT teams looking for a straightforward solution, while USB Rubber Ducky offers a more budget-friendly option. However, the latter requires scripting knowledge to create a "Duck Script" on a microSD card, along with thorough testing to ensure compatibility across different device models.
"Manual Chromebook enrollment is out. Anyone and everyone are looking for auto-enrollment solutions for their Chromebook fleet." – Go‑Box
Automated tools are particularly useful for large-scale 1:1 programs, annual re-enrollments, or managing devices that don’t support Zero-Touch Enrollment. If your district needs to re-enroll devices every year, investing in an automation tool can save money in the long run compared to recurring white-glove service fees, which typically range from $5 to $25 per device.
Once your devices are enrolled, the next step is configuring them to match your institution’s policies and requirements.
Configuration After Enrollment
Once enrollment is complete, the next step is configuring devices to align with school policies. This phase ensures every Chromebook is secure and ready for classroom use, maximizing the benefits of mass enrollment.
Device Organization and Naming
After enrollment, organizing Chromebooks into Organizational Units (OUs) within the Google Admin Console is essential. OUs allow you to group devices by categories such as school, grade level, specific classes, or special programs like IEPs.
To streamline tracking, link asset tags to the Device ID or Serial Number - required fields in the Google Admin Directory. Using the "Asset identifier during enrollment" setting helps automate metadata updates during this phase.
The Google Admin Console provides detailed metadata, including Chrome OS versions, last login dates, and firmware details. This information is invaluable for troubleshooting and resolving support requests. Regular audits via the "Devices audit log" can also help monitor student activity, such as account additions or password compliance issues.
Installing Apps and Setting Policies
Once devices are organized, head to the Admin Console's Device Management and User & Browser Settings sections to define policies. Key settings include:
- Disabling guest mode
- Enforcing internet usage restrictions
- Enabling data encryption
Additionally, you can lock Chromebooks to specific Google accounts and enable two-factor authentication (2FA) for enhanced security.
Pre-install critical educational apps and extensions, like Google Classroom, to ensure devices are ready for immediate classroom use. Configuring update policies is equally important - this ensures devices automatically receive the latest ChromeOS updates for better security and performance. For shared management, you can also create custom administrator roles, granting specific permissions without providing full "Super Administrator" access.
To simplify bulk metadata updates, consider using Chromebook Getter.
Managing Metadata with Chromebook Getter
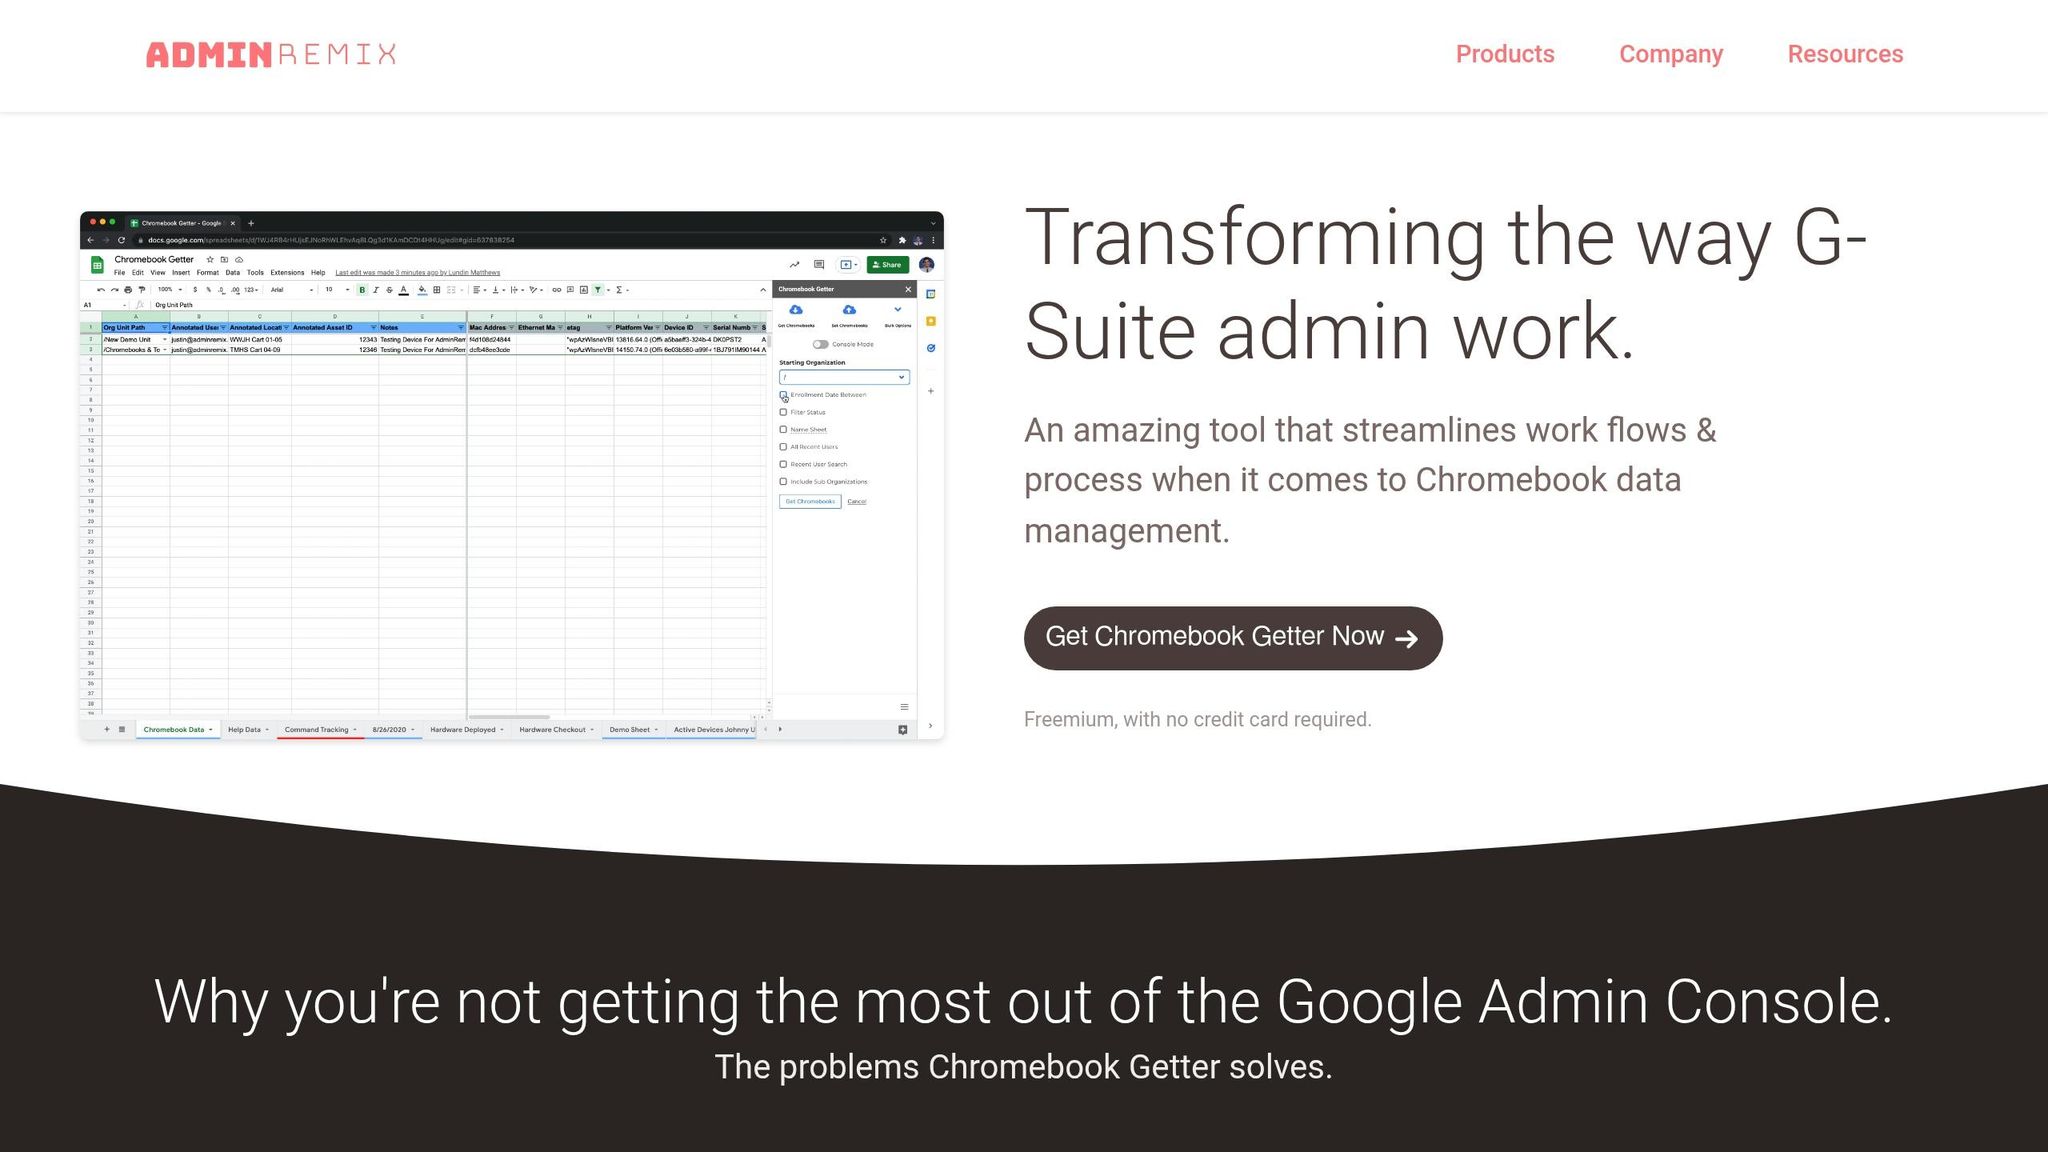
For large-scale metadata management, Chromebook Getter is a powerful tool that allows you to edit annotated fields directly in Google Sheets. This tool makes it easy to update fields like Asset ID, location, assigned user, and device-specific notes for hundreds or even thousands of devices simultaneously. It also enables bulk movement of devices across OUs to apply the right policies.
"This tool pulls device serial numbers right from the Chrome Admin console to your Google spreadsheet, along with any metadata you've assigned the machines." – AdminRemix
Chromebook Getter also generates reports on OS versions, Auto Update Expiration (AUE) dates, and activity history for your entire fleet. Curtis Doherty, a user of the tool, shared:
"Chromebook Getter has been an amazing tool in my Chromebook management process. I’ve been able to ditch GAM when it comes to Chromebooks".
The tool offers a free tier (500 uploads per month) and affordable options for unlimited uploads, making it a valuable resource for managing large Chromebook deployments.
Improving IT Workflows with AdminRemix

AdminRemix simplifies IT workflows by combining metadata management with integrated asset management, seamlessly linking device enrollment with lifecycle management.
Bulk Metadata Management with Chromebook Getter
Chromebook Getter transforms how IT teams handle Chromebook metadata. By allowing bulk downloads, edits, and uploads through Google Sheets, it eliminates the need for command-line tools. The tool pulls device serial numbers and metadata directly from the Google Admin Console, streamlining the unboxing and enrollment process while cutting down on manual data entry.
Philip Helmers from SWBOCES LHRIC shared his experience with the tool:
"I signed up for Chromebook Getter because it's faster than getting what I need with GAM command lines." – Philip Helmers, SWBOCES LHRIC
The tool’s Upload and Download Service Workers make managing large fleets even easier. IT administrators can move devices across Organizational Units in bulk and execute fleet-wide commands - like deprovisioning, disabling, power washing, or rebooting devices - straight from the spreadsheet.
With over 3 million installs on the Google Workspace Marketplace and adoption by more than 350 premium G‑Suite administrators, Chromebook Getter has become a go-to solution for schools handling mass Chromebook deployments. The tool offers a free plan with 500 uploads per month. Paid plans start at $9.08 per month for unlimited uploads, with premium options up to $20.75 per month, which include features like Auto Update Expiration (AUE) reports and telemetry data.
Complete Asset Management with AssetRemix
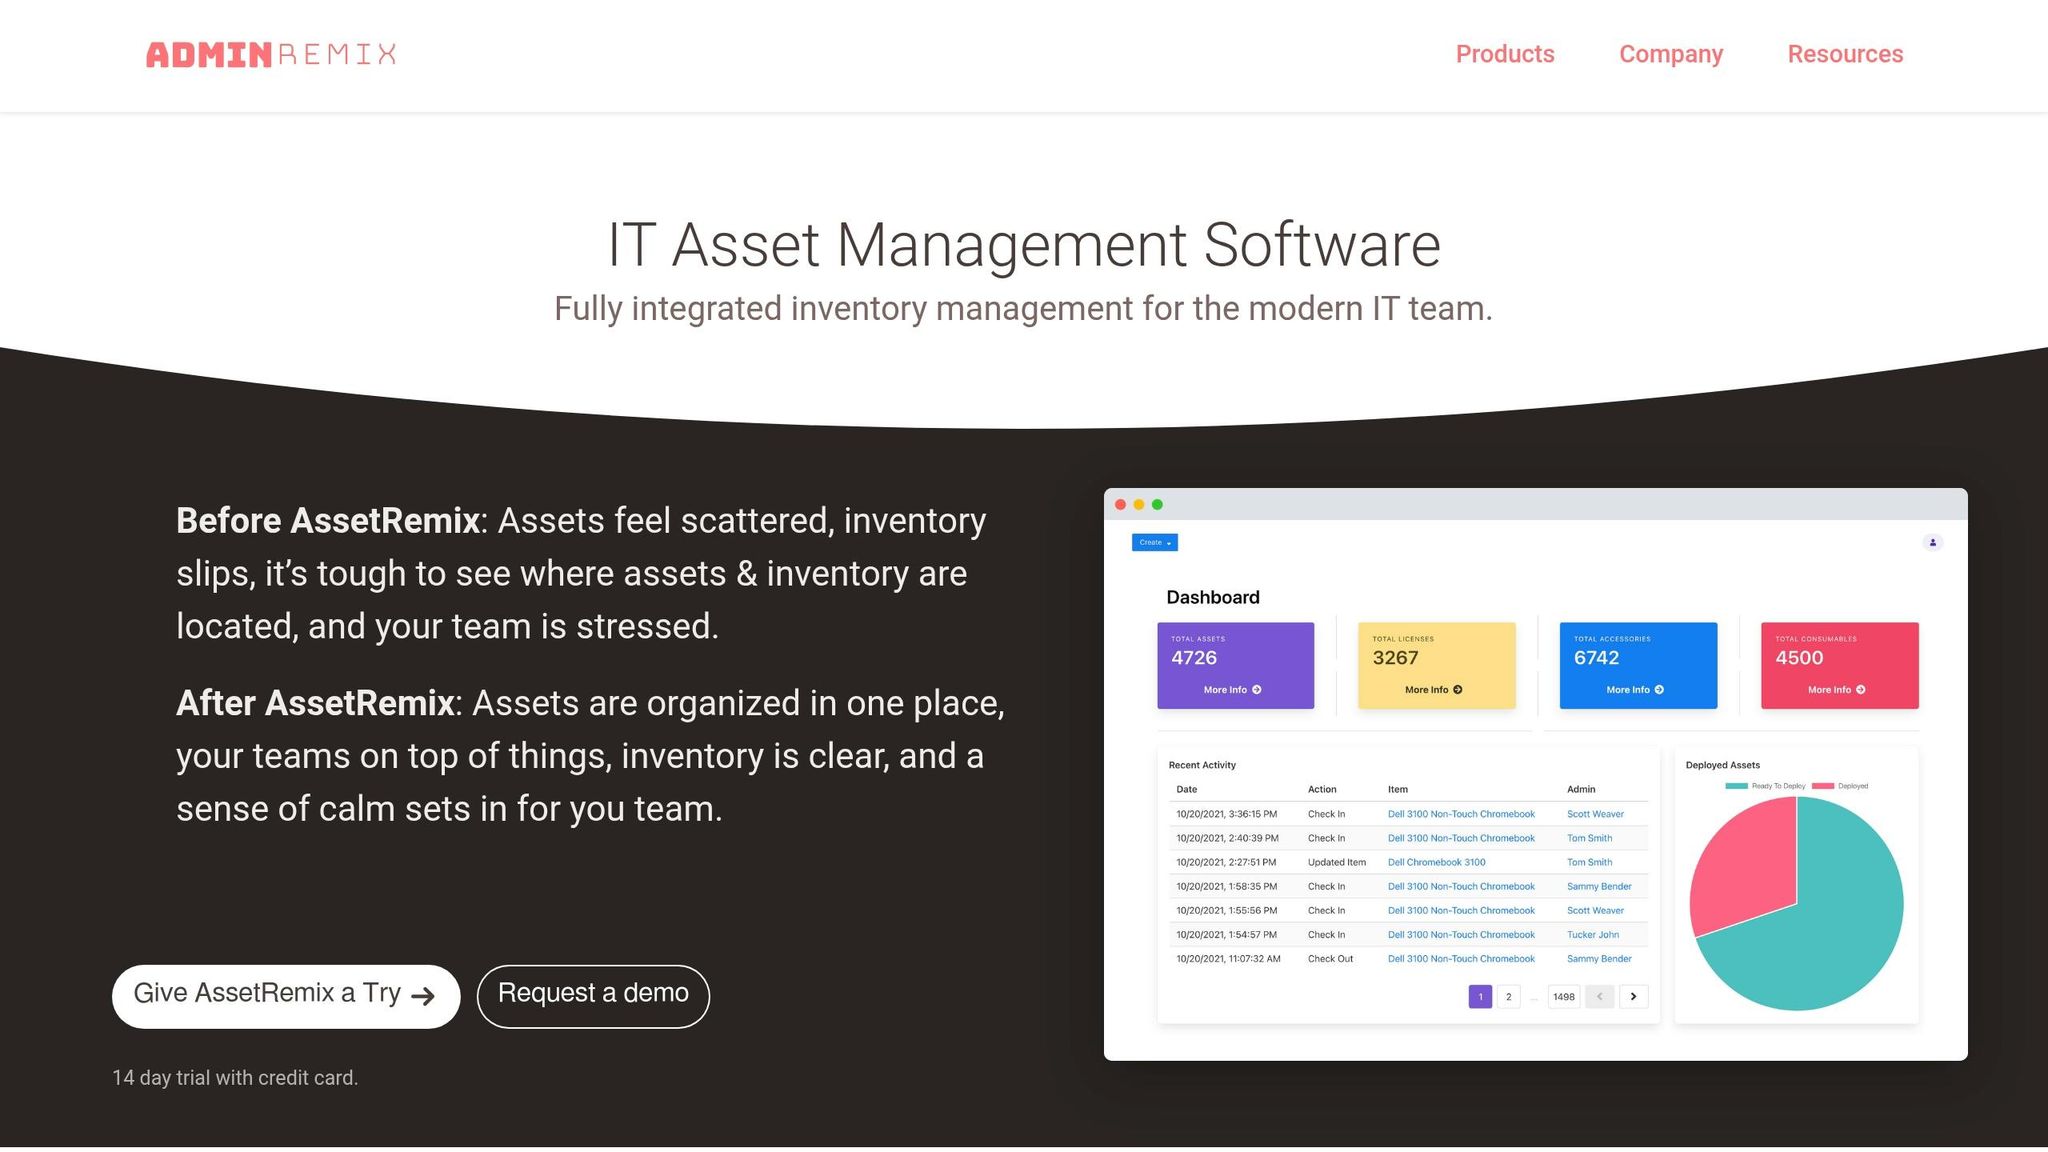
While Chromebook Getter focuses on bulk metadata tasks, AssetRemix delivers full-spectrum IT asset management and help desk support across a device’s lifecycle. It integrates directly with Google Admin, enabling administrators to map Asset Tags to Google Device IDs or Serial Numbers for automated data synchronization. The "Checked Out User" field helps track which student or staff member is assigned to a device.
AssetRemix goes beyond the standard Google Admin Console by supporting check-in/check-out workflows, maintenance tracking, and auditing. IT teams can filter devices by status - like active or deprovisioned - and generate detailed reports for compliance and audit purposes. Custom field mapping allows schools to track data specific to their needs.
For schools managing large Chromebook deployments, the combination of Chromebook Getter’s metadata tools and AssetRemix’s lifecycle tracking provides a robust management system. AssetRemix is available at $99/month or $999/year, covering unlimited assets and help desk support.
Conclusion
Deploying Chromebooks on a large scale requires careful preparation to avoid unnecessary headaches. Thoughtful pre-enrollment planning can save significant time and money while minimizing the chaos of managing hundreds - or even thousands - of devices at once.
Selecting the right enrollment method is a critical step. After the initial enrollment process, choosing an efficient method ensures smoother configurations down the line. Zero-Touch Enrollment (ZTE) is ideal for new devices, eliminating the need for manual setup. For older devices that don’t support ZTE, automated tools like USB Rubber Ducky scripts can handle mass enrollment effectively. For districts managing fleets of over 10,000 devices, relying on automated workflows isn’t just helpful - it’s essential. Manual setup simply isn’t feasible at that scale.
Once devices are enrolled, bulk management tools become indispensable for maintaining efficiency. For example, Chromebook Getter is 75% faster than the standard Google Admin Console when it comes to searching and editing device data. Bulk operations, such as disabling, re-enabling, or deprovisioning devices, allow IT teams to make fleet-wide changes in a fraction of the time it would take manually. These tools not only streamline post-enrollment tasks but also ensure the ongoing integrity of the deployment process.
The workflows and automation tools outlined earlier tie every aspect of Chromebook management together. By integrating tools like AssetRemix with Google Admin Console, schools can automatically sync asset tags, serial numbers, and user assignments, keeping records accurate and up-to-date without extra effort.
Districts that implement these systems early avoid common pitfalls like misplaced devices, messy inventory records, and IT teams bogged down in manual data entry. Investing in planning and automation upfront ensures smoother operations and long-term success for the entire Chromebook lifecycle.
FAQs
Which Chromebook enrollment method fits my district’s size and device mix?
The right approach varies depending on your district’s size and available devices. For larger districts, Zero-Touch Enrollment works best because it allows for automatic, bulk provisioning with very little manual effort. If your district manages a moderate number of devices, manual enrollment with barcode scanning offers a budget-friendly and efficient solution. Additionally, tools like Go-Box can simplify large-scale setups, especially for districts with limited IT resources. Your choice should align with your specific needs, the size of your device fleet, and the resources your IT team has available.
What should we set up before enrollment day to avoid bottlenecks?
To avoid delays on enrollment day, it's smart to set up zero-touch enrollment ahead of time. Start by creating pre-provisioning tokens in the admin console and linking them to the appropriate organizational units (OUs). Then, share these tokens with your pre-provisioning teams. Taking care of these configurations in advance streamlines the process, cutting down on manual work and enabling quicker, more efficient device enrollment.
How do we keep asset tags, OUs, and assignments accurate after enrollment?
To keep asset tags, OUs, and assignments accurate after enrollment, it's essential to maintain proper synchronization and mapping. Start by linking asset tags to the Device ID or Serial Number in the Google Admin Console. Make sure synchronization is enabled for the necessary fields, and perform regular manual syncs to catch any discrepancies.
It's also a good idea to periodically review and update OUs and user assignments to ensure they reflect the current status of devices. Using bulk management tools can save time and simplify this process, helping you stay organized and aligned with actual device usage.