
How to Test Third-Party Apps for Chromebook Compatibility
If a Chromebook app only installs, that tells you almost nothing. I need to know five things before rollout: does it install, open, sign in, run the main tasks, and still work under ChromeOS policy controls?
Here’s the short version:
- I set up a test OU that mirrors production
- I test each app type on its own install path
- I check forced install, user install, and permissions
- I run the app on different device models, ChromeOS versions, and AUE windows
- I log results by app version, device, OU, and pass/fail status
- I end with one decision: approved, restricted, or blocked
ChromeOS fleets often include mixed hardware and mixed OS versions. Even a small change - like touch vs. non-touch, clamshell vs. convertible, or an older build near AUE - can change test results. And since Android, web/PWA, Linux, and kiosk apps all behave differently, I test them separately instead of assuming one pass covers all four.
A simple way to think about it: same app, same test steps, different device groups. That gives me clean results I can compare later after a ChromeOS update or a new app release.
This article lays out that process in plain steps so I can test once, document it well, and avoid support issues after deployment.
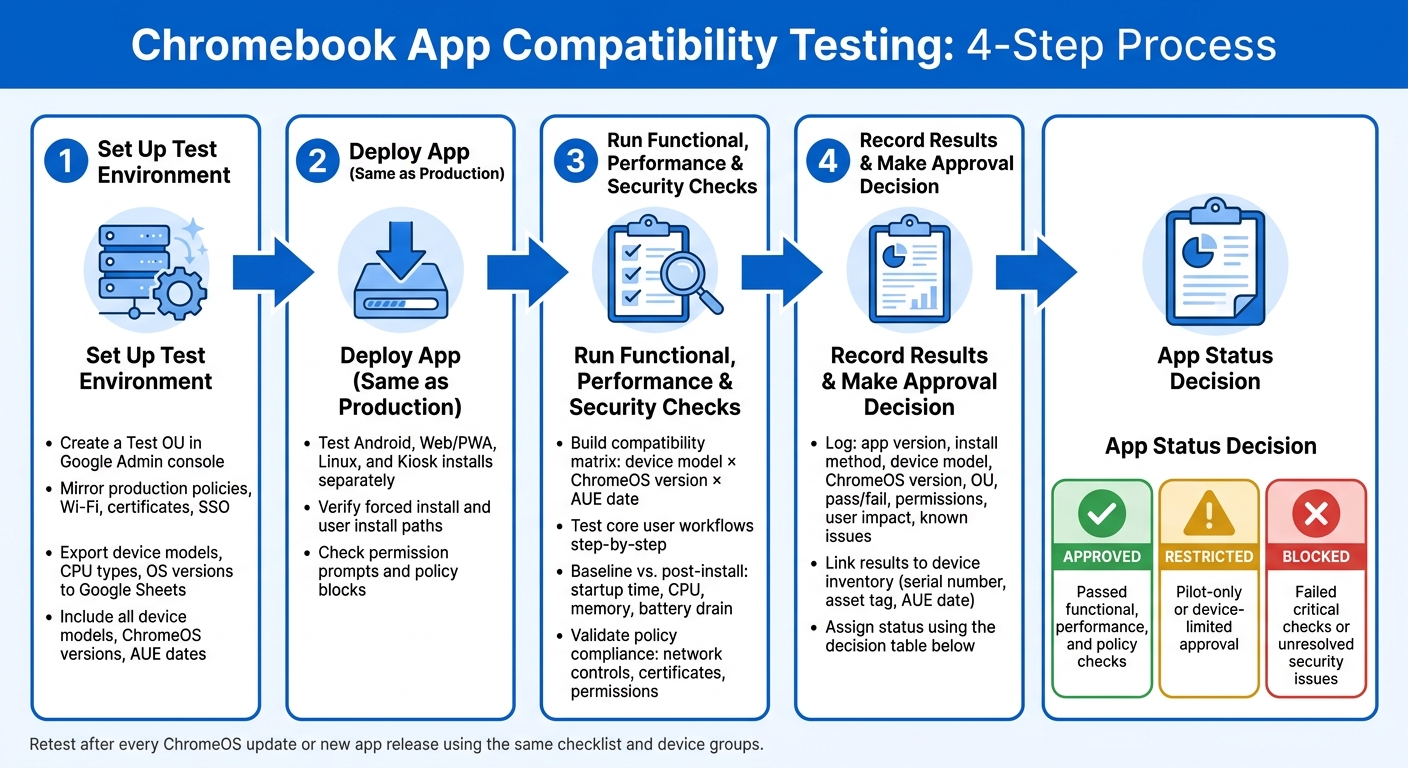
Chromebook App Compatibility Testing: 4-Step Process
1. Set up a controlled ChromeOS test environment
Use the device and app variables identified above to build a separate test environment that mirrors production without affecting users.
Create a test OU and assign the right devices
Create a separate Test OU in the Google Admin console. This keeps compatibility testing away from production policies and day-to-day users.
Once the OU is ready, move a small, representative group of devices into it. Keep the sample small, but make sure it includes each device model, CPU type, and ChromeOS version in scope.
Use Chromebook Getter's "Set Chromebooks" action to bulk-update the OU path for serial numbers from Google Sheets.
With the test OU in place, apply the same production controls users depend on.
Apply baseline policies, network settings, and certificates
Mirror production Wi-Fi, content filters, proxy settings, SSL certificates, SSO, sign-in rules, app policies, and user permissions before testing.
If an app breaks because of a certificate mismatch or a blocked proxy, you want to find that out here, not after rollout.
That baseline gives you a clear standard for every app test that comes next.
Use AdminRemix Chromebook Getter to plan test coverage
Use Chromebook Getter to export device models, CPU types, and ChromeOS versions into Google Sheets so you can build a representative test sample.
From that spreadsheet, filter by OS version and model to check that your test OU includes the hardware and software mix you want to validate. You can also use Chromebook Getter's reporting to compare OS versions across multiple organizational units.
That way, you don't end up testing just one device type or one ChromeOS build while problems show up somewhere else in the fleet.
2. Deploy the third-party app the same way users will get it
With the test environment ready, check each deployment path the same way users will get it in production. Test every path on its own so install, sign-in, and permission problems show up before rollout.
Test Android, web/PWA, Linux, and kiosk installs separately
For each app type, confirm the exact install path users will use. Android apps, web apps and PWAs, Linux apps, and kiosk apps each come with their own install flow, permission setup, and points where things can fail.
If you test them all together, it's easy to miss a problem tied to just one path. Running them separately makes it much easier to spot what broke and where.
Check forced install, user install, and permission behavior
Keep an eye on which users and devices get the app. For forced installs, make sure the app deploys on its own with no user action. For user installs, check that the app shows up in the right place and that users can install it without elevated permissions.
In both cases, confirm that permission prompts work the way you expect and that no policy blocks access to the features the app needs.
Once deployment works as expected, move to functional and performance checks.
3. Run functional, performance, and security checks
Once deployment is confirmed in the test OU, run the same checks across each device group. The goal is simple: use one repeatable process so any admin can run the tests and compare results side by side.
Build a simple compatibility test matrix
Set up the matrix around device model, ChromeOS version, and AUE date. Use Get Chromebooks in Chromebook Getter to export device metadata to Google Sheets. From there, filter by OS version and AUE date to spot the oldest or lowest-spec devices for baseline testing.
That gives you a clear way to compare results across:
- device models
- OS versions
- deployment paths
Test core workflows and user experience
Run the app through the workflows users depend on most. Stick to the exact user path, step by step, and log any issue with the matching device model, ChromeOS version, and deployment path.
That level of detail matters. If something breaks, you want to know whether the problem showed up on one device line, one OS build, or only through one deployment route.
Check performance, battery use, and policy compliance
Before you install the app, record a clean-device baseline for:
- startup time
- CPU use
- memory use
- battery drain
After installation, run those same checks again and compare the results. Put extra focus on lower-spec devices and devices nearing their AUE dates. They usually show performance issues first.
On the policy side, make sure the app works as expected under your managed restrictions. That includes network controls, certificate requirements, requested permissions, and locked settings.
Use Chromebook Getter to move test devices between OUs and confirm that permissions and settings change with the assigned OU. If a feature gets blocked by policy, document it in the test record. Then carry those findings into the approval review in the next step.
sbb-itb-c68f633
4. Record results and decide whether to approve the app
Once testing is done, write the results down and make the approval call. Keep this tied to the same device groups you used during testing so the decision is based on data you can check again later.
Document results by app version, device type, and ChromeOS version
Each test record should use the same fixed fields in a shared Google Sheet so another admin can follow the trail without guessing. At a minimum, record the app version tested, install method, device model, ChromeOS version, OU, pass/fail status, permissions, user impact, known issues, and any workarounds.
That consistency matters. If something breaks, you want to trace it back to a specific release, device family, or ChromeOS version instead of digging through messy notes. And if you need to retest after a ChromeOS update or a new app release, run the same checklist against the same device groups so the results line up cleanly.
Connect test results to asset inventory with AdminRemix
Don’t keep test results off to the side. Store them next to the device record so approval status stays linked to the fleet.
Use Chromebook Getter to pull Chromebook data into Google Sheets, including device ID, serial number, asset tag, ChromeOS version, AUE date, and OU assignment. Then add your app testing columns, such as app version, pass/fail status, permissions, user impact, and known issues.
After that, the Set Chromebooks action can sync those results back to the Admin console, which helps keep inventory and compatibility status in step. You can also connect compatibility findings to lifecycle records in AssetRemix to guide rollout and refresh decisions.
Assign an approved, restricted, or blocked status
Use the recorded results to pick one of three statuses:
| Status | When to use it |
|---|---|
| Approved | App passed the required functional, performance, and policy checks for the target devices and ChromeOS versions |
| Restricted | Use Restricted for pilot-only or device-limited approval |
| Blocked | App failed critical checks or has unresolved security or compatibility problems |
After you make the decision, use bulk OU updates to move devices into the right groups, or update device notes so the status is easy to spot later. If the app is blocked while you wait for a vendor fix, set a review date. Then schedule the next retest for the next app release or ChromeOS update.
Conclusion: Build a repeatable Chromebook app testing process
Put these steps together, and you get a repeatable Chromebook app testing process. The idea is simple: test in a controlled OU, deploy the app the same way users will get it, check the main workflows, and log the results against your device inventory.
Skip even one step, and blind spots can creep in. Those gaps often show up later as support tickets after rollout. A fixed checklist helps teams move approvals along faster and makes retesting much easier.
It also helps to tie test results directly to device inventory. That way, each approval stays linked to the right model, serial number, OU, and ChromeOS version. In plain terms, rollout choices stay tied to actual fleet data across device models, ChromeOS versions, and OUs.
The end goal is a process you can use again and again, so every app decision is based on data. That turns compatibility testing into a standard IT workflow instead of a one-off task.
FAQs
How many devices should I include in a Chromebook app test?
Include about 5% of your devices in a dedicated test Organizational Unit (OU). That gives you a small, controlled group to spot problems and fix them before you roll changes out across your full fleet.
It also helps to put this group on the Beta or Dev channel. That way, you can catch compatibility issues early without disrupting the rest of the organization.
What should I do if an app works on some Chromebooks but fails on others?
Check whether the issue lines up with certain Chromebook models or ChromeOS versions. A pattern like that can save you a lot of time.
In the Google Admin console, group devices by model so you can see if one device line is acting up more than others. Then use Chromebook Getter to review ChromeOS versions across organizational units. If one OU is stuck on an older release, that’s often a big clue.
Next, make sure the app is allowlisted for every relevant organizational unit. It’s easy to miss one OU and end up chasing the wrong problem. You’ll also want to confirm that devices have the permissions the app needs, especially if it relies on camera, microphone, storage, or other system access.
After that, open the device details page in the Admin console and look for signs of update failures or system log errors. Those logs can point to failed installs, policy mismatches, or OS issues that don’t show up at first glance.
How often should I retest apps after ChromeOS or app updates?
Retest third-party apps on the ChromeOS release cycle. Google usually ships security patches every two to three weeks and full OS updates about every four weeks, so your app testing should follow that same rhythm.
For upcoming changes, use the Dev channel for compatibility testing nine to twelve weeks before general release. That gives your team time to spot issues early and keep apps stable as devices update on the Stable channel automatically.