
How to Sync Google Sheets with IT Asset Data
Managing IT assets can be overwhelming when data is scattered across systems. Syncing this data with Google Sheets simplifies the process, allowing you to centralize inventory details like serial numbers, warranty dates, and assigned users. Using tools like Google Apps Script, REST APIs, or add-ons, you can automate updates, reduce errors, and streamline workflows. This article explains how to integrate IT asset data into Google Sheets, set up automated syncs, and maintain accurate records for better decision-making.
Key Takeaways:
- Sync Methods: Use Google Sheets add-ons for simplicity, Apps Script for custom workflows, or REST APIs for full control.
- Required Setup: Google Workspace account, IT asset management tools, and OAuth 2.0 credentials for API integration.
- Automation: Create triggers to automate updates, ensuring your data stays current without manual intervention.
- Best Practices: Organize spreadsheets with clear columns, protect sensitive data, and validate fields to maintain accuracy.
How to Use Google Sheets API with Python: Read, Write, Update, Delete
sbb-itb-c68f633
Planning Your Sync Workflow
Comparison of Google Sheets Sync Methods for IT Asset Management
Before diving into tool connections, it’s essential to map out how your IT asset data will flow into Google Sheets. Think about your team’s technical expertise, how often updates are needed, and what actions you want to perform with the data. This planning step sets the stage for the detailed integration steps covered in the next sections.
Selecting Your Sync Method
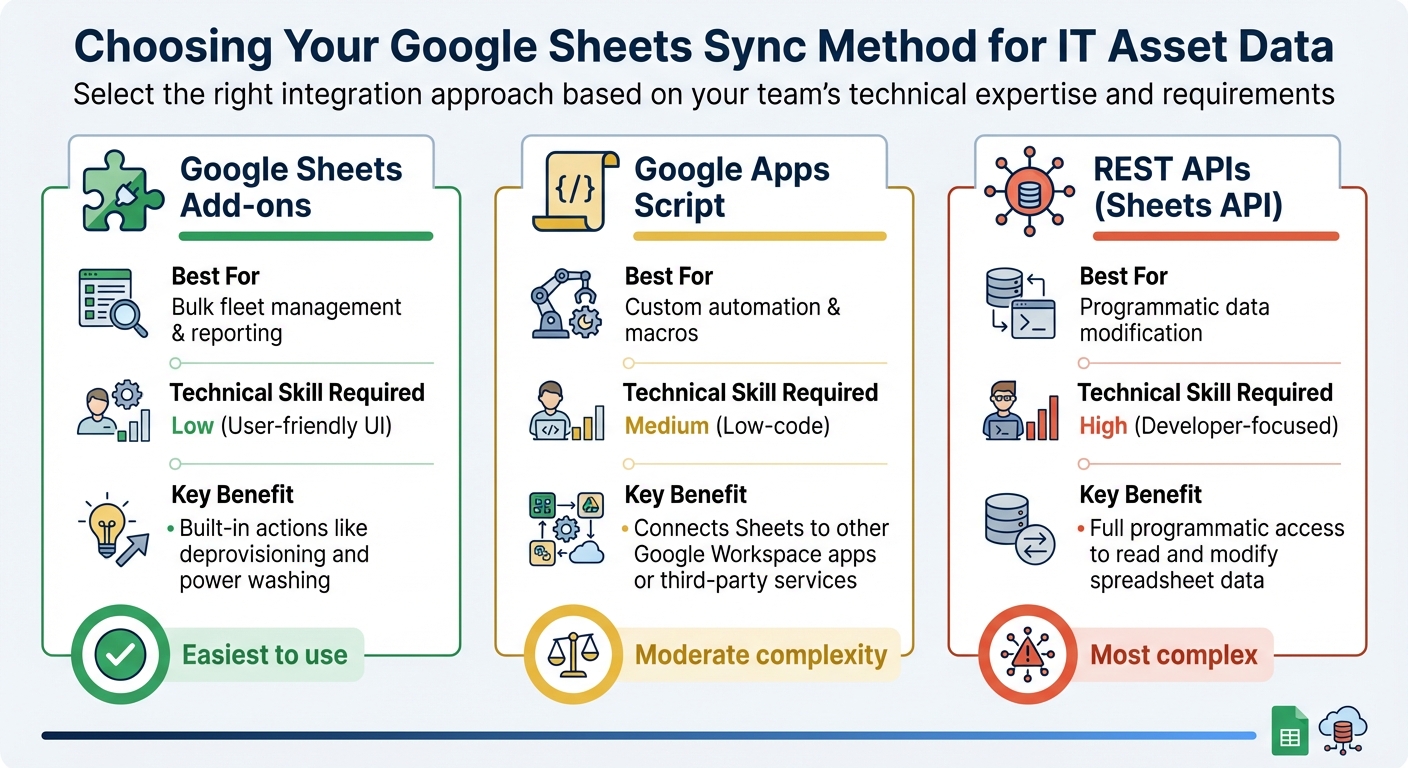
When it comes to syncing IT asset data with Google Sheets, there are three main methods to consider. Each one varies in complexity, functionality, and the level of technical know-how required. Here’s a quick breakdown:
| Method | Best For | Technical Skill Required | Key Benefit |
|---|---|---|---|
| Google Sheets Add-ons | Bulk fleet management & reporting | Low (User-friendly UI) | Built-in actions like deprovisioning and power washing |
| Google Apps Script | Custom automation & macros | Medium (Low-code) | Connects Sheets to other Google Workspace apps or third-party services |
| REST APIs (Sheets API) | Programmatic data modification | High (Developer-focused) | Full programmatic access to read and modify spreadsheet data |
Google Sheets Add-ons are the easiest to use, offering a simple interface for bulk fleet management and reporting tasks. If you’re looking for something more flexible, Google Apps Script provides a low-code environment for creating custom workflows and integrating with other tools. For those with advanced development skills, REST APIs (like the Google Sheets API) allow full control over reading and modifying spreadsheet data.
When deciding, think about whether bulk management capabilities are important to you. Tools designed for bulk actions save time by automating repetitive tasks. Also, consider if you need actionable data - some methods allow you to execute commands like bulk deprovisioning or power washing devices, while others simply sync information. AdminRemix tools can simplify these processes further.
Using AdminRemix Tools for Integration
Once you’ve chosen a sync method, AdminRemix tools can help streamline your IT asset management. With over 3 million installs on the Google Workspace Marketplace, AdminRemix’s Chromebook Getter and User Getter have become popular solutions for IT teams.
Chromebook Getter, for example, transforms Google Sheets into a powerful IT management hub. It pulls key device data - like serial numbers, AUE dates, and OS versions - directly into a spreadsheet. From there, you can edit metadata in bulk and upload changes back to the Google Admin Console in just minutes.
Here’s what Curtis Doherty, a Chromebook Getter user, had to say about the tool:
"Chromebook Getter has been an amazing tool in my Chromebook management process. I've been able to ditch GAM when it comes to Chromebooks".
Setting up the integration is straightforward. During the process, you’ll map fields like your Asset Tag to the Device ID or Serial Number to ensure everything syncs correctly with Google Admin. You can also filter the sync to focus only on the assets that matter most to your team.
AdminRemix tools offer a freemium model, so you can test the workflow without needing a credit card. This makes it easy to explore its features before committing to a paid plan.
Preparing Google Sheets for IT Asset Management
After selecting your sync method, it’s time to set up a well-structured Google Sheets file. A clear and organized spreadsheet makes IT asset management much more efficient.
Building Your IT Asset Structure in Google Sheets
To start, design your spreadsheet to reflect the data you plan to sync. Use separate tabs for categories like Assets, Users, and Lookups. This approach reduces clutter and ensures smooth performance, even when managing thousands of devices.
For the Assets tab, include these key columns:
| Column Header | Data Type | Purpose |
|---|---|---|
| Asset Tag | String/ID | Primary identifier; links to Serial or Device ID |
| Serial Number | String | Required for syncing with Google Admin Directory |
| Device ID | String | Unique ID assigned by Google |
| Status | Dropdown | Tracks lifecycle (e.g., Active, Shipped, Repair, Retired) |
| Assigned User | Email/String | Identifies the person currently using the asset |
| Location / OU | Dropdown | Denotes Organizational Unit or physical location |
| AUE Date | Date (MM/DD/YYYY) | Auto Update Expiration for budgeting and planning |
| Purchase Cost | Currency (USD) | Tracks cost for financial planning and depreciation |
| Warranty Date | Date (MM/DD/YYYY) | Monitors warranty coverage expiration |
| Last Known IP | String | Helps identify off-campus device usage |
Group related columns together, such as device metadata, assignment details, and lifecycle information, to make tracking and updates easier.
Setting Up Data Validation and Protection
Data validation is critical for maintaining consistency and avoiding errors. For fields like Status or Location, use dropdown menus with predefined options. This ensures uniform terms like "Active", "Shipped", "Repair", or "Retired", which are essential for accurate reporting. You can create dropdown menus by navigating to Data > Data validation.
Protecting sensitive information is equally important. Use the Data > Protect sheets and ranges feature in Google Sheets to secure columns containing confidential details like purchase costs or serial numbers. You can set these protections to either warn users before editing or restrict editing to specific individuals. To see which cells are protected, go to View > Show > Protected ranges, which will visually highlight locked areas.
Once your spreadsheet is set, align its columns with AdminRemix fields to complete the integration.
Mapping Google Sheets to AdminRemix Data
With your sync method selected, the next step is mapping your spreadsheet fields to AdminRemix data. Go to the Integrations section in the AdminRemix dashboard and select "Chromebook." If you’ve synced before, use the Refresh Token option to maintain a secure connection.
During the mapping process, link your Google Sheets columns to the corresponding AdminRemix fields. It’s essential that the Asset Tag column connects to either the Device ID or Serial Number, as these fields are mandatory in the Google Admin Directory. Enable syncing for each mapped field.
Make sure any user field already exists in AssetRemix, as missing fields can cause sync errors. You can also filter which Chromebook statuses to sync. If no specific status is chosen, the system will import all devices, including deprovisioned ones.
For added convenience, tools like Chromebook Getter can automate much of this process. This tool pulls data such as AUE dates, OS versions, and last known IP addresses directly into your spreadsheet. It minimizes manual work and keeps your records up to date. Philip Helmers from SWBOCES LHRIC shared his experience:
"I signed up for Chromebook Getter because it's faster than getting what I need with GAM command lines."
After mapping your fields, click Save in the bottom right corner, then Execute and Sync in the top left to start the data transfer.
Automating the Sync Process
Once you've structured and mapped your Google Sheets, the next step is to automate the data flow. Automation takes the hassle out of repetitive manual updates and ensures your IT asset records stay accurate without constant monitoring.
Configuring API or Add-On Integrations
To automate synchronization, you can either configure API access or install add-ons. For Google Sheets, start by opening the Apps Script editor (found under Extensions > Apps Script). Navigate to Services, click Add a service, and select the Sheets API. This setup allows your scripts to programmatically read and write data.
If you're working with third-party IT asset management systems, you'll need API credentials. For example, your IT asset management platform might require a Client ID, Client Secret, and specific API permissions, such as "Update Mobile Devices" or "Read User". To keep these credentials secure, store them as Script Properties in Project Settings instead of hard-coding them.
Before running a full sync, test API calls on a small sample to confirm that your field mappings and authentication are functioning as expected. The first time you execute a custom script, Google will prompt you to Review permissions and Allow the script to access your account data. Once API access is established, you can proceed to schedule automated triggers.
Creating Automated Workflows
With your API setup complete, you can use time-driven triggers to turn one-time scripts into automated workflows. In Google Sheets, go to Extensions > Apps Script and click the clock icon to open the Triggers menu. Here, you can schedule updates to run hourly, daily, or weekly - whatever suits your organization's needs.
Make sure to use the spreadsheetId and sheetId from the URL for stable references, even if the sheet names change. Always back up your IT asset database before running a new sync script, as many automation workflows overwrite existing data.
Syncing AdminRemix Data
AdminRemix offers tools like Chromebook Getter and User Getter for managing bulk metadata directly in Google Sheets. To sync Chromebook data, log in to the AdminRemix dashboard and go to Integrations > Chromebook. Ensure you're signed in with a Google Admin account that has the necessary permissions.
Toggle Sync On for each field you want to update. At least one field must be linked to either Device ID or Serial Number, as these are required by the Google Admin Directory. You can also filter which device statuses to sync - for instance, choosing only "Provisioned" or "Shipped" devices helps keep your sheet focused on active inventory. If no status is selected, the system will import all devices by default.
Once configured, the sync runs automatically based on your schedule, keeping your Google Sheets up-to-date with the latest asset information - no manual intervention required.
Maintaining and Monitoring Your Sync
Once your automation is up and running, it's crucial to ensure the data remains accurate. This phase focuses on maintaining the integrity of your automated sync setup. Start by comparing row counts between your IT asset system and Google Sheets. For instance, if your asset management platform lists 1,250 devices but your sheet only has 1,180 rows, something’s off - likely due to an API timeout or skipped sheet caused by empty headers.
Checking and Reconciling Data
Proper field mapping and API configuration can prevent many common errors. Ensure that Asset Tags are correctly aligned with identifiers like Device ID or Serial Number to avoid issues like duplicates or silent failures. Time zone alignment is another common pitfall. Misaligned time zones can cause timestamp discrepancies, so make sure both systems operate in the same time zone.
Set up automated notifications to confirm the successful completion of each sync. For a more thorough check, monitor the total number of cells in your spreadsheet to ensure it stays within Google Sheets' 10 million cell limit. Exceeding this limit can cause sync failures.
Fixing Errors and Conflicts
When errors or conflicts arise during a sync, follow these steps to address them. Start by reviewing sync logs for error codes, such as 500, or messages like "skipped sheet". Duplicate records are another common issue. Without a unique identifier like Serial Number or Device ID, your sync tool might create duplicates.
Always treat your IT asset management system as the source of truth. Any changes made directly in Google Sheets could be overwritten during the next sync cycle. For example, if a field name in your source system changes - say, "Status" becomes "Device Status" - the sync will fail until the mapping is updated. Also, be on the lookout for data type mismatches; if numbers are formatted as text in Google Sheets, calculations and formulas may not work correctly.
Improving Performance
To keep your automated workflow running smoothly, focus on optimizing your spreadsheet. Regularly archive old data to maintain speed and responsiveness. For example, move assets that have reached end-of-life to a separate "Retired Assets" tab or spreadsheet. This keeps your active inventory streamlined. Studies show that around 15%–30% of company assets are "ghost assets". Conduct quarterly physical audits - using tools like barcode scanners - to match your digital records with actual hardware.
Use delta syncing to update only the records that have changed since the last sync. This approach drastically reduces processing time and API quota usage. The Google Sheets API supports up to 300 read requests per minute per project, so avoid running more than three concurrent syncs with the same service account to prevent rate limiting. Additionally, simplify your queries by selecting only essential fields instead of syncing the entire database. This helps you stay under the 50 MB extension limit and speeds up each sync cycle.
| Verification Method | What to Check | Common Issue |
|---|---|---|
| Row Count Comparison | Total rows vs. total assets | Missing records or skipped sheets |
| Cell Limit Audit | Total cells vs. 10M limit | Sync failure due to spreadsheet size |
| Timestamp Audit | UTC vs. local time | Data drift or misaligned timestamps |
| Log Review | Error codes (e.g., 500) | Unexpected data types or API timeouts |
Conclusion
Syncing IT asset data with Google Sheets can revolutionize how your team handles devices, tracks inventory, and makes informed decisions. It provides a centralized source of truth that updates automatically, ensuring everyone stays aligned. By eliminating scattered data, this approach reduces the risk of costly errors and sets the stage for automation that simplifies your workflow.
Automation and collaboration are key to boosting efficiency. Real-time syncing between your IT asset system and Google Sheets frees your team from tedious tasks like manual data entry, letting them focus on more strategic priorities. For instance, automating software license management can cut costs by up to 30%. Tools like AdminRemix’s Chromebook Getter and User Getter make this transition even easier, leveraging Google Sheets as the main interface - no command-line skills required.
FAQs
Why use Google Apps Script instead of add-ons to sync IT asset data with Google Sheets?
Google Apps Script lets you build custom solutions right inside Google Sheets using JavaScript. With this, you can automate syncing IT asset data without installing any extra add-ons. It works effortlessly with other Google services, provides built-in storage through Google Drive, and operates entirely on Google’s servers, ensuring easy access and dependable performance.
Apps Script offers flexibility to customize workflows, create custom menus or dialogs, and handle real-time updates - all while keeping IT management tasks smooth and efficient.
How can I ensure my IT asset data stays accurate when syncing with Google Sheets?
To keep your data accurate during synchronization, begin by mapping the necessary fields - like Device ID or Serial Number - to the corresponding records in AssetRemix. Make sure to enable the Sync On option for these columns. If you have custom fields, add and confirm them before saving your mapping. When everything is set, perform a focused sync by choosing the relevant device status. This ensures that only the intended assets are updated, reducing errors and keeping your records current.
What should I do if I experience sync errors or data conflicts in Google Sheets?
If you're facing sync issues or conflicting data in Google Sheets, the first step is to check your sync settings. Ensure that fields, filters, and date ranges are properly configured - missteps here are often the root of many errors.
Next, verify your API credentials, such as the API key or OAuth token. These need to be valid and have the correct permissions to keep the integration running smoothly. If you suspect outdated or cached data might be causing problems, try manually refreshing the data to reset it.
It's also essential to confirm that the column names in Google Sheets align with the required fields in your integration. For instance, when dealing with IT asset data, make sure fields like Asset Tag, Device ID, or Serial Number are correctly matched. If issues persist, take a look at the sync logs - they often contain specific error messages that can guide you toward a solution. For timestamp-related problems, double-check that the time zones are consistent across both systems.