
How to Replace Chromebook Display Cables
Replacing a Chromebook display cable is a straightforward fix for common screen issues like flickering, discoloration, or blank displays. This guide covers everything you need to know, from identifying a faulty cable to safely disassembling your device and installing a replacement. Here's a quick overview:
- What is a Display Cable? It's the component connecting the motherboard to the LCD screen, often located in the hinge area, prone to wear from movement.
- When to Replace? If screen flickering or image issues occur when adjusting the lid, or if an external monitor works while the internal display doesn’t.
- Cost Savings: Replacing a cable (around $17.95) is far cheaper than replacing the entire display assembly (up to $94.99).
- Tools Needed: Precision screwdrivers, plastic pry tools, tweezers, and an anti-static wrist strap are essential.
- Steps: Confirm the cable is the issue, power off the Chromebook, disconnect the battery, access the display cable, replace it, and test before reassembly.
This process typically takes 30–60 minutes and can extend your Chromebook's lifespan at a fraction of the cost of a full repair. Follow these steps to ensure a smooth and safe repair.
Tools, Parts, and Workspace Setup
Tools and Parts You Will Need
Having the right tools on hand can save time and prevent accidental damage. For Chromebook display cable repairs, you'll need precision Phillips head screwdrivers in sizes #1, #0, and #00. Some Dell models may also require a Torx driver to remove the base cover. When it comes to opening the case and separating the bezel, stick to plastic opening tools and nylon spudgers - metal tools can crack the chassis or scratch connectors.
For handling delicate components like ribbon cable connectors, adhesive tape, and screw-cover stickers, ESD-safe blunt-nose tweezers are indispensable. Make sure to order a replacement cable that matches your Chromebook model. For example, the Dell Chromebook 13 specifically requires a "P0XR8" ribbon cable. As for costs, plan to spend around $17.95 for the cable and an additional $3.95 for a replacement mounting bracket.
To keep screws organized during repairs, a magnetic project mat is a game-changer. These mats, priced between $36.95 and $52.95, help you sort screws by size and location. Chromebook repairs often involve screws ranging from 2.5 mm to 13 mm, and mixing them up can lead to stripped threads or internal damage.
Once your tools are ready, set up a secure workspace and prepare the Chromebook for disassembly.
Safety and ESD Precautions
After gathering your tools, it's essential to follow safety guidelines. Start by completely powering off the Chromebook, unplugging it from chargers, and discharging the battery to below 25%. When you remove the base cover, disconnect the battery from the motherboard immediately to avoid short circuits while working near the display cable.
Static electricity poses a real threat to Chromebook internals. As iFixit advises:
"Static can short circuit your Chromebook, so be sure to either wear an anti-static wrist strap or work on a surface that does not generate static electricity, like wood tile."
Always use plastic or nylon tools when working near the motherboard, and never attempt to connect or disconnect the display cable while the device is powered on.
Preparing Chromebooks for Fleet Repairs
For IT teams managing multiple devices, staying organized can simplify the repair process. Keeping detailed repair records ensures efficiency and complements the quality checks and documentation steps outlined later in this guide.
This is where AdminRemix's AssetRemix can be a valuable tool. AssetRemix allows IT teams to track repair statuses and manage Chromebook asset data across an entire fleet. By consolidating each device's repair history, it becomes easier to identify recurring problems and plan for future maintenance.
With these preparations in place, you're ready to move on to disassembling the Chromebook and accessing the display cable, ensuring a smooth and efficient repair process.
Replace the Display Panel Cable | HP Chromebook 11 G5 EE | HP
Disassembly and Accessing the Display Cable
Chromebook Display Cable Replacement: Model-by-Model Disassembly Guide
Checks to Run Before Disassembly
Before grabbing a screwdriver, you’ll want to confirm that the display cable is actually the culprit. Start by slowly opening and closing the lid while watching the screen. If the image flickers, cuts out, or shifts at certain angles, it’s a strong sign of a loose or damaged cable. Another handy test: connect the Chromebook to an external monitor using HDMI or USB-C. If the external display works perfectly but the built-in screen doesn’t, it’s likely an issue with the display cable rather than the motherboard or the LCD panel.
Skipping these simple checks can cost you time, effort, and possibly unnecessary parts. Once you’ve confirmed the cable is the issue, you’re ready to move forward with disassembly.
Opening the Chromebook and Disconnecting Power
Although specifics vary by model, the general process is similar across Chromebooks. Start by powering the device off completely, then flip it over. Look for screws - some might be hidden under rubber feet or small stickers. Carefully remove these and set them aside for reassembly later.
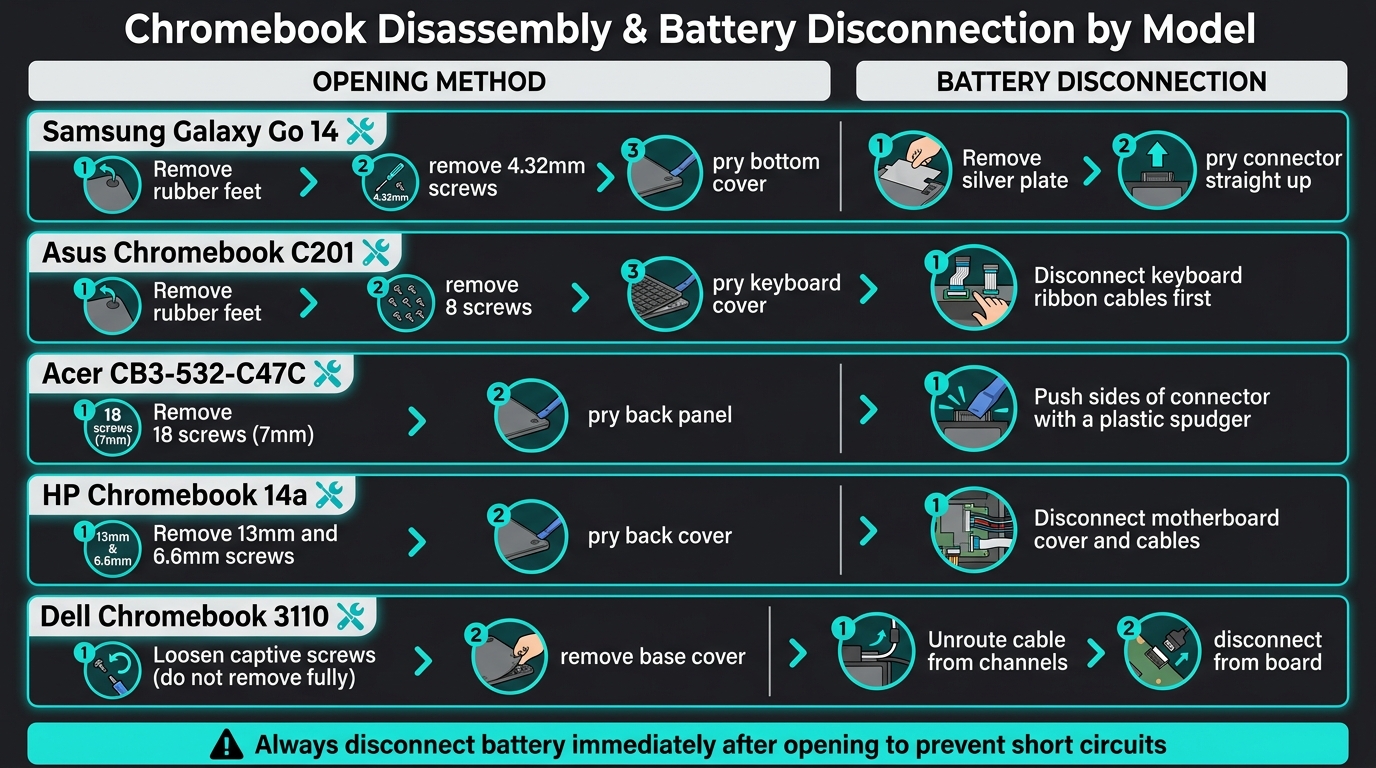
Here’s a quick summary of opening methods and battery disconnection steps for a few popular Chromebook models:
| Chromebook Model | Opening Method | Battery Disconnection |
|---|---|---|
| Samsung Galaxy Go 14 | Remove rubber feet, 4.32mm screws, pry bottom cover | Remove silver plate, pry connector straight up |
| Asus Chromebook C201 | Remove rubber feet, 8 screws, pry keyboard cover | Disconnect keyboard ribbon cables first |
| Acer cb3-532-c47c | Remove 18 screws (7mm), pry back panel | Push sides of connector with a plastic spudger |
| HP Chromebook 14a | Remove 13mm and 6.6mm screws, pry back cover | Disconnect motherboard cover and cables |
| Dell Chromebook 3110 | Loosen captive screws, remove base cover | Unroute cable from channels, disconnect from board |
For Dell models, remember that the screws are captive - they won’t come out completely. Just loosen them until they rattle. Once you’ve removed the cover, disconnect the battery immediately. Use a pry tool to lift the connector from its edge, avoiding the motherboard socket to prevent damage.
Following these steps ensures you can safely access the internal components without causing harm to the device.
Removing the Display Assembly
With the battery disconnected, locate the display cable. It typically exits the base unit and runs through or under the hinges toward the screen. Before making any adjustments, take a photo of the cable’s routing. This will help you reassemble it correctly, avoiding pinched cables or issues with the bezel not closing properly.
Next, remove the hinge screws that secure the display assembly to the base. Most of these screws are Phillips head, but their size and number will depend on the model. Once the screws are out, carefully separate the display assembly. Be sure to lift and support it properly - never let it dangle by the cable. As iFixit's Michael Deitz warns:
"If you lift the keyboard away carelessly, you may break these ribbon cables."
Always handle the display assembly with both hands and keep it flat until you’re ready to disconnect the cable in the next step. This careful approach minimizes the risk of accidental damage.
sbb-itb-c68f633
Removing and Installing the Display Cable
Accessing the Cable Inside the Display Assembly
Once you've separated the display assembly from the base, the next step is to remove the bezel to access the cable. The bezel, which is the plastic frame around the screen, is typically secured with clips instead of screws. Use a plastic pry tool to carefully work around the bezel, being cautious to avoid cracking it.
After removing the bezel, you may notice tape covering the cable connectors. As noted in the HP Chromebook Video Cable Replacement Guide:
"The tape covering the display internals may stick to the bezel. To unstick it, carefully pry it away with a spudger. Note that the tape will tear easily."
Start peeling the tape slowly from one corner. If you feel resistance, adjust your angle rather than pulling harder to avoid damaging the tape or connectors.
Disconnecting the Old Cable and Installing the New One
Locate the locking mechanism on the connector. Chromebook display cables often use a small metal latch, a flip-up tab, or a thin lock bar to secure the cable. Gently lift the lock bar about 90 degrees using a spudger or precision tweezers before sliding the cable out. The Acer Chromebook CB315-4H-P8FZ repair guide offers this advice:
"Avoid pulling on the cable itself. Grip the connector to prevent damage."
This applies to both the motherboard and display panel ends of the cable.
To install the new cable, reverse these steps. Slide the connector straight into its socket, press the lock bar down until it’s flat, and secure the connector with tape - either the original or a replacement strip. Ensure the cable is routed under the hinge to prevent strain or wear over time. For eDP connectors, push firmly until you hear two distinct clicks, one on each side, signaling a proper connection.
Testing the New Cable Before Reassembly
Before reattaching the bezel, test the new cable to confirm the display is working. With both ends of the cable connected, reconnect the battery and power on the Chromebook. A glowing backlight or a lit screen indicates a good connection. Verify that any previous issues, such as flickering, discoloration, or a blank display, have been resolved.
If the screen remains dark, power off immediately and double-check your work. Common issues include an improperly seated lock bar or a cable routed over the hinge instead of under it. If the Chromebook was powered on during the repair, perform a full restart to allow the system to detect the display properly.
Once the display is confirmed to be functioning, you can move on to reassembly and documentation.
Reassembly, Testing, and Documentation
Reassembling the Chromebook
Once you've confirmed everything is working, it's time to put the Chromebook back together. Start by carefully routing the display cable under the hinge plate and through the motherboard tabs - never over the hinge. This step is critical to avoid pinching or damaging the cable.
Here’s the reassembly process:
- Secure the LCD panel: Place the LCD panel into the frame and secure it using screws. Tighten them in an X pattern to evenly distribute pressure across the screen.
- Attach the bezel: Align the bezel with the lid edges and snap each tab into place. If it doesn't sit flush, double-check the cable routing under the tabs.
- Reconnect internal components: Reattach the keyboard and touchpad ribbon cables before securing the palmrest.
- Reconnect the battery: Ensure the battery connection is secure.
- Close up the device: Snap the bottom cover back into place and replace all external screws. Depending on the Chromebook model, this could involve anywhere from 4 to 18 screws.
Once everything is back together, power on the Chromebook and move on to the final testing phase.
Final Testing and Quality Checks
Turn on the Chromebook and perform these checks to ensure everything is functioning properly:
- Backlight: Confirm the screen lights up during boot.
"If the backlight is visible from the back of your display model, it should light up if the computer is on, indicating a good connection." - iFixit
- Image quality: Check for any flickering, discoloration, or other display issues.
- Brightness controls: Test the brightness settings to ensure they respond as expected.
- Hinge movement: Open and close the lid several times to confirm smooth movement without pulling or straining the cable.
- External display: If the Chromebook supports it, connect an external monitor to verify that the external display output is still functional.
Once all tests are complete and the device is working correctly, move on to documenting the repair.
Logging Repairs with AdminRemix

Proper documentation is just as important as the repair itself, especially when managing a large number of devices in schools or organizations. AssetRemix by AdminRemix offers a centralized platform for tracking repairs, ensuring that no detail is overlooked.
For every display cable replacement, make sure to log the following details:
- The Chromebook model
- The initial issue (e.g., blank screen, flickering, discoloration)
- The specific part replaced
- The results of your functionality tests
Record this information in AdminRemix immediately after testing. It's also helpful to track the time spent on repairs - most Chromebook display cable replacements take 30 to 60 minutes. This data can support staffing decisions and help determine whether repairs or replacements are more cost-effective. With repair histories tied to individual assets, your team can easily identify recurring issues and make informed decisions about device lifecycle management.
FAQs
How do I know it’s the display cable and not the LCD?
Symptoms such as blank spots, discoloration, or flickering on your screen often suggest a problem with the display cable. However, these issues could also be caused by a defective LCD. Start by testing the cable connection - reseating or replacing it might resolve the issue. If the problem persists, it's likely that the LCD screen itself will need to be replaced.
What can I damage if I route the cable wrong near the hinge?
When the display cable is routed incorrectly near the hinge, it can be subjected to unnecessary strain or even break if it doesn't properly reach its connection point. Similarly, routing the cable improperly under the tabs below the display can lead to damage. For example, forcing the bezel back into place can break the bezel tabs or damage the cable itself. Careful handling and precise routing are crucial to prevent these problems.
Why does my new cable work before reassembly but fail after?
If your display cable functions properly before reassembly but stops working afterward, the problem is likely tied to how the cable was routed or connected during the final steps. It’s possible the cable became loose or wasn’t seated correctly in its designated channels. Make sure it’s properly secured under any hinges or tabs, as the pressure from reattaching the bezel or covers could pinch or damage it. Be careful not to force components into place, as this can lead to further damage.