Google Workspace Alerts for Compliance Monitoring
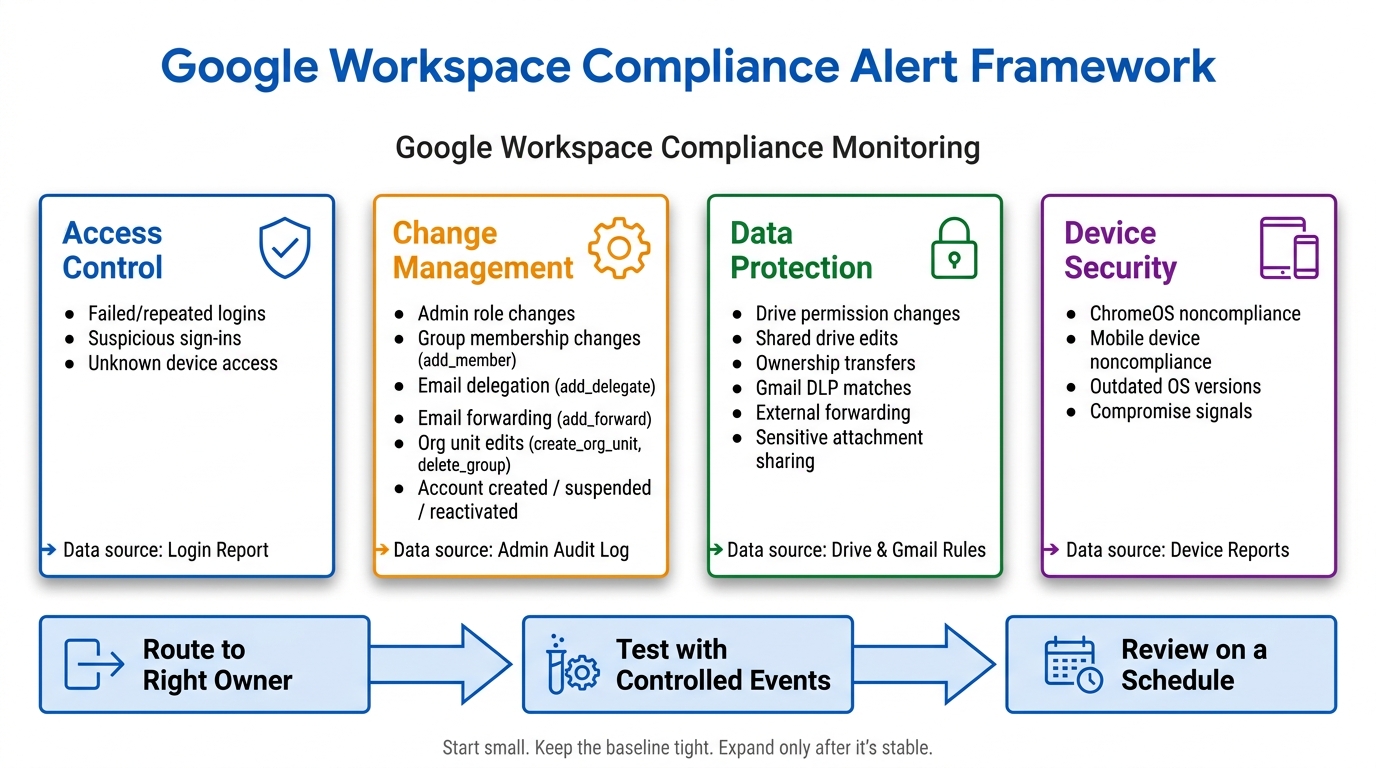
If I want a clean compliance alert setup in Google Workspace, I start small: login events, admin changes, risky sharing, DLP hits, and device issues. That gives me a tight baseline I can review, test, and route without drowning in noise.
Here’s the short version:
- I watch failed logins, suspicious sign-ins, and unknown-device access
- I track account creation, suspension, and reactivation
- I monitor admin role changes, group changes, org unit edits, email delegation, and forwarding changes
- I flag Drive sharing changes, ownership transfers, shared drive edits, and Gmail DLP matches
- I review ChromeOS and mobile device noncompliance, old versions, and compromise signals
- I route each alert to the right inbox, group, or admin owner
- I test rules with controlled events before I rely on them
A few setup points matter right away. I make sure Admin audit logs, login reports, and user activity reports are turned on. I also expect a short delay in reporting, and for U.S. teams I log dates in mm/dd/yyyy format, like 07/17/2026, while converting UTC timestamps to local time.
In plain terms: I begin with the alerts most likely to show access trouble or risky admin action in the last 24 hours, then I add data and device checks after that base is stable.
To keep this simple, I think in four buckets:
- Access control
- Change management
- Data protection
- Device security
That’s the whole job: build a small alert set, send it to the right people, confirm it works, and review it on a schedule.
Google Workspace Compliance Alerts: 4-Bucket Framework
Set Up Alerts for Login Events and Admin Changes
Create Login and Account Activity Alerts
Start with the Login audit log and login reports as your main data sources. They show failed sign-ins, suspicious sign-ins, and access from unknown devices.
When you build the rule, use a lookback window that helps you catch repeated failures over time. Then use that same 24-hour window to group those repeated failures into a single alert.
The tables below show which login and account lifecycle events are worth flagging.
Login alerts
| Event | Audit Data Source |
|---|---|
| Repeated failed logins | Login Report |
| Suspicious sign-ins | Login Report |
| Login from an unknown device | Login Report |
Account lifecycle alerts
| Event | Audit Data Source |
|---|---|
| Account created | Admin Audit Log |
| Account suspended | Admin Audit Log |
| Account reactivated | Admin Audit Log |
Send critical login alerts to Security or Compliance. Route account lifecycle alerts to a shared IT inbox so someone can follow up without the ball getting dropped.
After these access alerts are in place, move to admin changes.
Create Alerts for Admin Role and Settings Changes
Use the Admin audit log to watch admin role, privilege, and settings changes. Start with the changes that can shift access or redirect communications fast: admin group membership changes (add_member), email delegation and forwarding changes (add_delegate, add_forward), and org unit and group changes (create_org_unit, delete_group).
Once the login and admin alerts are working, expand into file sharing, DLP, and device rules.
sbb-itb-c68f633
Monitor File Sharing, DLP Incidents, and Device Compliance
Use Drive and Gmail Rules to Flag Risky Sharing
Next, move from access control to data exposure. The goal here is simple: spot risky sharing before it turns into unauthorized outside access.
Watch for Drive permission changes, shared drive changes, and ownership transfers. Those actions can look small at first, but they often signal that files are moving into the wrong hands.
It also helps to set Gmail alerts for:
- External forwarding
- Sensitive attachment sharing
- DLP matches tied to regulated data
That gives you a clearer view of how data leaves the organization, whether it happens through Drive or email.
After file exposure, check endpoint health.
Use Device Rules to Catch Noncompliant or Compromised Endpoints
Monitor ChromeOS and mobile devices for noncompliance, outdated versions, and signs of compromise. If a device looks off, review the device details right away and disable compromised devices.
A risky account is one problem. A risky device attached to that account is a whole different ball game.
Google Workspace Administrator - Working with the Alert Center
Route Alerts to the Right Team and Confirm the Setup Works
Once your alert rules are set, decide who gets each alert and how fast they need to act.
Send Alerts to Super Admins, Shared Inboxes, or Groups
After you define alert types, assign an owner for each one.
Send critical alerts to super admins. For routine monitoring, use a shared inbox or Google Group.
Review group membership on a regular basis. That helps keep routing clean before you test the rules.
Test Alerts and Review Coverage
Test every rule before you depend on it. Trigger a controlled event, like a failed login or a temporary suspension, then confirm it shows up in the admin audit log and reaches the right people.
Next, compare recent login and admin reports with the alerts that actually fired. It also helps to set a recurring review for recipient lists and alert coverage.
Conclusion: Start with a Small, Reliable Alert Baseline
With routing and testing in place, keep the baseline small.
Start with a small set of high-value alerts. A tight, well-kept baseline is far more useful than a big ruleset that spits out noise and gets ignored.
Assign owners, test alerts, and review them on a regular schedule.
Expand only after the baseline is stable.
FAQs
Which alerts should I enable first?
Start with Google Admin console system-defined critical event rules like Suspicious login and Device compromised. These preconfigured rules give you instant visibility into high-priority security incidents.
Then set up custom rules based on your organization’s main risks, like external file sharing. Also make sure Admin, Login, and OAuth Token audit logs are active.
How often should I review alert coverage?
Review alert history on a regular basis so your audit record stays complete over time.
It also helps to set a steady reporting rhythm, whether that’s weekly, monthly, or quarterly. That makes it easier to track security trends, application usage, and compliance needs without scrambling later.
When alerts come in, document the steps you took in response. That record shows steady oversight and helps prove you’re following internal policies.
What should I do if an alert creates too much noise?
To cut down on alert fatigue, start with system-defined rules. Google caps these at 25 emails within a two-hour window, which helps keep things from getting out of hand right away.
For custom rules, set severity levels like High, Medium, or Low so your team can sort what needs attention first and what can wait a bit.
If things still feel noisy, use the Alert Center to filter and manage notifications in one place. And before you apply rules across the board, test them first. That extra step can save you a lot of cleanup later and helps make sure critical events stand out from routine activity.