Disaster Recovery Documentation Checklist
If your DR documents are out of date, recovery slows down fast. I’d review four areas first: the main DR plan, asset and dependency records, backup and restore runbooks, and communication plus compliance files.
Here’s the short version:
- Define scope and targets: list covered systems, exclusions, owners, and each service’s RTO and RPO
- Name real people: record primary and backup contacts, after-hours methods, time zones, and step-by-step escalation paths
- Map your environment: keep asset inventories, network diagrams, cloud details, SaaS records, and dependency maps current
- Document restore steps: for every critical system, keep backup records, restore runbooks, validation checks, failover steps, and fallback steps
- Keep proof and reviews: store test results, audit records, version history, approval status, and review dates in one place
A few numbers stand out in the article: Tier 1 systems should be tested quarterly, the full DR plan yearly, documentation updates should follow major changes within 30 days, and one sample escalation rule is to contact the backup lead after 15 minutes with no response.
If I were using this checklist, I’d treat each document like a live record: confirm it exists, confirm it matches the current setup, and confirm one person owns it. That’s the core idea behind the full checklist below.
How to Write & Maintain a Disaster Recovery Runbook
sbb-itb-c68f633
Core Disaster Recovery Plan Checklist
The core DR plan is the main guide for bringing back critical IT services after a disruption. Runbooks, contact lists, and asset records support it, but this document is the one that sets the direction. It spells out what must come back first. The sections that follow handle the records and details that support that work.
Purpose, Scope, and Recovery Objectives
Start by stating what the plan restores, who should use it, and which business outcomes it protects. If it also covers facilities, vendors, or business operations that rely on those systems, say that plainly.
Be exact about scope. Include the locations, environments, critical services, and third-party dependencies covered by the plan. Also name what is not covered, along with any separate plans for those systems. Add system owners, application names, service tiers, and dependencies so the response team knows what needs to be brought back and in what context.
Document the RTO and RPO for each critical service. RTO is the maximum downtime the business can accept. RPO is the maximum data loss the business can accept. These targets shape backup frequency, failover design, staffing needs, and recovery priority.
Roles, Contacts, and Escalation Paths
Each recovery role should have a named primary person and a named backup. A job title alone isn't enough. Record the direct phone number, email address, after-hours contact method, and time zone for each person, especially if the team is spread across regions.
Make sure the plan covers roles such as:
- DR coordinator
- Infrastructure lead
- Network lead
- Application owner
- Security lead
- Communications lead
Also name the executive who can declare a disaster, approve failover, and authorize vendor engagement.
Write escalation paths as step-by-step instructions, not as an org chart. If no one answers, what happens next? Say it directly. For example, note that the backup lead should be contacted if no acknowledgment comes in within 15 minutes. Add clear triggers too, such as data center loss, ransomware, primary database corruption, or a SaaS outage.
Vendor contacts belong here as well. Include support portals, 24/7 emergency lines, and escalation tiers for hosting providers, network carriers, SaaS vendors, and data-recovery partners.
Incident Response and Recovery Workflow
Document the recovery flow from detection through restoration. Cover detection, triage, containment, recovery, and post-incident review. For each phase, name the owner and the trigger that moves the team into that phase.
Be specific about disaster declaration. State who can declare one, what evidence or criteria they need, and how that declaration is shared. Common triggers include a multi-hour outage of a critical service, confirmed destructive malware, total site loss, or a backup failure that blocks normal restoration.
List the recovery order for each major service, and tie every step to its runbook and validation checks. Each action should point responders to the matching runbook, asset record, and validation checklist. That way, no one is guessing in the middle of an outage.
Use this plan as the main reference for the infrastructure, asset, and backup records that follow.
Infrastructure, Asset, and Configuration Documentation Checklist
Use the recovery order from the core plan to build the records below. When disaster hits, your team needs to know what exists, where it lives, and what depends on what. If those records are out of date, recovery can slow to a crawl.
Hardware, Software, and Service Inventory
Document every asset you may need to recover before you need it. That includes servers, hypervisors, network devices, storage arrays, endpoints, operating systems, applications, databases, SaaS services, and cloud-managed services.
For each item, record:
- Version or release
- Hostname or asset ID
- Owner
- Business criticality
- Site or cloud region
- Support contract or vendor
- Special recovery constraints, such as licensing limits, geographic limits, or hardware dependencies
Use recovery tiers to set restoration order. Give each asset a clear tier:
- Tier 1 for systems that must be restored right away
- Tier 2 for systems that matter but are not first in line
- Tier 3 for systems that can wait
Then map each asset tier to the RTO/RPO already defined in the core plan. In plain terms, the core plan tells you how fast recovery needs to happen, and the asset tier helps you line systems up in the right order.
Add a status field too - production, standby, archived, or retired. That small detail can save a lot of wasted effort when people are moving fast and trying to avoid bringing back a system that was already decommissioned.
Those tiers should flow straight into the dependency map in the next subsection.
Network Diagrams and System Dependencies
Current network diagrams are not optional. Document your topology, VLANs, subnet ranges, routing paths, firewall rules, DNS dependencies, VPNs, security zones, load balancers, cloud virtual networks, and internet-facing endpoints.
For cloud workloads, include the provider, account or subscription, region, availability zone, and whether the workload runs in a multi-region or single-region setup. For example, noting that a database runs in an AWS us-east-1 multi-AZ deployment with a DR replica in us-west-2 under a different security group set is exactly the kind of detail that can stop an expensive failover mistake.
Topology alone is not enough. You also need application-to-application dependencies mapped out. Show which apps rely on which databases, identity providers, or external integrations such as payment gateways. Use that map to confirm restore order.
A useful diagram should answer three things fast:
- What must exist first
- What talks to what
- What breaks if a component is missing
Asset Records and Google Workspace Details
Identity and access records belong here because they often become the first blocker during recovery. Link each record to its runbook, owner, and support contact.
At a minimum, each record should include the asset name, unique ID or serial number, owner, department, location, criticality, lifecycle state, and configuration baseline, along with related applications or services. For cloud and virtual assets, add the account, subscription, region, instance type, and backup or snapshot references.
For organizations using Google Workspace, the documentation needs more depth. Record the Workspace domain, tenant/admin ownership, user and group structures, sharing and retention settings, device management status, authentication methods, and any custom policies affecting Gmail, Drive, Meet, or Chromebooks.
For Chromebook fleets, useful fields include user email, OU placement, device serial number, enrollment status, assigned asset tag, last sync time, and ownership status. These details help teams re-establish access, re-enroll devices, and reapply policy after an incident.
If you use AdminRemix, use AssetRemix for asset visibility and Chromebook Getter/User Getter to manage Chromebook and Google Workspace metadata in bulk through Google Sheets.
The table below sums up the main documentation fields by asset category:
| Asset Category | Key Documentation Fields |
|---|---|
| Hardware | Serial number, owner, physical location, condition |
| Software/SaaS | Version, license key, renewal date, owner |
| Network Devices | Configuration baseline, security zone, dependencies |
| Google Workspace | Chromebook metadata, user permissions, Google Workspace records |
Backup, Restoration, and Runbook Checklist
Use the system inventory, tiers, and RTO/RPO from the previous section to finish each backup record.
Asset records show what you have. This section shows how to bring it back.
Backup Coverage, Retention, and Storage Records
For every critical system, keep a backup register that shows what is backed up, how often it runs, and where the data lives. A solid entry should include:
- Backup scope: full, incremental, differential, snapshot-based, or application-aware
- Schedule in local time, such as Nightly at 11:00 PM PT
- Retention rules
- Storage location
- Estimated storage size and cost in USD
- Encryption method and key management details
Keep these records in a spreadsheet or CMDB, and use consistent U.S. date, time, and number formats.
Add the RPO target next to each backup entry. If your email system has an RPO of 4 hours, the backup schedule and storage setup need to show that they can hit that mark. If they can’t, that’s a gap you want to fix before an incident turns into a scramble.
Tools like AdminRemix can map backup sets to assets and owners.
Each backup set should also link to its restore runbook and validation steps.
System Recovery Runbooks and Validation Steps
A runbook needs to work for someone who didn’t write it. That’s the test.
Start with the system context: name, owner, criticality, RTO, RPO, and support contact. Then spell out the prerequisites in plain language. What has to be online first? What access is needed? Where are the credentials stored? If normal access is blocked, point to the break-glass procedure by name, such as Obtain credentials via DR-SEC-001 if normal access is unavailable, instead of putting passwords in the document.
Number the restoration steps and state the expected result for each one. For example:
- Log into the backup console.
- Select the relevant job.
- Choose the last successful backup before the incident timestamp.
- Restore to the target server and path.
- Run the post-restore validation script.
Every step should say what success looks like, whether that’s a log entry, a status code, or a health check. It should also say when to escalate if that result doesn’t show up.
End each runbook with validation checks and rollback criteria. Technical checks matter, but so do functional ones. A help desk platform isn’t back just because the service starts. You should be able to create a test ticket, assign it, attach a file, and close it. If any validation step fails and can’t be fixed within 30 minutes, start the rollback procedure and revert to the confirmed backup. After recovery, get service-owner sign-off and log it in the ticketing system.
Failover, Fallback, and Recovery Strategy Comparison
For each critical system, document both the failover steps and the fallback steps, along with the criteria for reversing each one. Include the failover target, whether that’s a cloud DR site, a secondary data center, or an alternate SaaS tenant. Also note how DNS or routing changes will happen, who can approve failover, and what data sync checks must be complete before fallback starts.
Use the asset tier and RTO/RPO to choose the recovery method below.
| Recovery Method | Recovery Speed (RTO) | Documentation Complexity | Key Operational Considerations |
|---|---|---|---|
| Snapshot-based | Fast - full VM restore in 30–60 minutes | Moderate | Snapshot sprawl increases storage costs; dependent on hypervisor or storage platform |
| File-level backup | Slower for full rebuilds; fast for single-file restores | Higher | More portable across platforms; backup windows can burden servers |
| Cloud storage (e.g., AWS S3, us-east-1) | Fast for small/medium datasets; may slow on multi-terabyte restores | Low to moderate | Egress fees in USD add up at scale; internet-dependent |
| Offsite/secondary data center | High throughput once online; slower initial access | Moderate | Strong for air-gapped compliance scenarios; physical logistics add recovery time |
Don’t use one recovery method for every system just because it’s simpler on paper. Match the method to the workload’s RTO and RPO instead.
Record the chosen method in the system runbook and recovery record.
Communication, Compliance, Maintenance, and Final Checklist Summary
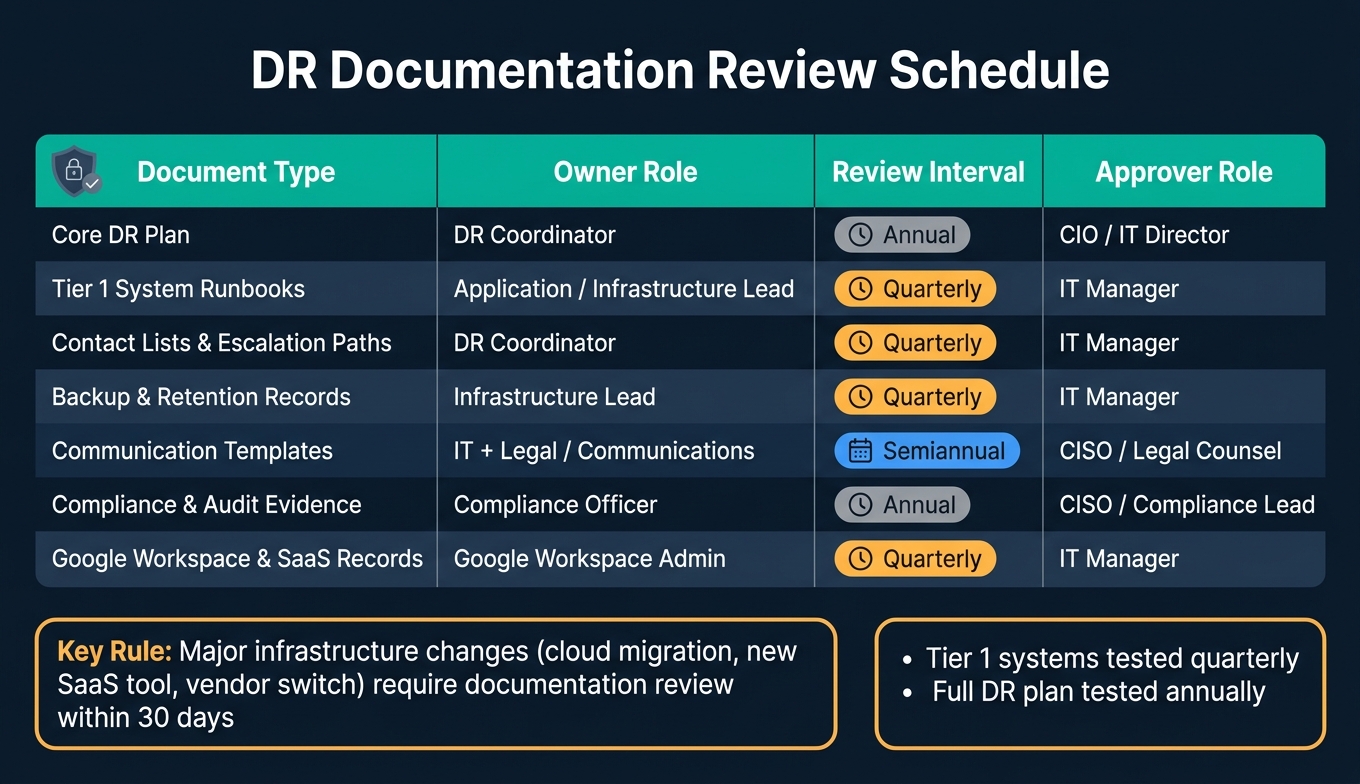
DR Documentation Review Schedule: Owners, Intervals & Approvers
Communication Templates, Compliance Records, and Policy References
Once the recovery steps are in place, the next job is simple: make sure people know who says what, when, and to whom.
Put together a communication kit for internal teams, executives, vendors, customers, and regulators. Each template should clearly spell out:
- what happened
- the impact
- the action required
- the time of the next update
Every template should also name the approved sender and show the approval path before anything goes out. NIST SP 800-34 also calls for a crisis communications plan with one public spokesperson and press release templates.
On the compliance side, keep a section that maps each recovery duty back to its source. That source might be a regulation, a customer contract, or a framework such as NIST SP 800-34 or ISO 22301. Store DR test reports, recovery logs, and sign-off records in one central repository, then map each item to the duty it supports. Frameworks such as HIPAA, SOC 2, and PCI DSS require documented and tested recovery procedures with retained results. HIPAA guidance also recommends keeping audit logs for at least six years.
Once that evidence is in place, keep it current with version control and a set review cadence.
Version Control, Review Schedule, and Ownership Matrix
A DR plan that no one updates is like a fire extinguisher with no pressure gauge. It may look fine on the wall, but you don't want to find out too late that it won't work.
Use one naming format for every file. For example: DRP-Email-v2.1-2026-07-01. Keep a change log with the date, author, type of change, and the trigger behind it. Changes to RTO/RPO targets, contact details, and critical runbooks should go through formal approval.
Major infrastructure changes should also force a review. That includes a cloud migration, a new SaaS tool, or a vendor switch. In each case, review the related documentation within 30 days and record the update in the change log.
The table below maps document types to review intervals and approval requirements:
| Document Type | Owner Role | Review Interval | Approver Role |
|---|---|---|---|
| Core DR Plan | DR Coordinator | Annual | CIO / IT Director |
| Tier 1 System Runbooks | Application / Infrastructure Lead | Quarterly | IT Manager |
| Contact Lists & Escalation Paths | DR Coordinator | Quarterly | IT Manager |
| Backup & Retention Records | Infrastructure Lead | Quarterly | IT Manager |
| Communication Templates | IT + Legal / Communications | Semiannual | CISO / Legal Counsel |
| Compliance & Audit Evidence | Compliance Officer | Annual | CISO / Compliance Lead |
| Google Workspace & SaaS Records | Google Workspace Admin | Quarterly | IT Manager |
Test Tier 1 systems quarterly and test the full plan each year. Record the results and share them with stakeholders. Tools like AdminRemix can help keep Google Workspace asset records and user metadata current. That supports cleaner ownership matrices and cuts the risk of stale records during an audit.
Disaster Recovery Documentation Checklist Summary
Use this summary as a final readiness check before an incident hits.
The checklist below helps confirm that the four main documentation areas are covered:
| Group | Key Confirmation |
|---|---|
| Plan | Core DR plan is current, tested, and aligned with RTO/RPO targets; scope, assumptions, and escalation paths are defined |
| Infrastructure & Assets | All hardware, software, cloud services, and SaaS platforms are inventoried with dependencies and owners; changes trigger updates |
| Backups & Runbooks | Every critical system has a tested backup strategy, a step-by-step runbook, and documented failover/fallback procedures |
| Communication & Compliance | Templates, contact lists, compliance mappings, and contractual obligations are documented, reviewed, and tied to specific systems and incidents |
Assign owners, set review dates, and treat every operational change as a reason to update the record.
FAQs
What’s the most important DR document to update first?
Your asset inventory should come first. It’s the base of disaster recovery because it keeps your hardware, software, and network equipment in one central place.
When that inventory stays accurate and up to date, it’s much easier to track asset status, warranty details, and location. That matters a lot for business continuity. Tools from AdminRemix, like AssetRemix, can help keep those records current and ready to use.
How often should DR documentation be reviewed and tested?
Disaster recovery documentation needs regular review and testing so the details stay current and the steps still work when pressure is high. While the exact schedule depends on your organization, a full review at least once a year is a common best practice.
Regular updates help keep old or incorrect information from slipping into the plan. Regular testing shows whether the plan works as expected when a critical event hits.
What should a disaster recovery runbook include?
A disaster recovery runbook should be the central place your team turns to when an emergency hits and normal operations are on the line.
It should include a full inventory of your hardware, software, and network equipment. For each item, keep records for serial numbers, manufacturer details, purchase dates, warranty status, assigned users, physical location, maintenance history, and support incident logs.
Why does that matter? Because when something breaks, gets lost, or needs to be replaced fast, your team shouldn’t have to dig through old spreadsheets, emails, or ticket threads to piece things together.
AdminRemix can help streamline and centralize this documentation.