
Checklist for Chromebook Warranty Claims
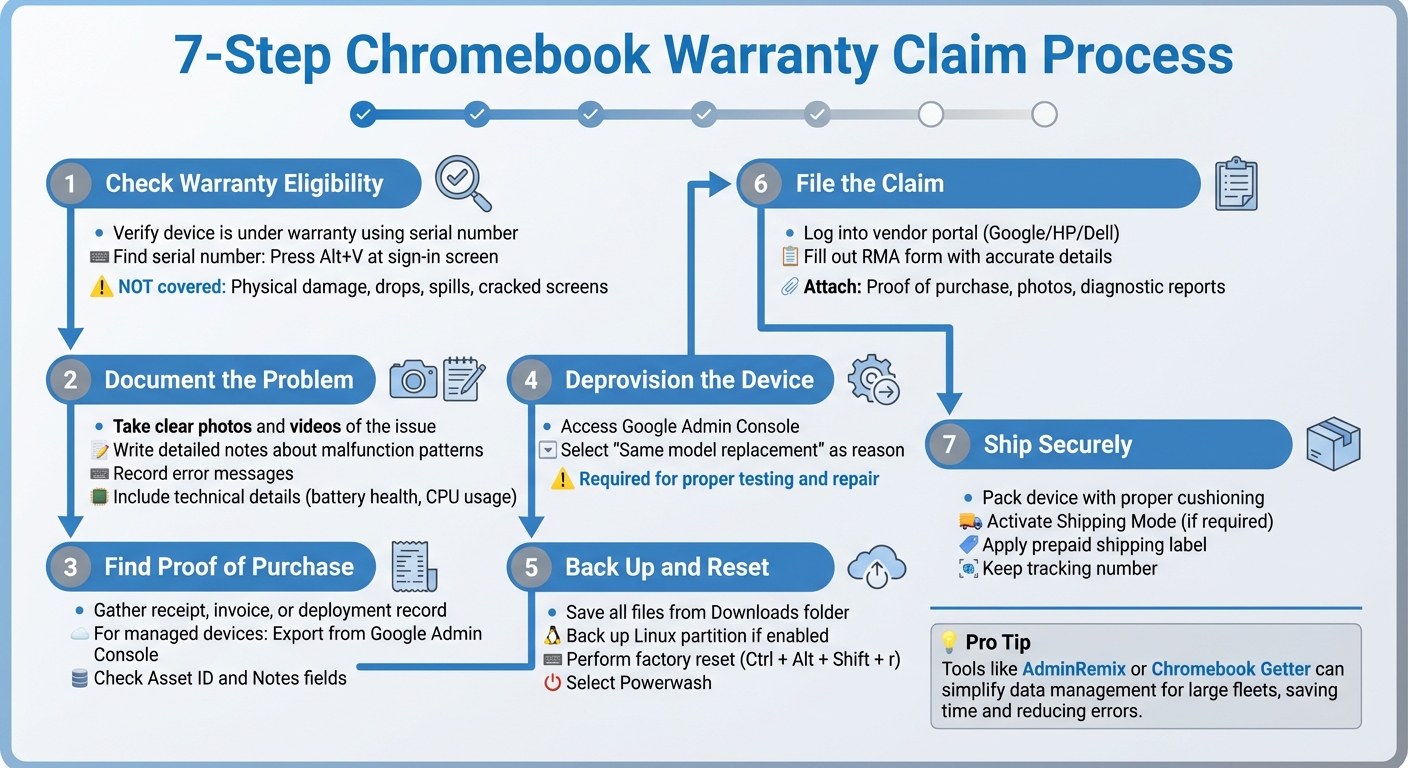
Filing a Chromebook warranty claim can be a hassle if you miss key steps. Here’s what you need to know to avoid delays and ensure your claim is processed smoothly:
- Check Warranty Eligibility: Verify your Chromebook is still under warranty using the serial number. Physical damage (like cracked screens or spills) is usually not covered.
- Document the Problem: Take photos, videos, and detailed notes about the issue. Include any error messages or patterns of malfunction.
- Find Proof of Purchase: You’ll need a receipt or invoice. Use tools like the Google Admin Console for managed devices to access this data.
- Deprovision the Device: Before sending the Chromebook for repair, deprovision it to allow proper testing and maintain license management.
- Back Up and Reset: Save your files and perform a factory reset to protect sensitive data.
- File the Claim: Use the vendor’s portal, provide all required details, and attach supporting documents like proof of purchase and diagnostics.
- Ship Securely: Pack the device carefully, activate Shipping Mode (if required), and use the provided label.
Pro Tip: Tools like AdminRemix or Chromebook Getter can simplify data management for large fleets, saving time and reducing errors.
7-Step Chromebook Warranty Claim Process Checklist
Steps to Take Before Filing a Claim
Check Warranty Eligibility
Before filing a claim, make sure your device is still under warranty. Manufacturers typically use the serial number to confirm the warranty status, manufacturing date, and device configuration. Many vendors, including Google, provide online tools where you can enter the serial number or IMEI to check the warranty expiration date.
If your device is powered on, you can find the serial number by pressing Alt+V at the sign-in screen or by navigating to Settings > About ChromeOS > Additional details. This screen also shows the ChromeOS version. For managed devices, administrators can use the Google Admin Console to access warranty status and repair history.
Keep in mind that warranty coverage does not include physical damage such as drops, liquid spills, cracked screens, or repairs made by unauthorized parties. If you purchased the device from a third-party retailer, ensure they are authorized. Otherwise, you may need to contact the retailer directly instead of the manufacturer.
Once you’ve confirmed your warranty coverage, the next step is to document the issue thoroughly.
Record the Problem
After verifying warranty eligibility, carefully document any issues with the device. This step is crucial to support your claim. Take clear photos and videos that highlight the problem - whether the device won’t charge, the display is malfunctioning, or vertical lines appear on the screen. Write a detailed explanation to differentiate between a manufacturing defect and damage caused by the user.
Warranty claims often cover problems like malfunctioning keyboards, adhesive separation, or display issues such as vertical or horizontal lines. However, they do not cover liquid damage, black spots on the LCD, missing keys, cracks, dents, or damage to ports caused by foreign objects. As the Hesperia Unified School District explains:
All of the above is subject to Dell Repair Depot evaluation. If damage is found to be customer induced, that damage will be charged to the student.
For performance or power-related issues, gather technical details like battery health percentage, cycle count, and CPU or memory usage. The Google Admin Console can also provide logs for system crashes or failed updates, which can serve as additional evidence for your claim.
Find Proof of Purchase
To process your claim, vendors typically require proof of purchase, such as a receipt, invoice, or deployment record. For managed Chromebooks, the Google Admin Console can store this information. Navigate to Devices > Chrome > Devices and click Export to download a CSV file containing details like enrollment times, serial numbers, and hardware models for your fleet.
Additionally, check the "Asset ID" or "Notes" fields in your management console. IT teams often use these fields to store internal tracking numbers or purchase details. The "Enrollment time" field can also serve as a secondary way to verify when the device was first used. If your organization uses asset management tools like AssetRemix, procurement records and funding information should already be centralized for easy access.
sbb-itb-c68f633
Collect Device and Account Information
Once you've documented the issue and gathered proof of purchase, the next step is to compile detailed device and enrollment data to strengthen your claim.
Get Device Details
Start by noting the serial number and model number of the device. These identifiers are crucial for manufacturers to access warranty details and understand the internal components of your Chromebook.
If the device won't turn on, you can find the serial number on a physical label. Look for a sticker marked "SN" or "S/N" on the bottom of the Chromebook or inside the battery compartment. To avoid losing this information, take a clear photo of the label. For IT administrators managing large fleets, exporting a CSV file with up to 100,000 devices is possible through the Google Admin Console. Navigate to Devices > Chrome > Devices and click Export.
Pull Enrollment Records
For managed Chromebooks, enrollment data is just as critical as the serial number. The Google Admin Console stores essential details like the Asset ID, Organizational Unit (OU) path, and enrollment status. Confirm that the device is listed as "Provisioned" to ensure it's properly registered. The Admin Console’s natural language search feature can simplify this process. For example, typing "devices enrolled last month" will quickly display relevant data.
Before sending a device for repair, remember to deprovision it in the Admin Console. Select "Same model replacement" as the reason for deprovisioning so the license can be reassigned. Google Support emphasizes this step:
"A device that hasn't been deprovisioned can't be fully tested and repaired."
Using the right tools can make managing and tracking this data much easier.
Track Data with AdminRemix
Handling warranty dates, serial numbers, and claim histories across numerous devices can quickly become unmanageable without a streamlined system. AdminRemix simplifies this process by syncing asset tags, serial numbers, and warranty expiration dates directly with the Google Admin Directory. This eliminates the need for manual updates and cross-referencing.
For bulk inventory management, Chromebook Getter is a widely-used tool with over 3 million users on the Google Workspace Marketplace. It allows you to export and manage data in Google Sheets, including metadata, Auto Update Expiration (AUE) dates, and telemetry data - no barcode scanning needed. Philip Helmers from SWBOCES LHRIC highlights its efficiency:
"I signed up for Chromebook Getter because it's faster than getting what I need with GAM command lines."
When integrating AdminRemix, ensure the "Asset Tag" field is connected to either the "Device ID" or "Serial Number", as both are mandatory in the Google Admin Directory. This connection ensures accurate and seamless data management.
File the Warranty Claim
Once you've gathered all the necessary device information and documentation, you're ready to submit your warranty claim. Although each manufacturer has its own system, the process generally follows similar steps.
Log Into the Vendor Portal
Begin by visiting the manufacturer's support website. Enter your device's serial number to confirm warranty eligibility. For example:
- Google offers an Interactive Warranty Checker.
- HP provides a Product Warranty Checker.
- Dell uses its Support Site, which requires the Service Tag instead of a standard serial number.
If you're unsure where to find the serial number, check the device label. Can't locate it? Try these shortcuts:
- For most devices, pressing Alt + V at the login screen may display system information.
- On HP Chromebooks, press Ctrl + Alt + S to bring up a window showing both the serial and model numbers.
According to HP:
The serial number is unique to your specific device. It can be used to check warranty information and receive service directly from HP or an authorized retailer.
If you're working with managed Chromebooks, make sure they are deprovisioned before submitting the claim.
Fill Out the RMA Form
Once coverage is confirmed, fill out the RMA form with accurate details. For Dell devices, use the upper-case Service Tag (e.g., ABC1234) instead of the serial number. Include key information such as:
- SKU
- Model name
- Region
- Keyboard layout
This ensures that any replacement hardware matches your original configuration. Provide a clear and detailed description of the issue in the designated field. Avoid vague statements like "won't turn on", which could delay processing or lead to a "no trouble found" response. Instead, explain the problem thoroughly - mention when it occurs, any error messages, and whether external peripherals were connected when the issue happened.
Keep in mind that the RMA process typically erases all data on the internal SSD and reinstalls the base operating system. Additionally, repaired devices are often returned in "Shipping Mode", meaning they won't power on until connected to an AC adapter, even if the battery is charged.
Attach Supporting Files
After completing the form, upload all required supporting documents. Start with proof of purchase - HP may request a sales or delivery receipt to verify the warranty start date. If applicable, include clear photos of any physical damage, such as cracked casings or malfunctioning ports, to help technicians identify whether the issue stems from a manufacturing defect or accidental damage.
For hardware issues, attach diagnostic reports. Tools like HP Support Assistant or ChromeOS logs can provide technical evidence to prevent your claim from being misclassified as a software problem. For Dell devices, if the system board is replaced, ensure you document and return any service tools, like an RMA Shim USB drive, that were provided during the repair process.
Once you've submitted your claim online, you'll need to move on to preparing and shipping your device for repair.
Pack and Ship the Device
With your documentation completed and essential data collected, it's time to securely prepare and ship your Chromebook for repair. This step ensures your device arrives safely while protecting your information.
Back Up and Reset the Device
Data synced to your Google Account is safe, but any files stored locally in the Downloads folder will be permanently erased during a reset. To avoid losing them, open the Files app, select everything in your Downloads folder, and transfer these files to Google Drive or a USB drive.
If your Chromebook has Linux enabled, back up the Linux partition by navigating to Settings > Advanced > Developers > Linux > Back up and restore.
Once your data is backed up, sign out of your account and press Ctrl + Alt + Shift + r to restart the Chromebook. Then, select Powerwash and click Continue. According to Google Chromebook Help:
A factory reset erases all user data on your Chromebook's hard drive, including all the files in the Downloads folder.
Prepare the Package as Specified by Your Vendor
Before packaging your device, check if your vendor requires it to be in Shipping Mode. For instance, some models, like the Dell Chromebook 3110, have a Shipping Mode feature that locks the battery, ensuring the device doesn’t power on during transit. Activate Shipping Mode, wait at least 10 seconds to complete the process, and then close the lid.
If your repair involves a system board replacement and the vendor provided an RMA Shim USB drive, include it along with the defective hardware in the return package. For example, Dell requires these tools to be sent back with the faulty components. Use the original packaging if it's available, or pack the device securely with enough cushioning to protect it from damage during shipping.
Apply the Shipping Label
Once the device is packed, attach the shipping label. Most vendors provide a prepaid label through their RMA portal. Download, print, and securely affix it to the package, ensuring all details - like the address and included components - are correct. Seal the box properly, and keep the tracking number handy so you can monitor the shipment and confirm when the vendor receives your device.
Track Your Claim After Submission
Once your claim is submitted, keep a close eye on its progress. Most manufacturers provide an online portal where you can track your RMA status using the Serial Number or RMA Number assigned during the process. Vendors also typically send email updates at key stages - when they receive your device, begin repairs, or ship it back with tracking details included. These notifications work alongside your own monitoring efforts.
Before shipping the device, log into your Google Admin console to confirm that the device is deprovisioned. It’s important to keep the device in a deprovisioned state until it’s returned. Afterward, you’ll need to manually re-enroll it to restore policies and updates.
Check your vendor’s Service Level Agreement (SLA) for repair timelines. For instance, CTL guarantees a 5-day turnaround and includes free two-way RMA shipping. Mark Jorgensen from CTL suggests:
You can loan out whole devices in exchange for those in for repair. One cost-saving tip: buy refurbished devices for this purpose.
Once the claim is resolved, update your asset records promptly. Keeping asset records current ensures smooth lifecycle management. Tools like AssetRemix can sync your Google Admin console data with your local inventory system, ensuring fields like Device ID and Serial Number reflect the latest status. This is crucial for accurate tracking, linking devices to users, and maintaining compliance with vendor contracts. Since deprovisioning is a manual task, keep a log of devices sent for warranty claims to ensure they are re-enrolled before being reassigned.
For larger claims, the Google Admin console’s bulk export feature allows you to export up to 100,000 devices into a CSV file for auditing. Additionally, tools like Chromebook Getter can simplify bulk deprovisioning, helping to reduce administrative workload.
Mistakes to Avoid
Don't Void Your Warranty
Understanding what can void your warranty is crucial to avoid unexpected repair bills. Manufacturers often require a "Repair Depot evaluation" for warranty claims. If they find damage caused by the user during inspection, you’ll be responsible for the repair costs, even if your claim seemed valid at first.
Physical damage is a common warranty disqualifier. For example, leaving objects on your keyboard before closing the lid can cause black spots or blotches on the LCD display. These are considered pressure-related damages and aren't covered under warranty. Always check for foreign objects before shutting your laptop.
Unauthorized repairs are another major issue. Google's Safety, Warranty & Regulatory Manual emphasizes:
Unauthorized repairs or modifications could result in permanent damage to the device, and may affect your warranty coverage and regulatory authorizations.
If your device needs repairs, always reach out to the manufacturer or an authorized service center, even if the fix appears simple.
Environmental factors can also play a role. For instance, exposing your Chromebook to temperatures above 113°F (45°C) can harm the battery and internal components, possibly voiding your warranty. Similarly, using uncertified or incompatible power adapters can lead to safety risks and affect coverage. To protect your device, store it in a dedicated case rather than tossing it loosely into a backpack, where pressure can damage screens and internal parts.
| Covered by Standard Warranty | NOT Covered (May Void Warranty) |
|---|---|
| Devices that won’t charge or turn on | Any type of liquid damage |
| Vertical or horizontal lines on the LCD display | Cosmetic issues (chips, cracks, dents, scratches) |
| Non-functional keyboard or trackpad | Missing or broken keyboard keys |
| Adhesive separation of the LCD panel | LCD damage (e.g., black spots caused by pressure) |
| Malfunctioning input ports (HDMI, USB) | Port damage from foreign objects |
| Defects in battery or hardware due to manufacturing | Unauthorized disassembly or modifications |
Paying attention to these details can save you from costly mistakes.
Review All Documentation
Accurate documentation is essential for a smooth warranty claim process. Start by running hardware diagnostics for components like the keyboard, microphone, speaker, and webcam. Generate detailed PDF reports that include the asset ID or serial number - these reports add credibility to your claim.
Ensure physical identifiers match digital records. For example, Dell devices require Service Tags to be entered in upper case (e.g., ABC1234) to avoid processing issues. Before filing your claim, inspect your device for any damage caused by spills or cracks, as these will likely result in rejection.
When submitting your claim, include all vendor-provided tools. For instance, if you’re using a Dell RMA Shim USB drive to write Vital Product Data during a system board replacement, make sure it’s returned along with the faulty component. Failing to do so could lead to additional charges or delays. Double-checking these details ensures your claim proceeds without unnecessary setbacks.
Conclusion
Filing a Chromebook warranty claim doesn’t have to be complicated if you follow a clear process. Start by confirming your device’s warranty eligibility, document the issue, gather all necessary details about the Chromebook, file the claim, and ship the device according to the vendor’s instructions. These steps, paired with efficient tools, make it easier for IT teams to manage claims seamlessly.
Accurate record-keeping plays a key role in successful claims. Manual data entry often leads to mistakes, which can cause work orders to be overlooked. To minimize errors, tools like AdminRemix simplify the process for managing large Chromebook fleets. For instance, Chromebook Getter pulls device metadata directly from the Google Admin Console into spreadsheets, eliminating the need for manual barcode scanning or searching. The AdminRemix Chrome extension ensures work orders are submitted with 100% accurate metadata in just three clicks, requiring minimal manual input. Additionally, AssetRemix centralizes help desk and asset management, allowing IT teams to track RMA statuses efficiently. These tools also help maintain accurate fleet records by monitoring Auto Update Expiration dates and tracking each device’s lifetime costs.
Before sending devices for repair, make sure they are deprovisioned. Once repaired and returned, re-enroll them to maintain data integrity and ensure the devices are fully functional.
FAQs
What should I do if I don’t have a receipt?
If you don't have a receipt for your Chromebook warranty claim, don't worry - there are other ways to provide proof of purchase. You can usually use details like the device's serial number, the purchase date, or other identifying information tied to the device. It's best to reach out to the warranty provider directly, explain your situation, and ask what alternative forms of proof they'll accept.
Do I need to deprovision a managed Chromebook before repair?
When repairing a managed Chromebook, it's crucial to deprovision the device first. This step clears all policies, management settings, and licenses, effectively disconnecting the Chromebook from your organization. Deprovisioning ensures the device can be properly tested and repaired. It’s especially important if the Chromebook is being resold, donated, or retired from active use.
What happens to my data during an RMA repair?
If you're sending your Chromebook in for an RMA repair, keep in mind that your data might be erased during the process. This is especially true if the device is enrolled in an organization. In some cases, remote data wiping may also occur. To avoid losing important files, it's a good idea to back up everything you need ahead of time.