Asset Tagging for Chromebooks: 6 Common Issues
If your Chromebook tag, cart, and Google Admin record don’t match, your inventory will drift. And in K–12, that happens fast when Chromebooks make up about 55% of the U.S. device market and devices move all day.
I’d sum up the problem like this: one device can pass through a cart, a student, a repair ticket, and a loaner shelf in the same week. If staff miss even one update, you get the same six problems over and over:
- Shared use makes it hard to tell who is tied to a device
- Damaged labels make physical ID hard or impossible
- Shelf swaps put devices in the wrong cart or room
- Repair handoffs break the link between the tag and the record
- Loaner mix-ups can tie one Chromebook to two users
- Tag mismatches throw off audits, support, and counts
I’d keep the fix simple: use one asset tag per device, link it to the serial number or device ID, treat carts as named locations, and update Google Admin right after every move, repair, checkout, or return.
An audit across 20 New York school districts found that more than 20% of IT assets were not properly accounted for. That’s the risk in one number.
| Issue | What goes wrong | What to do |
|---|---|---|
| Shared student use | No clear device ownership | Assign by cart or room, not by student |
| Damaged labels | Staff can’t read or scan the tag | Tie asset tag to serial number and reprint tags |
| Shelf swaps | Device sits in the wrong cart | Track cart ID and log moves |
| Repair tracking | Ticket and device record split | Scan at intake and return |
| Loaner mix-ups | Duplicate user assignments | Scan at checkout and check-in |
| Tag/data mismatch | Label and Admin record differ | Run routine record checks and bulk sync updates |
So if I had to put the whole article into one line, it would be this: keep the physical label and the digital record matched at all times.
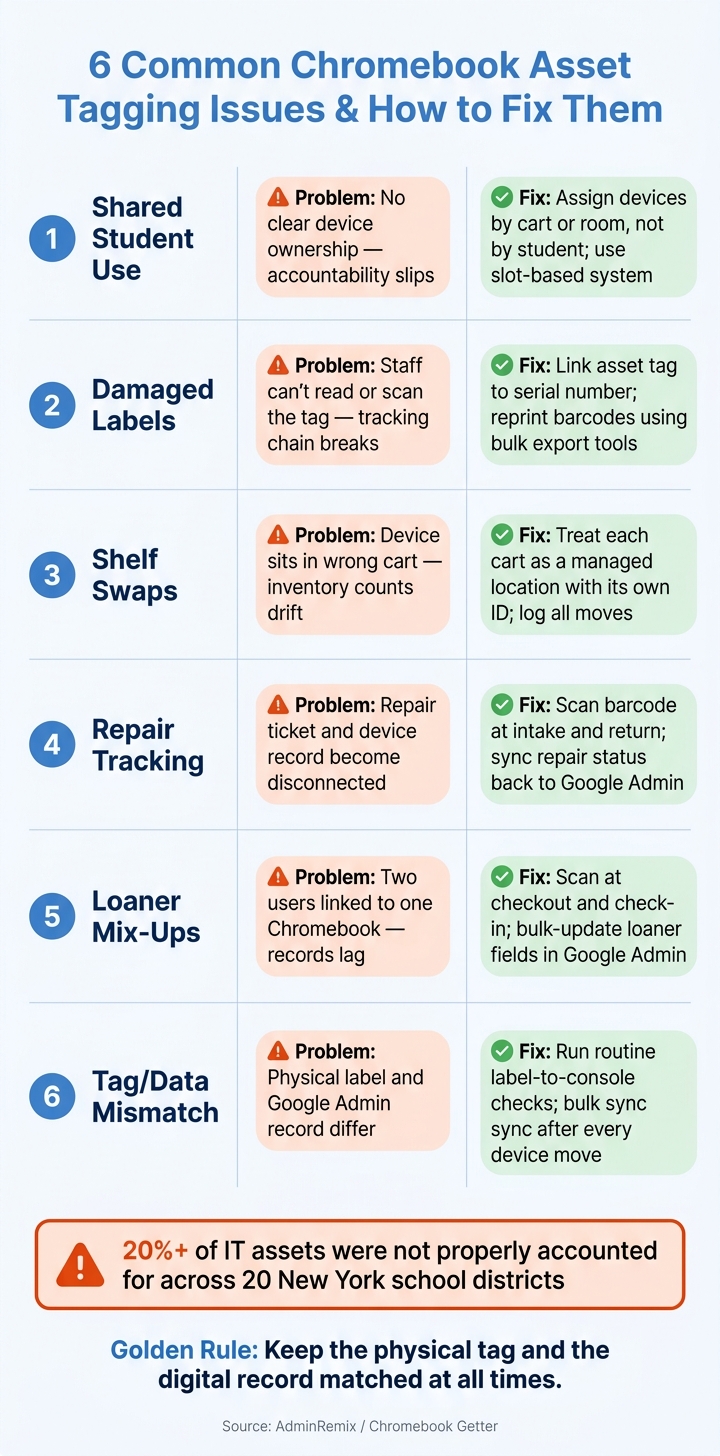
6 Chromebook Asset Tagging Issues: Problems & Fixes at a Glance
1. Shared Student Use Blurs Device Ownership
When students can grab any Chromebook from a cart, ownership gets fuzzy fast. And once that happens, accountability usually slips right behind it. A student who uses a device for just one class period often won’t feel responsible for small damage, and those small problems can pile up without anyone tracing them back.
This usually falls apart during checkout, passing periods, and end-of-day return. Devices move between students, carts, or rooms without a logged change. Then Google Admin ends up showing the wrong user, or just a broad cart assignment that doesn’t help much.
The better fix is location-based ownership, not student-based ownership. In plain terms: the cart or classroom set should be treated as the owner. In Google Admin, create organizational units (OUs) that match real physical locations, such as MS Science Lab Cart 2, and place each device in its matching OU. It also helps to name devices in a way staff can read and match at a glance. A format like HS-ROOM104-AT12345 works well because it ties together the school, room, and asset tag.
For day-to-day control, a slot-based system is simple and effective:
- Label each cart slot clearly
- Assign each student the same slot every class
- Have teachers do a fast visual check before dismissal to make sure every slot is filled
Loaners and take-home loaners need a bit more structure. Log the student, the checkout date, and the due date. Then move the device into a Checked Out OU until it comes back. That sounds simple, but it gets messy when staff have to update devices one at a time.
That’s where AdminRemix tools such as AssetRemix and Chromebook Getter help. They let teams bulk-update device names, locations, and OUs when a cart moves to another room or grade. One catch: the whole setup depends on the physical label staying readable.
sbb-itb-c68f633
2. Damaged Labels Make Physical ID Impossible
A worn or missing label breaks the tracking chain. Staff can't scan the device, might log the wrong Chromebook, and can end up creating duplicates or losing the device in inventory.
The fix is pretty simple: connect each asset tag to the Chromebook serial number or Google Admin device ID. Tools like Chromebook Getter can export device data in bulk from Google Admin into a spreadsheet, which makes it easier to identify a device and print a replacement barcode when needed. If a label is unreadable, staff can pull the serial number straight from the Google Admin console instead of depending on a scan.
For the long run, keep the serial number, device ID, and asset tag fields synced. That way, when a replacement tag gets updated in your system, the change stays aligned in Google Admin and you don't have to clean up mismatched records later.
Once the replacement tag is in place, the next risk is a device being shelved in the wrong spot.
3. Shelf Swaps Lead to Inventory Confusion
Once labels are easy to read, the next issue is simple: where the Chromebook actually ends up.
Devices move around all the time. A student uses one for testing, a teacher grabs one for make-up work, or a cart gets shared for room coverage. Later, the device goes back to the wrong cart. The label still tells you which device it is, but the asset record may still point to the old cart and room. So the system says "Cart 3, Room 205," while the Chromebook is sitting in "Cart 7, Library."
That gap causes a mess fast. Support teams spend extra time hunting devices down, inventory counts start to drift, and missing-device alerts stop being reliable.
The day-to-day fix is to treat each cart as a managed location, not just a pile of devices. Label every cart with its own ID, like "CART-07 Library," and store that cart ID in both your asset system and Google Admin. If a device is borrowed for a short time, staff can log the move in a simple Google Form or shared sheet with:
- Device tag
- Origin cart
- Destination cart
- Date
That small habit makes device moves traceable without adding much work.
What matters most is having one master record for each asset tag and its current cart location, then making bulk updates when carts shift. Tools like Chromebook Getter help here: IT staff can export current device metadata into a Google Sheet, update cart IDs for a group of devices in one pass, and push those changes back to Google Admin in bulk.
Once cart locations stay current, the next risk is losing the repair trail.
4. Repair Tracking Gets Disconnected from the Original Tag
Chromebooks move all over the place: between carts, classrooms, and students. Then a device leaves campus for repair, and that’s often where things start to slip. The connection between the physical tag and the admin record can break when staff create the repair ticket, especially if they type in the asset tag or serial number by hand instead of scanning it.
Keep the asset tag tied to the device ID or serial number in Google Admin Console.
The best time to prevent this mess is before the device leaves the building. At intake, staff should scan the barcode so the repair ticket links to the right device record. No scanner on hand? Then double-check the serial number and device ID before it goes out the door.
On the admin side, tools like Chromebook Getter can help IT staff pull serial numbers straight from Google Admin into a Google Sheet, update repair status, and sync those changes back in bulk .
When the Chromebook comes back, scan it again at re-entry. If the repair changed the shell or label, print a new barcode that keeps the original asset ID and links it to the updated serial number. That way, the physical tag, serial number, and admin record stay in sync through the full repair cycle.
Once repaired devices go back into circulation, loaner tracking is often the next spot where tags start to drift.
5. Loaner Device Mix-Ups Cause Duplicate Assignments
Loaner Chromebooks move fast. A student picks one up in the morning, brings it back at lunch, and by the afternoon that same device may already be handed out again before the record catches up. When checkout updates lag, two users can end up linked to one Chromebook, and staff lose sight of who has it. The fix starts at checkout: the asset tag needs to be tied to the right device before the Chromebook leaves the shelf.
Each asset tag should map to one Device ID or serial number in Google Admin. If it doesn’t, loaner checkouts can create duplicate assignments.
Use barcode scans at checkout and check-in so staff can assign the right user and confirm the returned device before it goes back into circulation. Loaner devices move too fast for manual updates. The barcode should drive every handoff.
Keep the Asset Tag, Checked Out User, OU, and Device Notes in sync across your asset system and Google Admin. Tools like Chromebook Getter can help IT teams bulk-update loaner-specific fields - checked-out user, OU, and device notes - in Google Sheets and sync those changes back to Google Admin so records stay current. If that sync slips, the next issue is simple but messy: a physical tag no longer matches what’s in Google Admin.
When loaner records drift, physical tags and Google Admin data stop matching.
6. Physical Tags and Google Admin Data Do Not Match
When loaner records fall behind, the problem spreads to the main device record: the physical tag no longer matches what’s in Google Admin. That gap slows support, makes compliance checks harder, and pushes staff into constant double-checking between labels and console data. If the tag and the console don’t line up, inventory counts and audit results become shaky.
This usually starts during enrollment, when barcode scans get rushed or skipped. It can also happen after bulk OU changes aren’t synced back to Google Admin. Once that happens, audit lists, repair logs, and inventory counts drift apart.
For day-to-day work, pull serial numbers straight from Google Admin into a spreadsheet, make bulk edits there, and sync those updates back so the console stays the single source of truth after device movement, repair, and checkout failures. KIPP Indy Public Schools reported that bulk syncing Chromebook metadata reduced manual updates and improved workflow speed. It also helps to run regular label-to-console checks so mismatches show up before an audit or repair ticket does.
Use the table below to compare what the physical tag should show against what Google Admin should record.
Quick Reference Table: Physical Tags vs. Admin Records
Use this table as a fast check when devices move during checkout, repair, or cart swaps. If something doesn’t match, fix that first.
| Physical Label Field | Google Admin Field | Inventory System Field |
|---|---|---|
| Serial Number | Serial Number | Serial Number |
| Asset ID | Asset ID / Annotated Asset ID | Asset Tag / ID |
| Assigned User | Annotated User / Recent User | Checked Out User |
| Cart / Shelf Location | Annotated Location | Location / Department |
| Loaner Status | Notes | Status |
| Repair Status | Notes | Status |
For loaners and repairs, use the same Notes or Custom Fields in both systems. That way, staff aren’t guessing where the latest status lives.
Also check the Auto Update Expiration (AUE) date in Google Admin. You usually won’t see it on a physical label, but it tells you when a Chromebook should come out of rotation.
Each Asset Tag should link to just one Device ID or serial number. That one-to-one match helps keep records in sync.
Conclusion
All six Chromebook tagging problems point to the same habit: keep the physical tag and the digital record in sync. Once those two drift apart, accountability slips, locations get muddled, and status tracking breaks down.
The fix is pretty simple, but it takes consistency. Standardize where tags go, and update records right after every move, repair, checkout, or reassignment. No lag, no “we’ll fix it later.”
That habit starts with regular audits. Check devices on a routine basis and confirm each physical tag matches its Google Admin device ID or serial number.
Chromebook Getter by AdminRemix can bulk-sync users, locations, and notes with Google Admin, which helps cut manual mistakes. When the tag matches the record, the fleet is much easier to manage.
FAQs
How often should Chromebook asset records be audited?
Audit Chromebook asset records on a set schedule.
- Monthly: catch orphaned accounts, unassigned devices, and failed automation workflows.
- Quarterly: run data quality checks and reconciliation, including assignments and mappings.
- Annually: perform a full physical inventory, ideally through in-person checks or regular device pinging.
This keeps fleet records aligned with actual device status.
What fields should always match between the tag and Google Admin?
Your asset tag should always map to either the Device ID or Serial Number in Google Admin. Those are the required identifiers Google Admin uses to track hardware, and they stay consistent over time.
When you match your asset tag to one of these fields, it’s much easier to keep each device tied to a single record. That helps prevent duplicate entries and keeps your physical labels in sync with your digital records through regular synchronization.
What’s the best way to track temporary loaner Chromebooks?
Use one asset tag or barcode for each Chromebook, and tie it to a Google Admin field like Device ID or Serial Number. That way, your inventory records and Google Admin stay in sync instead of drifting apart over time.
When you issue a loaner, log the user who checked it out and update the device status at the same time. Then run a clear check-in/check-out process for returns, maintenance, and audits. With AdminRemix, you can map tags and sync the checked-out user field.