
10 Ways to Repurpose End-of-Life Chromebooks
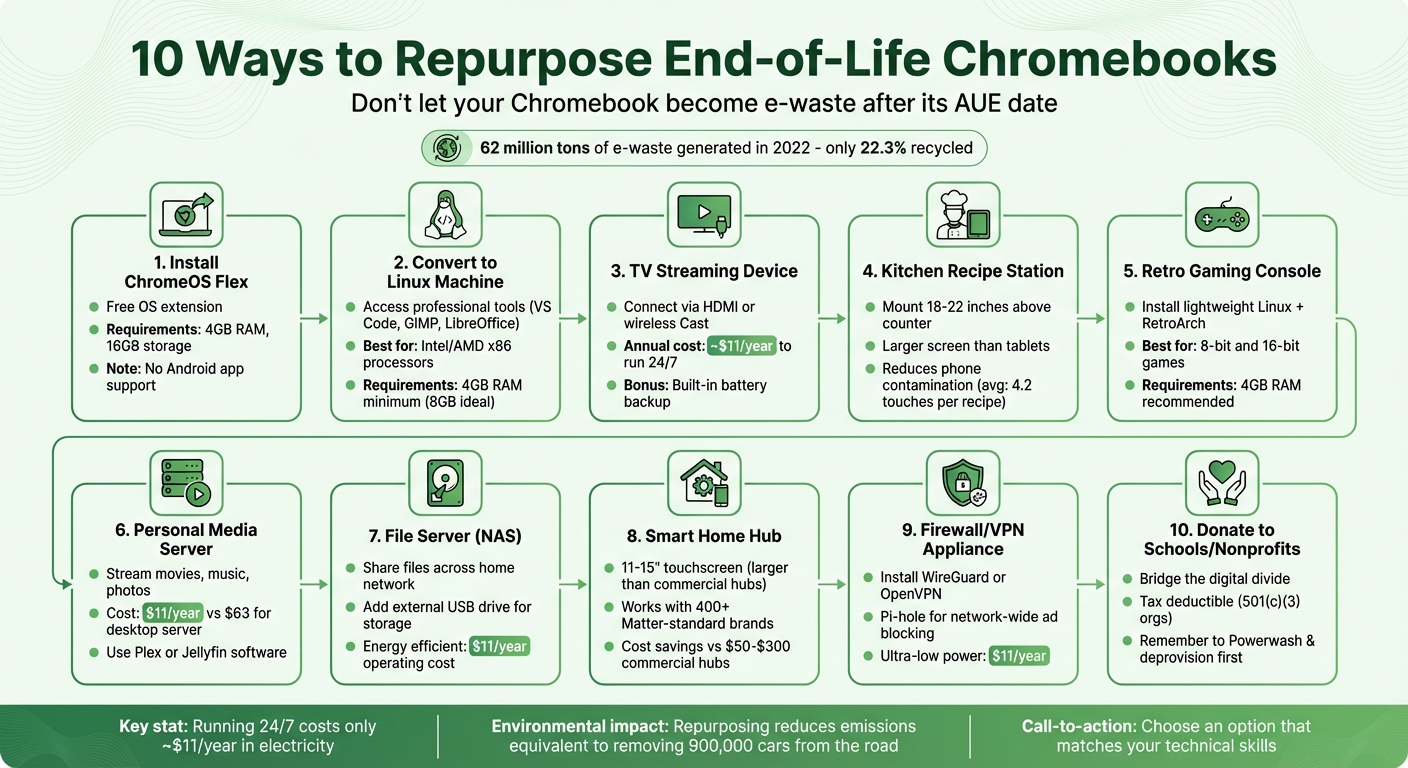
If your Chromebook has reached its Auto Update Expiration (AUE) date, it doesn’t have to end up as e-waste. You can give it a second life by repurposing it for offline tasks, installing a new operating system, or even donating it. Here’s a quick overview of how to make the most of an old Chromebook:
- Install ChromeOS Flex: Extend its usability with this free OS, though it won’t support Android apps.
- Switch to Linux: Unlock access to professional tools like LibreOffice or Python environments.
- Use as a Streaming Device: Connect it to your TV via HDMI or Cast for seamless streaming.
- Set Up a Recipe Station: Mount it in your kitchen for hands-free cooking assistance.
- Turn into a Retro Gaming Console: Install lightweight Linux and emulators for classic games.
- Create a Media Server: Store and stream your favorite content across devices.
- Deploy as a File Server: Share files efficiently with Samba and external storage.
- Build a Smart Home Hub: Manage smart devices with a larger screen than most hubs.
- Use as a Firewall or VPN Appliance: Enhance network security with tools like WireGuard or Pi-hole.
- Donate to Schools or Nonprofits: Help others while reducing e-waste.
Each option reduces waste and gives your Chromebook a new purpose. Whether you’re tech-savvy or looking for simple solutions, there’s a way to reuse your device. If none of these work, recycle it responsibly to keep it out of landfills.
10 Ways to Repurpose End-of-Life Chromebooks - Complete Guide
Old Chromebook? Here’s How to Still Use It in 2025
sbb-itb-c68f633
1. Install ChromeOS Flex for Continued Chrome OS Use
ChromeOS Flex is a free operating system designed to breathe new life into aging Chromebooks and other older hardware. Will Smith, Product Manager for ChromeOS, sums it up perfectly:
"Instead of throwing away your old device, you can give it a new lease on life. It's the environmentally friendly way to show your tech some love."
Before diving in, make sure your device meets the technical requirements. ChromeOS Flex is compatible with devices that have a 64-bit Intel or AMD x86 processor, at least 4 GB of RAM, and 16 GB of storage. To ensure everything works smoothly, test it using a live USB drive to check hardware compatibility. And don’t forget: back up your files first, as the installation process will wipe all existing data.
A key limitation to note is that ChromeOS Flex does not support Android apps or the Google Play Store. If you rely heavily on Android apps, this might be a dealbreaker. However, if your primary needs revolve around web-based tools and Chrome extensions, you probably won’t notice the difference.
Installing ChromeOS Flex is a cost-effective way to extend the life of your devices without spending a dime. It also promotes sustainability by reducing electronic waste. Plus, your repurposed device will stay current, as ChromeOS Flex follows the same update schedule as standard ChromeOS, ensuring access to the latest features and security updates. For organizations, centralized management is possible, but it requires purchasing a ChromeOS Enterprise or Education Upgrade for each device.
Google offers a list of over 600 certified devices that are fully compatible with ChromeOS Flex. That said, many non-certified x86 devices also work well. However, keep in mind that Google doesn’t officially support installing Flex on Chromebooks that have passed their Auto Update Expiration (AUE) date, even though it often functions just fine on Intel or AMD x86 models.
2. Convert to a Linux Machine
Turning an end-of-life Chromebook into a Linux machine can breathe new life into the device, bypassing the AUE (Auto Update Expiration) date and enabling access to professional tools like VS Code, GIMP, LibreOffice, and Python development environments. Before diving in, though, it’s crucial to check if your Chromebook's hardware can handle the switch.
Linux conversion is most seamless on Chromebooks with Intel or AMD x86 processors. ARM-based models, like those using MediaTek or Rockchip processors, often face limited firmware support and fewer software options. To confirm compatibility, head to chrome://version on your Chromebook, find the "Platform" section, and cross-check it with the MrChromeBox compatibility list.
Once you’ve verified compatibility, the next step is replacing the firmware. This involves swapping the original ChromeOS firmware with custom UEFI firmware using free tools from MrChromeBox. For older models, you might need to physically remove the "write-protect screw" to enable firmware modifications. Keep in mind, older hardware might require manual driver configurations for components like touchpads, audio, and Wi-Fi.
For a smooth Linux experience, ensure your Chromebook has at least 4GB of RAM (though 8GB is ideal) and 16GB of storage, with 64GB being a better option for full Linux distributions. If your device uses eMMC storage, you can extend its lifespan by setting /tmp as tmpfs (a temporary file system) and redirecting heavy write operations to external storage.
Interestingly, repurposing a Chromebook as a server is not only cost-effective - using just 5–10 watts of power and about $11 annually - but also environmentally friendly. Extending the lifespan of these devices can significantly reduce e-waste. In fact, it’s estimated that such efforts could cut emissions on a scale comparable to removing 900,000 cars from the road. As Jim Mendenhall aptly put it:
Repurposing an expired Chromebook as a server... takes a device that was heading for the waste stream and gives it a genuine second life doing actual work.
3. Use as a TV Streaming Device
Turn an old Chromebook into a TV streaming device without needing extra gadgets. You can connect it to your TV using an HDMI cable or a USB-C to HDMI adapter if required. Prefer a wireless setup? Use the built-in Cast feature for a cable-free experience. For wired connections, go to Settings > Device > Displays and enable "Mirror Built-in Display." If you're casting wirelessly, click the clock, choose "Cast devices available", and select your Chromecast or Android TV (make sure both are on the same network). While wireless casting is convenient, a direct HDMI connection ensures the best video quality and eliminates any lag.
One big perk of using a Chromebook over a typical streaming stick is the desktop browser experience. You can stream directly from sites like Netflix, YouTube, or Spotify without being restricted to specific apps. Plus, the keyboard makes searching faster and easier than fumbling with a TV remote. And here's another bonus: the Chromebook's battery can keep it running through short power outages, so your movie night won't be interrupted.
Running your Chromebook 24/7 for streaming is surprisingly affordable. At an average U.S. electricity rate of $0.18 per kilowatt-hour, it costs about $11 per year to keep it on, thanks to its low idle power consumption of 5 to 10 watts. To keep the streaming uninterrupted, disable Sleep Mode in the settings.
This setup not only gives your Chromebook a second life but also helps reduce e-waste. And when it’s not streaming, you can use it as a smart home hub or even a digital recipe station in the kitchen. It’s a simple yet effective way to make the most of your old device.
4. Set Up as a Kitchen Recipe Station
Transforming an old Chromebook into a recipe station is a clever way to combine practicality with eco-consciousness. Instead of buying a new tablet, you can give your Chromebook a second life right in your kitchen. Plus, it helps reduce screen contamination risks. Studies show that the average cook touches their phone 4.2 times per recipe, which increases the chances of spreading germs and dirtying the screen. With a mounted Chromebook, you get a larger display that’s easier to read and keeps your hands off your phone. It’s a win-win: more usability for your device and less e-waste.
For the best setup, mount the Chromebook 18–22 inches above your counter in portrait mode using a wall bracket or a sturdy stand. Make sure it’s away from water or cooking splashes. If extra protection is needed, consider an IP54-rated enclosure.
Here are some tips to optimize your recipe station:
- Reset the Chromebook to remove unnecessary apps, so it’s focused solely on recipes.
- Adjust Chrome settings by enabling "Force enable zoom" and setting the default zoom to 125% for easy reading.
- Add a matte anti-glare screen protector to reduce reflections and shield the screen from oils or scratches.
- Save recipes offline as PDFs or HTML files for quick access without relying on Wi-Fi.
- Disable sleep mode to keep recipes visible throughout your cooking session.
As Mia, a Digital Productivity Coach, puts it:
The tablet exists solely for recipes, nothing else. This isn't about extending device lifespan - it's about intentional constraint.
This setup keeps your cooking process smooth and distraction-free. It’s budget-friendly, eco-conscious, and offers a larger, more reliable screen than standard kitchen tablets. Plus, it creates a hygienic, hands-free cooking assistant that won’t interrupt you with notifications.
5. Turn into a Retro Gaming Console
Breathe new life into your old Chromebook by transforming it into a retro gaming console. This is a great way to avoid adding to e-waste while setting up a low-power gaming system for enjoying classic games.
To get started, you’ll need some basic technical know-how. The first step is replacing the ChromeOS firmware with custom UEFI firmware using MrChromeBox. Before diving in, check if your Chromebook has an Intel or AMD x86 processor by looking under the "Platform" entry at chrome://version. These processors are ideal for this project, while ARM-based models like MediaTek or Rockchip have limited compatibility. You’ll also need to enable Developer Mode (press Esc + Refresh + Power) and, in some cases, physically open the device to remove a write-protect screw.
Once the firmware is updated, install a lightweight Linux distribution like Lubuntu or Debian. Then, add RetroArch, an all-in-one emulation platform that supports a wide range of retro games. This setup works well for classic 8-bit and 16-bit games, but keep in mind that most older Chromebooks, with their low-power Celeron or Pentium processors, may struggle with more demanding 3D titles. For the best experience, use a device with at least 4GB of RAM, though 2GB can handle lighter games.
It’s important to note that flashing UEFI Full ROM firmware is a one-way process - once installed, ChromeOS cannot be restored. However, for a device that might otherwise end up recycled, it’s a worthwhile trade-off.
To extend the life of your Chromebook and improve performance, consider running the operating system or storing game ROMs on an external USB SSD. This reduces wear on the internal eMMC storage and offers faster load times. Plus, the Chromebook’s built-in battery acts as a backup power source during short outages, giving it a unique edge over traditional desktop gaming setups.
6. Set Up as a Personal Media Server
Giving your old Chromebook a new purpose not only helps cut down on e-waste but also turns it into a handy personal media server. With this setup, you can store and stream your favorite movies, music, and photos across your home network. Plus, it's incredibly cost-efficient - running a Chromebook server uses about $11 per year in electricity compared to the $63 you'd typically spend on a traditional desktop server. This approach makes use of the Chromebook's low power consumption and requires minimal additional hardware.
If your Chromebook still supports ChromeOS, you can enable Linux (Beta) in the settings, download the Plex Media Server .deb file for Ubuntu, and install it directly. If the device has reached its end-of-life, you can boost its performance by flashing custom UEFI firmware with tools like MrChromebox. Afterward, install a Linux distribution such as Ubuntu or Debian, and add media server software like Plex or Jellyfin. Once you're set up, managing storage effectively is key for smooth streaming.
Since most Chromebooks come with just 16GB to 32GB of internal eMMC storage, which isn’t built for heavy use, an external USB SSD is essential for storing media files. To ensure a stable connection, consider using a USB-to-Ethernet adapter, which costs about $10. Another bonus? The Chromebook’s built-in battery acts as a backup power supply during short outages.
However, keep in mind that low-power processors in Chromebooks, like Celeron or Pentium models, can struggle with demanding tasks such as video transcoding. As Jim Mendenhall from Starry Hope explains:
Media servers like Jellyfin or Plex that need to transcode video will overwhelm the CPU immediately.
These processors are better suited for direct play streaming, where the client device handles the decoding, rather than converting formats on the fly (e.g., 4K to 1080p).
While it won’t match the performance of dedicated hardware, turning your Chromebook into a media server is an affordable and practical solution. All it takes is a few inexpensive peripherals to get started.
7. Deploy as a File Server
Turn your Chromebook into a budget-friendly NAS for sharing files and media, all while cutting down on electronic waste. Like other reuse ideas, this approach stretches the usefulness of your device while keeping its impact on the environment low.
Start by setting up Linux to handle file-sharing protocols. If your Chromebook still runs ChromeOS, go to Settings > Advanced > Developers and enable the Linux (Beta) environment. For older models that no longer support ChromeOS updates, you'll need to flash custom UEFI firmware and install a full Linux distribution like Ubuntu or Debian. Once Linux is up and running, install Samba to manage file sharing, and you'll be ready to host your files.
Since most Chromebooks come with limited storage (16–32GB eMMC), you'll want to connect an external USB drive for more space. To keep file transfers smooth and stable, consider using a USB-to-Ethernet adapter (around $10) instead of relying on Wi-Fi. Also, make sure to disable sleep mode so your server stays accessible around the clock.
This setup is incredibly energy-efficient, costing only about $11 per year in electricity compared to a traditional desktop server. Plus, the Chromebook’s built-in battery can act as a mini UPS (uninterruptible power supply) during short power outages. While it doesn’t offer high-end features like RAID or multiple drive bays, it’s perfect for everyday file-sharing needs.
When using the Linux environment, remember to place your files in the "Linux files" folder in the Files app so the server software can access them. While the process does involve a few technical steps, it’s a great way to extend your Chromebook’s lifespan and reduce waste. This simple file server setup fits seamlessly into a broader strategy for giving your Chromebook a second life.
8. Build a Smart Home Hub
Turn your old Chromebook into a smart home control center and save money compared to commercial hubs, which can cost anywhere from $50 to $300. With its 11–15 inch touchscreen, your Chromebook offers a larger display than devices like the Nest Hub Max or Echo Show 21, which typically run between $229 and $250. Plus, it lets you access multiple platforms through web browsers, something proprietary hubs often can't do.
Setting up a basic smart home hub is simple. Start by disabling sleep mode in your Chromebook's settings. Then, open web-based dashboards for platforms like Google Home, Home Assistant, or Nest. Mount the Chromebook on a kitchen wall or place it on a stand in a convenient spot, like your entryway. The touchscreen makes it easy to control lights, adjust thermostats, or check camera feeds. Even better, your Chromebook works with thousands of Matter-standard devices from over 400 companies, including popular brands like Philips Hue, Sonos, Tapo, and Roborock.
For those looking to take things further, you can install a full Linux distribution using MrChromebox firmware. With this setup, you can run advanced software like Home Assistant via Docker, turning your Chromebook into a local server to manage your home network. This setup is energy-efficient too - the device uses just 5 to 10 watts, costing around $11 per year in electricity.
"The hardware hasn't gotten slower. The processor is the same chip it was the day you bought it. Google just stopped sending it software updates, and for a device running its own Linux installation behind your home firewall, that particular problem disappears entirely." - Jim Mendenhall, Starry Hope
Another perk? The Chromebook's built-in battery acts like a mini uninterruptible power supply, keeping your hub running during short power outages and protecting your files from corruption. For even better network reliability, especially with smart home devices, consider adding a USB Ethernet adapter instead of relying solely on Wi-Fi.
9. Use as a Firewall or VPN Appliance
Transform your Chromebook into a network security powerhouse by setting it up as a dedicated VPN endpoint or a network-wide ad blocker using a DNS sinkhole. To get started, flash UEFI Full ROM firmware using MrChromebox tools, which allows you to install Ubuntu Server or Debian. Before diving in, make sure to check your device's board name at chrome://version and confirm its compatibility on the MrChromebox support list.
For VPN capabilities, WireGuard is an excellent choice due to its lightweight design and minimal CPU requirements. Alternatively, OpenVPN stands out with its extensive documentation and widespread support. If you're leaning toward network-wide ad blocking rather than a traditional firewall, Pi-hole is a great option. It works as a DNS sinkhole and can run smoothly on devices with as little as 512 MB of RAM. For those needing advanced firewall features, IPFire offers tools like network segmentation and support for multiple VPN protocols.
"A WireGuard VPN endpoint is another natural fit... running it on a home server lets you tunnel your traffic through your own network when you're away from home." – Jim Mendenhall
Most Chromebooks only have a single Ethernet port, which can limit their utility as an inline firewall. To address this, you can add a USB-to-Ethernet adapter, which typically costs around $10, to create the additional network interface you need. Plus, running your Chromebook as a 24/7 security appliance is incredibly energy-efficient, costing about $11 annually in electricity at average U.S. rates.
One thing to keep in mind: Chromebooks rely on eMMC storage, which has limited write endurance. To extend the life of your device, consider mounting /tmp as tmpfs (RAM-based) and redirecting write-heavy operations, like Docker logs, to an external USB drive. Another bonus? The Chromebook's built-in battery acts as a mini uninterruptible power supply, keeping your VPN or firewall running during short power outages.
Ready for one more idea? In the next section, you’ll learn how to give your Chromebook a second life by donating it.
10. Donate to Schools or Nonprofits
Donating your Chromebook is a great way to reduce e-waste while helping others gain access to technology. By passing on your device, you can help close the digital divide and provide students or community members with tools they might not otherwise afford. Before donating, remember to clear all personal data and remove any organizational controls. If you’re an individual user, perform a Powerwash (Ctrl+Alt+Shift+R) to reset the device. This will erase local files, photos, and saved networks that aren’t synced to your Google account.
For Chromebooks managed by a school or business, the process is a bit different. The administrator must deprovision the device through the Google Admin console. To do this, navigate to Devices > Chrome > Devices, select the device, click Deprovision, and choose "Retiring from fleet" as the reason. Skipping this step means the Chromebook will remain locked to your organization’s domain, rendering it unusable for the recipient. Once the device is wiped and deprovisioned, you’re ready to donate.
When deciding where to donate, look for schools or nonprofits that are focused on bridging the digital divide. It’s also important to ensure they have the technical capability to manage refurbished devices. If you’re planning to claim a tax deduction, verify that the organization is a registered 501(c)(3) nonprofit. The deduction amount depends on the device’s Fair Market Value (FMV), which is typically 20–30% of its original cost. Here’s a quick breakdown of the requirements for tax deductions based on FMV:
| Deduction Amount | Requirement |
|---|---|
| Under $500 | Receipt from the charity is sufficient |
| $500 - $5,000 | File IRS Form 8283; items must be in good used condition |
| Over $5,000 | Requires a qualified appraisal and Form 8283 |
To qualify for any deduction, ensure your Chromebook is in "good used condition." Always request a donation receipt and keep detailed records, including the device’s serial number, date of transfer, and any certificates of data destruction.
As Mark Jorgensen from CTL explains:
Donating devices bridges the digital divide and empowers individuals with valuable technology access.
Conclusion
Your Chromebook doesn't have to end up as e-waste once it reaches its AUE (Auto Update Expiration) date. While Google may stop providing updates, the hardware itself remains perfectly usable. Instead of discarding it, consider giving it a new purpose - turn it into a Linux machine, a kitchen recipe hub, a retro gaming console, or donate it to organizations working to bridge the digital divide. Repurposing your Chromebook not only extends its life but also makes a positive environmental and economic impact. For instance, keeping it running 24/7 costs just about $11 per year in electricity and significantly reduces carbon emissions.
The numbers speak for themselves: in 2022, the world generated 62 million tons of e-waste, but only 22.3% was properly recycled. Every device repurposed helps chip away at that alarming statistic.
As Mark Jorgensen from CTL points out:
Responsible e-waste management is not just an option; it's a necessity.
Whether you install ChromeOS Flex, switch to Linux, set up a home server, or donate your Chromebook to schools or nonprofits, you’re actively countering the culture of planned obsolescence. Choose an option that matches your technical skills and the condition of your device, and give it a meaningful second life.
If repurposing isn’t feasible, proper disposal is essential. Don’t simply throw your device in the trash. A quick online search can help you find local electronics recycling programs. For those managing multiple devices, many manufacturers offer trade-in programs with credits toward new hardware. Taking these steps ensures your Chromebook’s story doesn’t end in a landfill.
FAQs
How do I check my Chromebook’s AUE date?
To find your Chromebook’s AUE (Auto Update Expiration) date, head to the settings menu and look under "About Chrome OS". This section usually displays details about the update status and the expiration date. If you need a more detailed overview, tools like Chromebook Getter from AdminRemix can help by providing comprehensive information about your device, including its AUE date. For step-by-step instructions, consult your device's documentation or any management tools your organization might use.
Will ChromeOS Flex work on my Chromebook?
Yes, you can install ChromeOS Flex on your Chromebook to give it a new purpose - provided your device is compatible with the operating system. Ensuring compatibility is crucial for successfully transforming your Chromebook for other uses.
Will switching to Linux erase my data?
Switching your Chromebook to Linux typically doesn’t wipe your data, but this largely depends on the method you choose for the installation. The process often involves creating a new partition or even replacing ChromeOS entirely, which can lead to data loss if not handled properly. To stay safe, make sure to back up all your important files before you begin the installation. Better safe than sorry!